Section 4: Running AI Inference on Vista with Tapis and FlexServ
Stage 4.1: Running FlexServ on Vista with TAPIS
Step 4.1.1: Adding TMS Credentials on the Vista system.
If you have set up TMS credentials in our previous hands-on session, you are good to go and can skip this step. If you haven’t set up TMS credentials yet, please follow the instructions below to add TMS credentials for the Vista system.
To access the public system running on Vista, first you will need to add TMS credentials on the system. TMS (Trust Management System) credentials on Tapis systems are temporary credentials generated by the TMS System and stored in the Tapis Security Kernel (SK) that allow services or applications to securely access external resources on behalf of a user. Instead of storing permanent usernames or passwords, Tapis retrieves the required credentials from the TMS service at runtime. This approach improves security by keeping sensitive information encrypted and centrally managed while enabling automated job execution on Tapis systems.
When you log in to Tapis UI and click on Systems, you should see one public system you have access to. This system has been pre-registered for you. But you are not authenticated yet to access files on it.
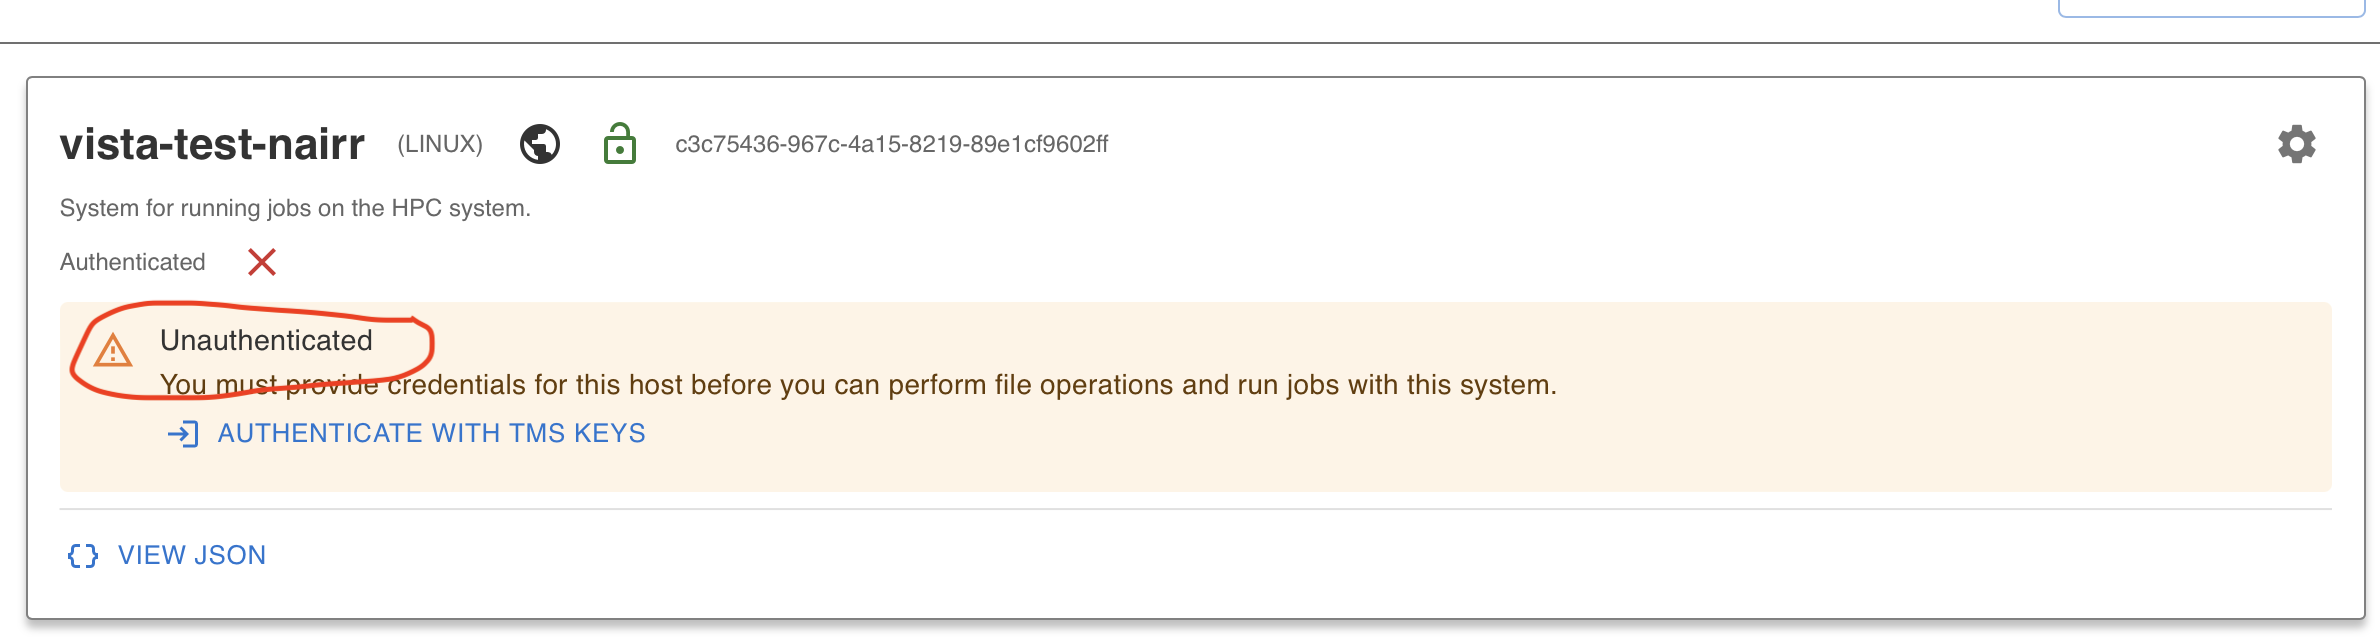
Click on Authenticate with TMS Keys and that should add your credentials.
For detailed instructions on how to add TMS credentials, please refer to this
tutorial here
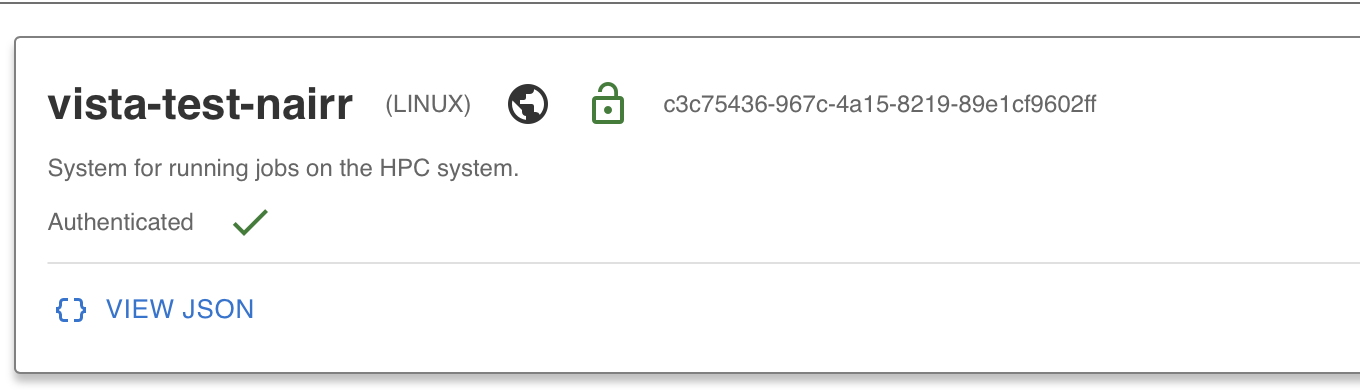
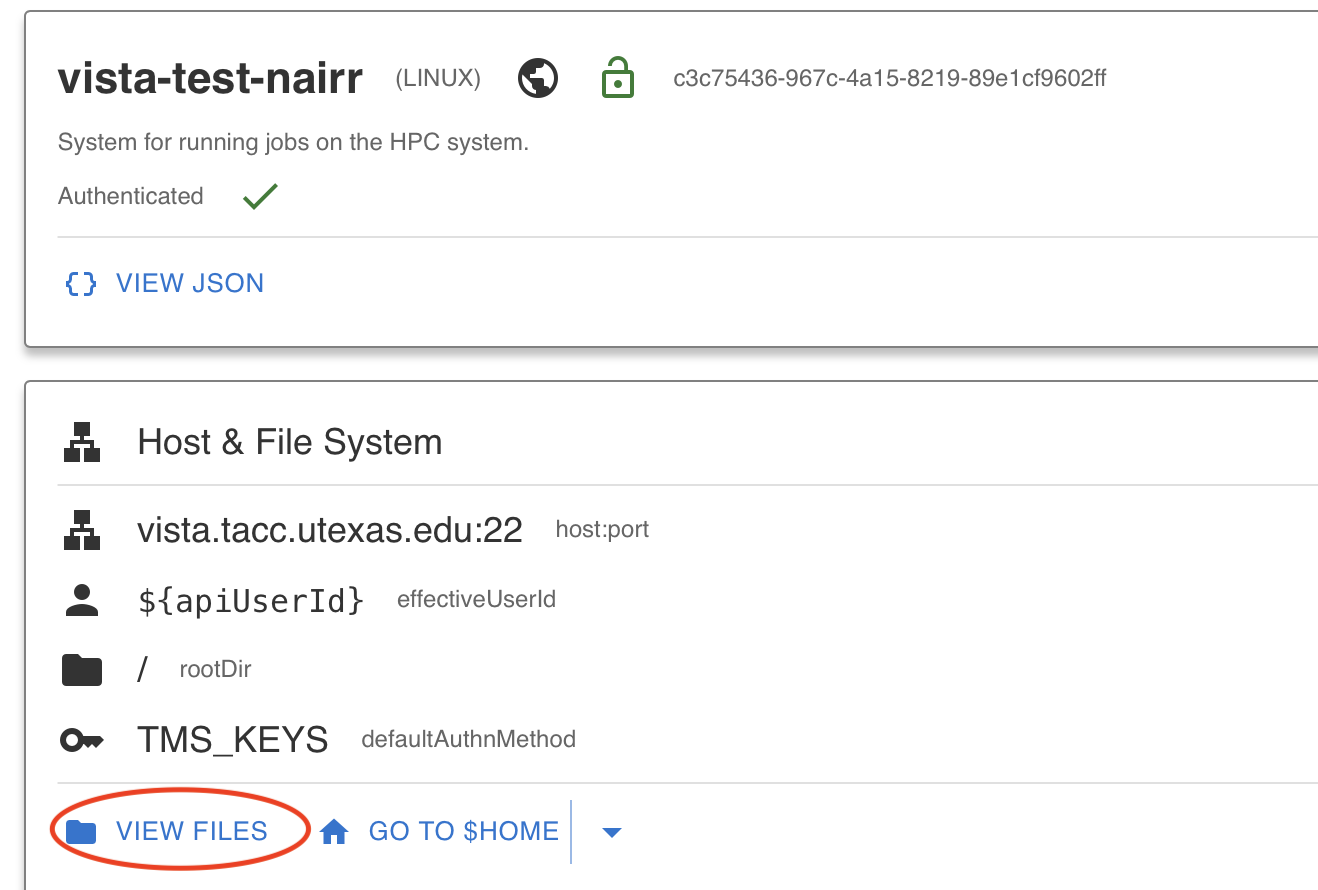
After completing the authentication, you can now view files on Vista by clicking on the View Files button. If you can view the files, that means you have successfully added your TMS credentials and you are authenticated to access the Vista system.
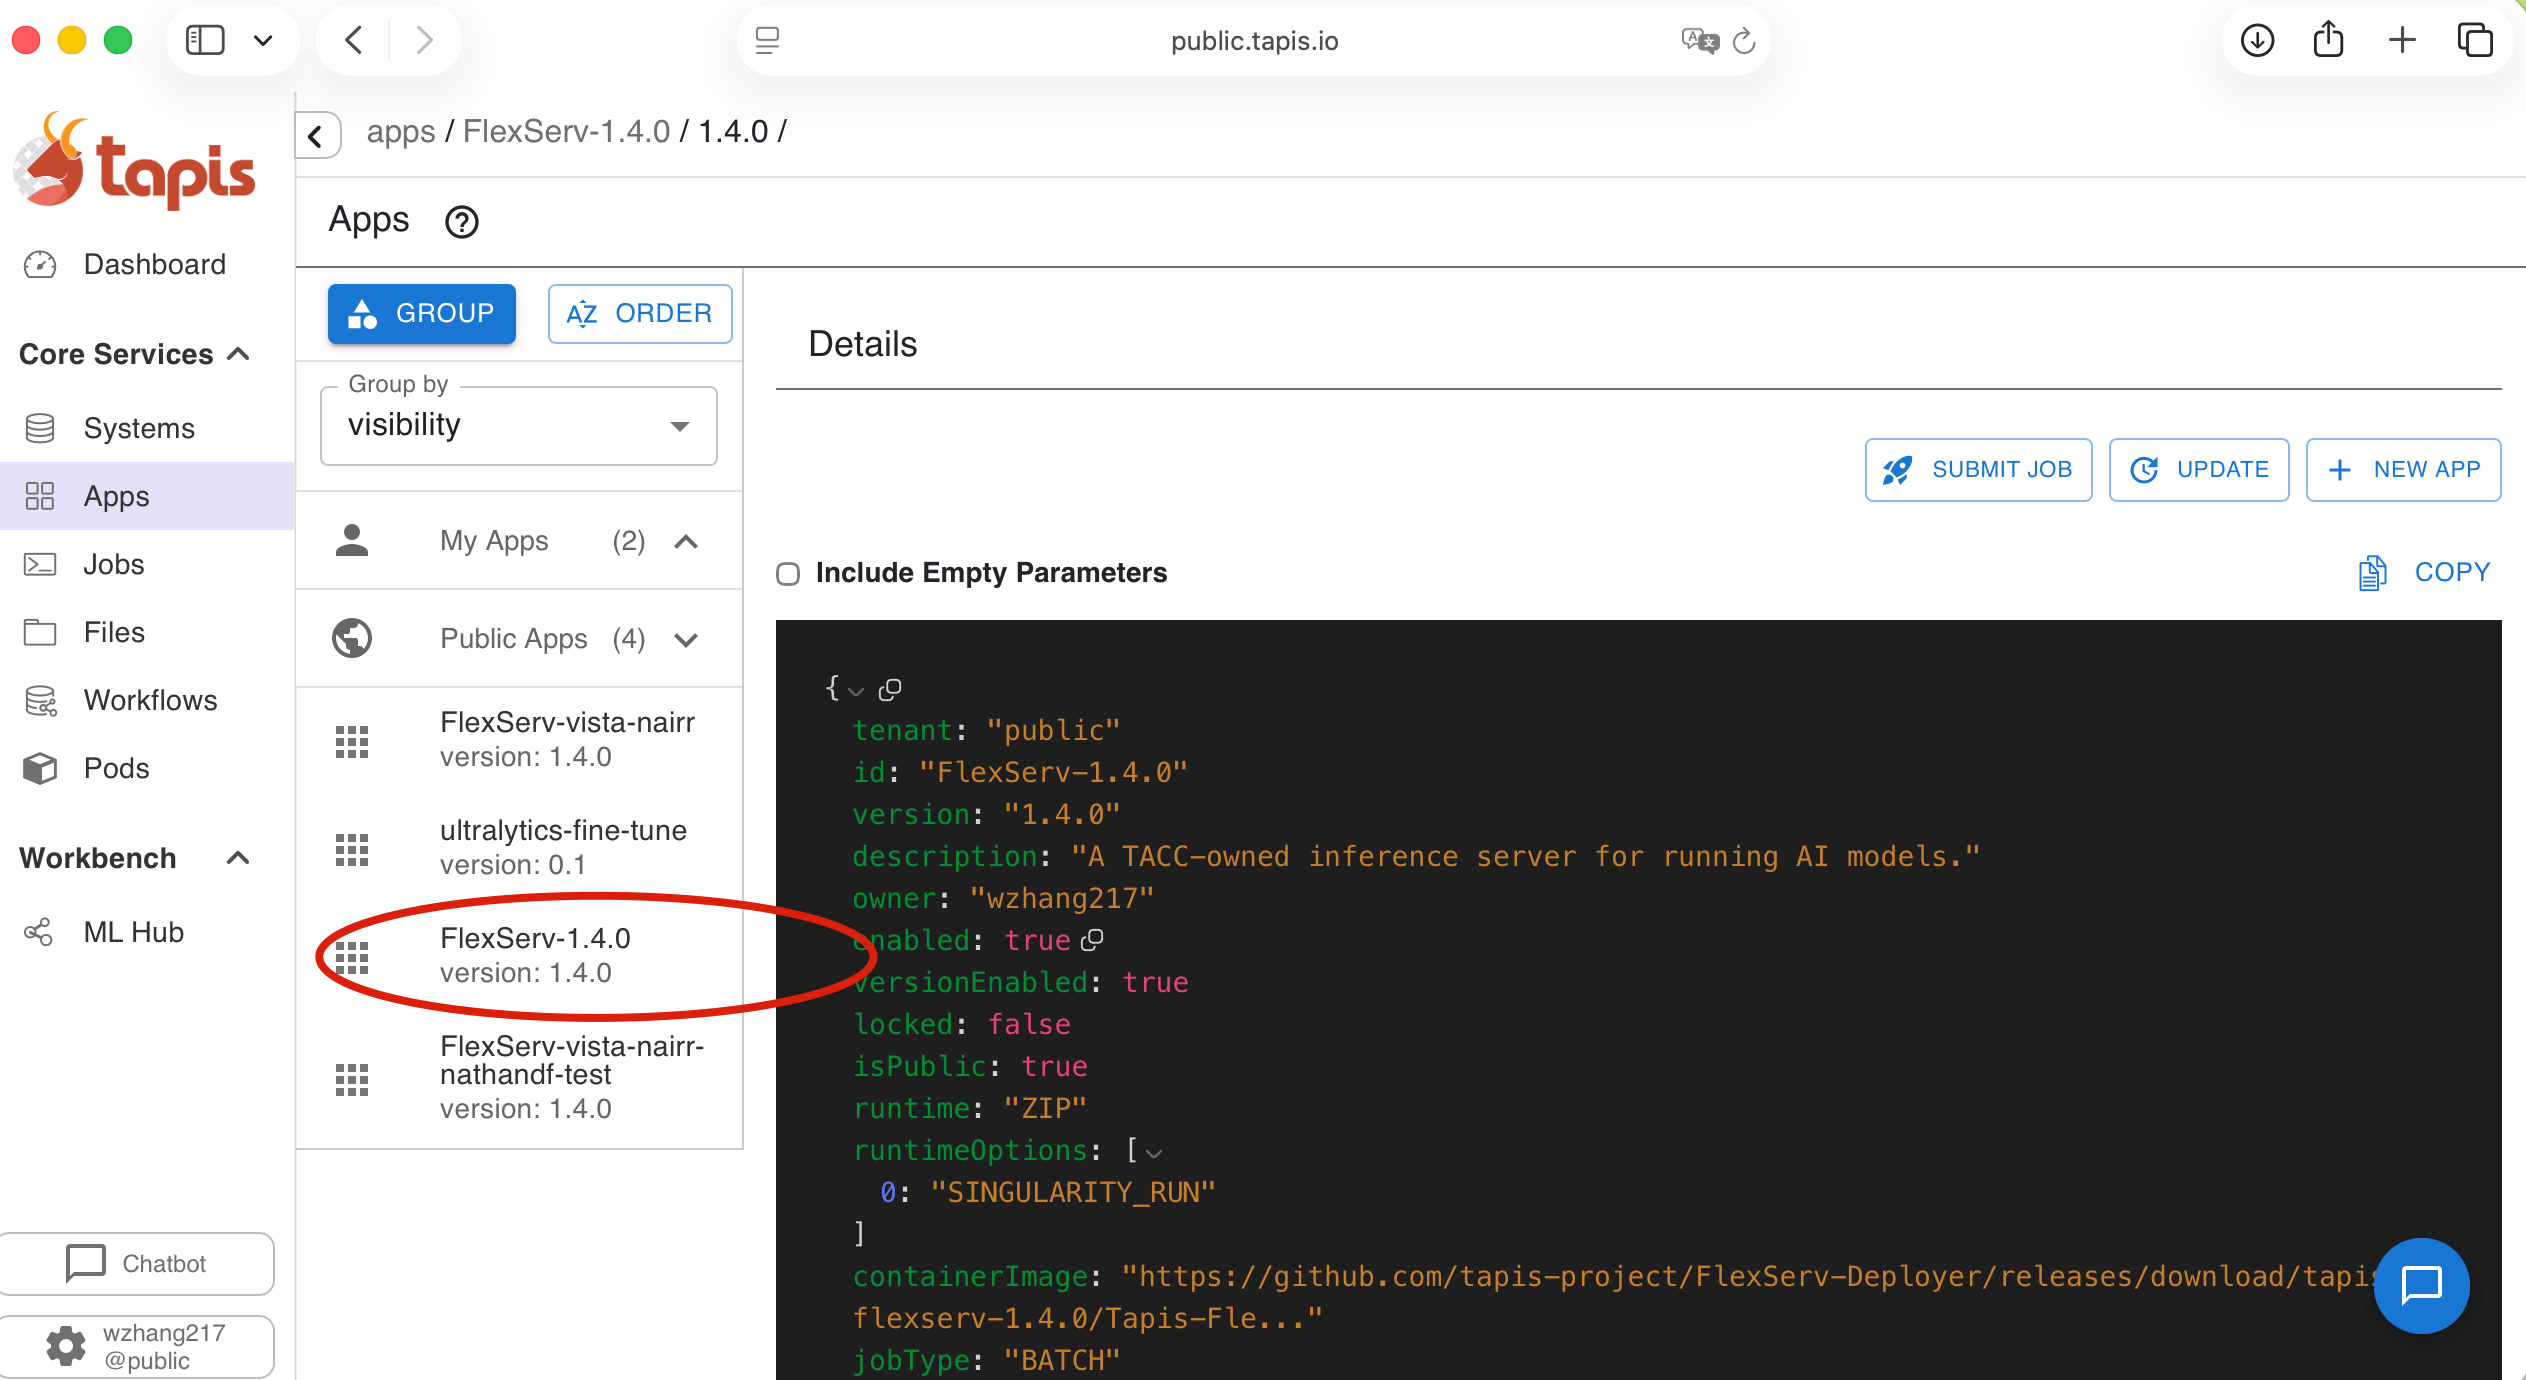
Step 4.1.2: Running FlexServ Application on Vista
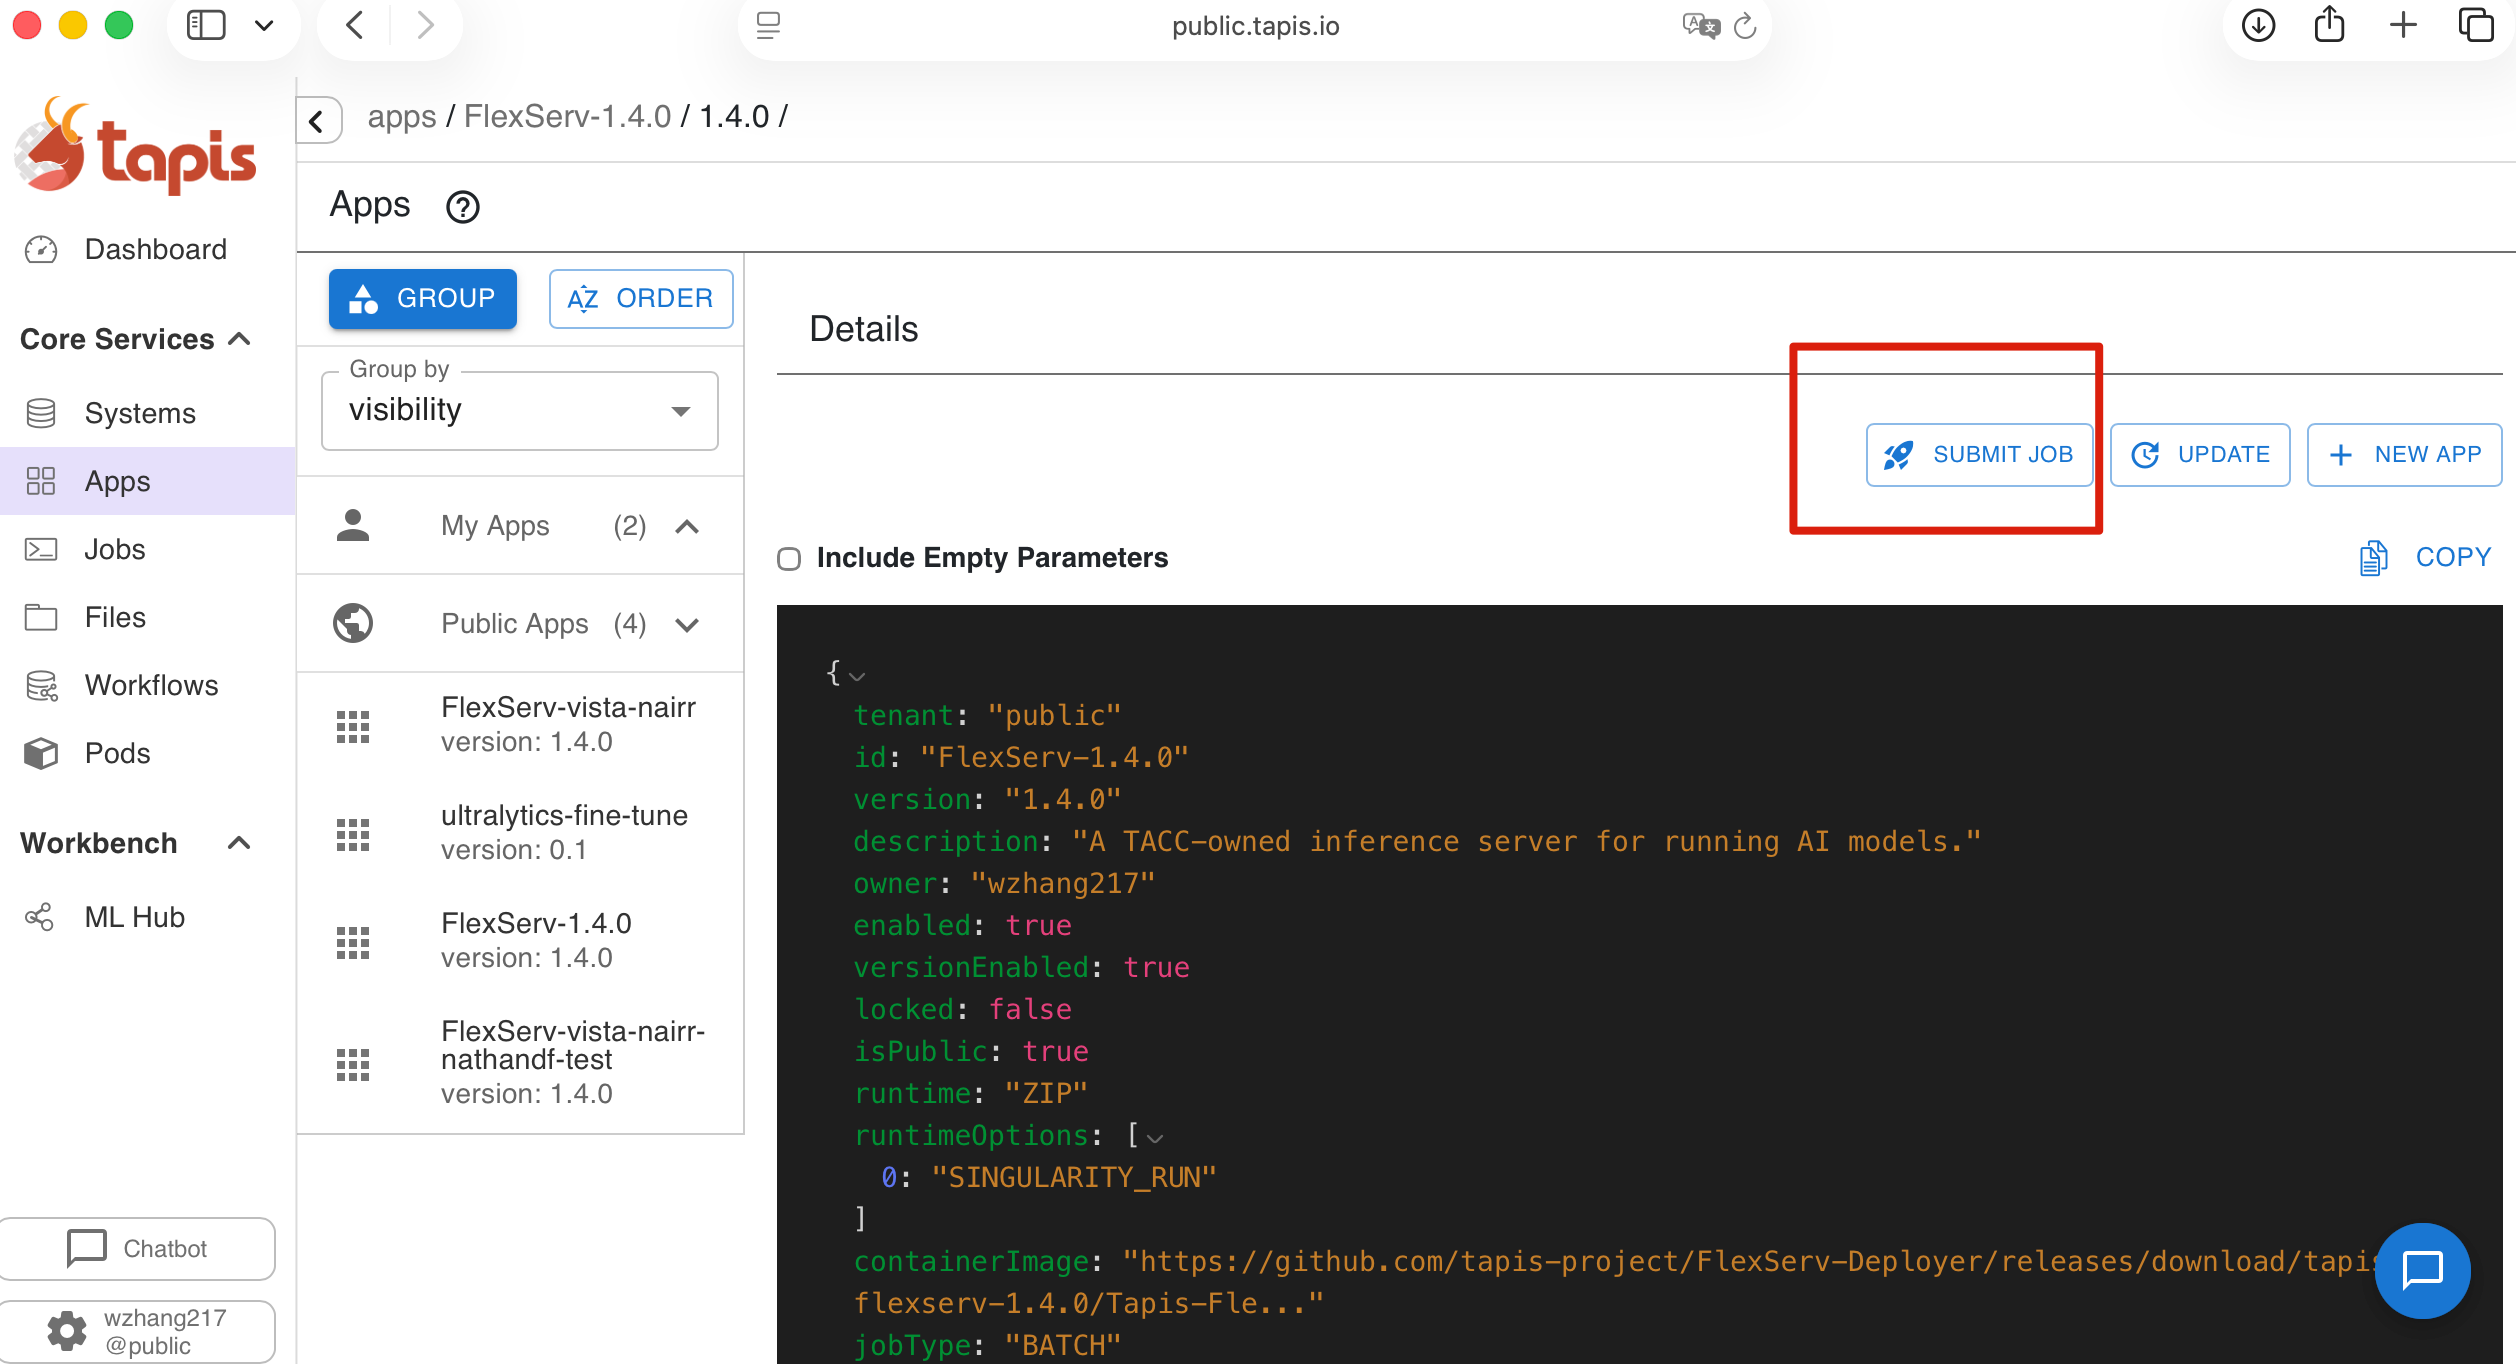
In the Tapis UI, you should navigate to Apps and you should see the Flex Server application already registered in your Tapis UI: FlexServ-1.4.0 version 1.4.0
Step 4.1.3: Submit FlexServ Job using TAPIS UI
1. Initiate Submission
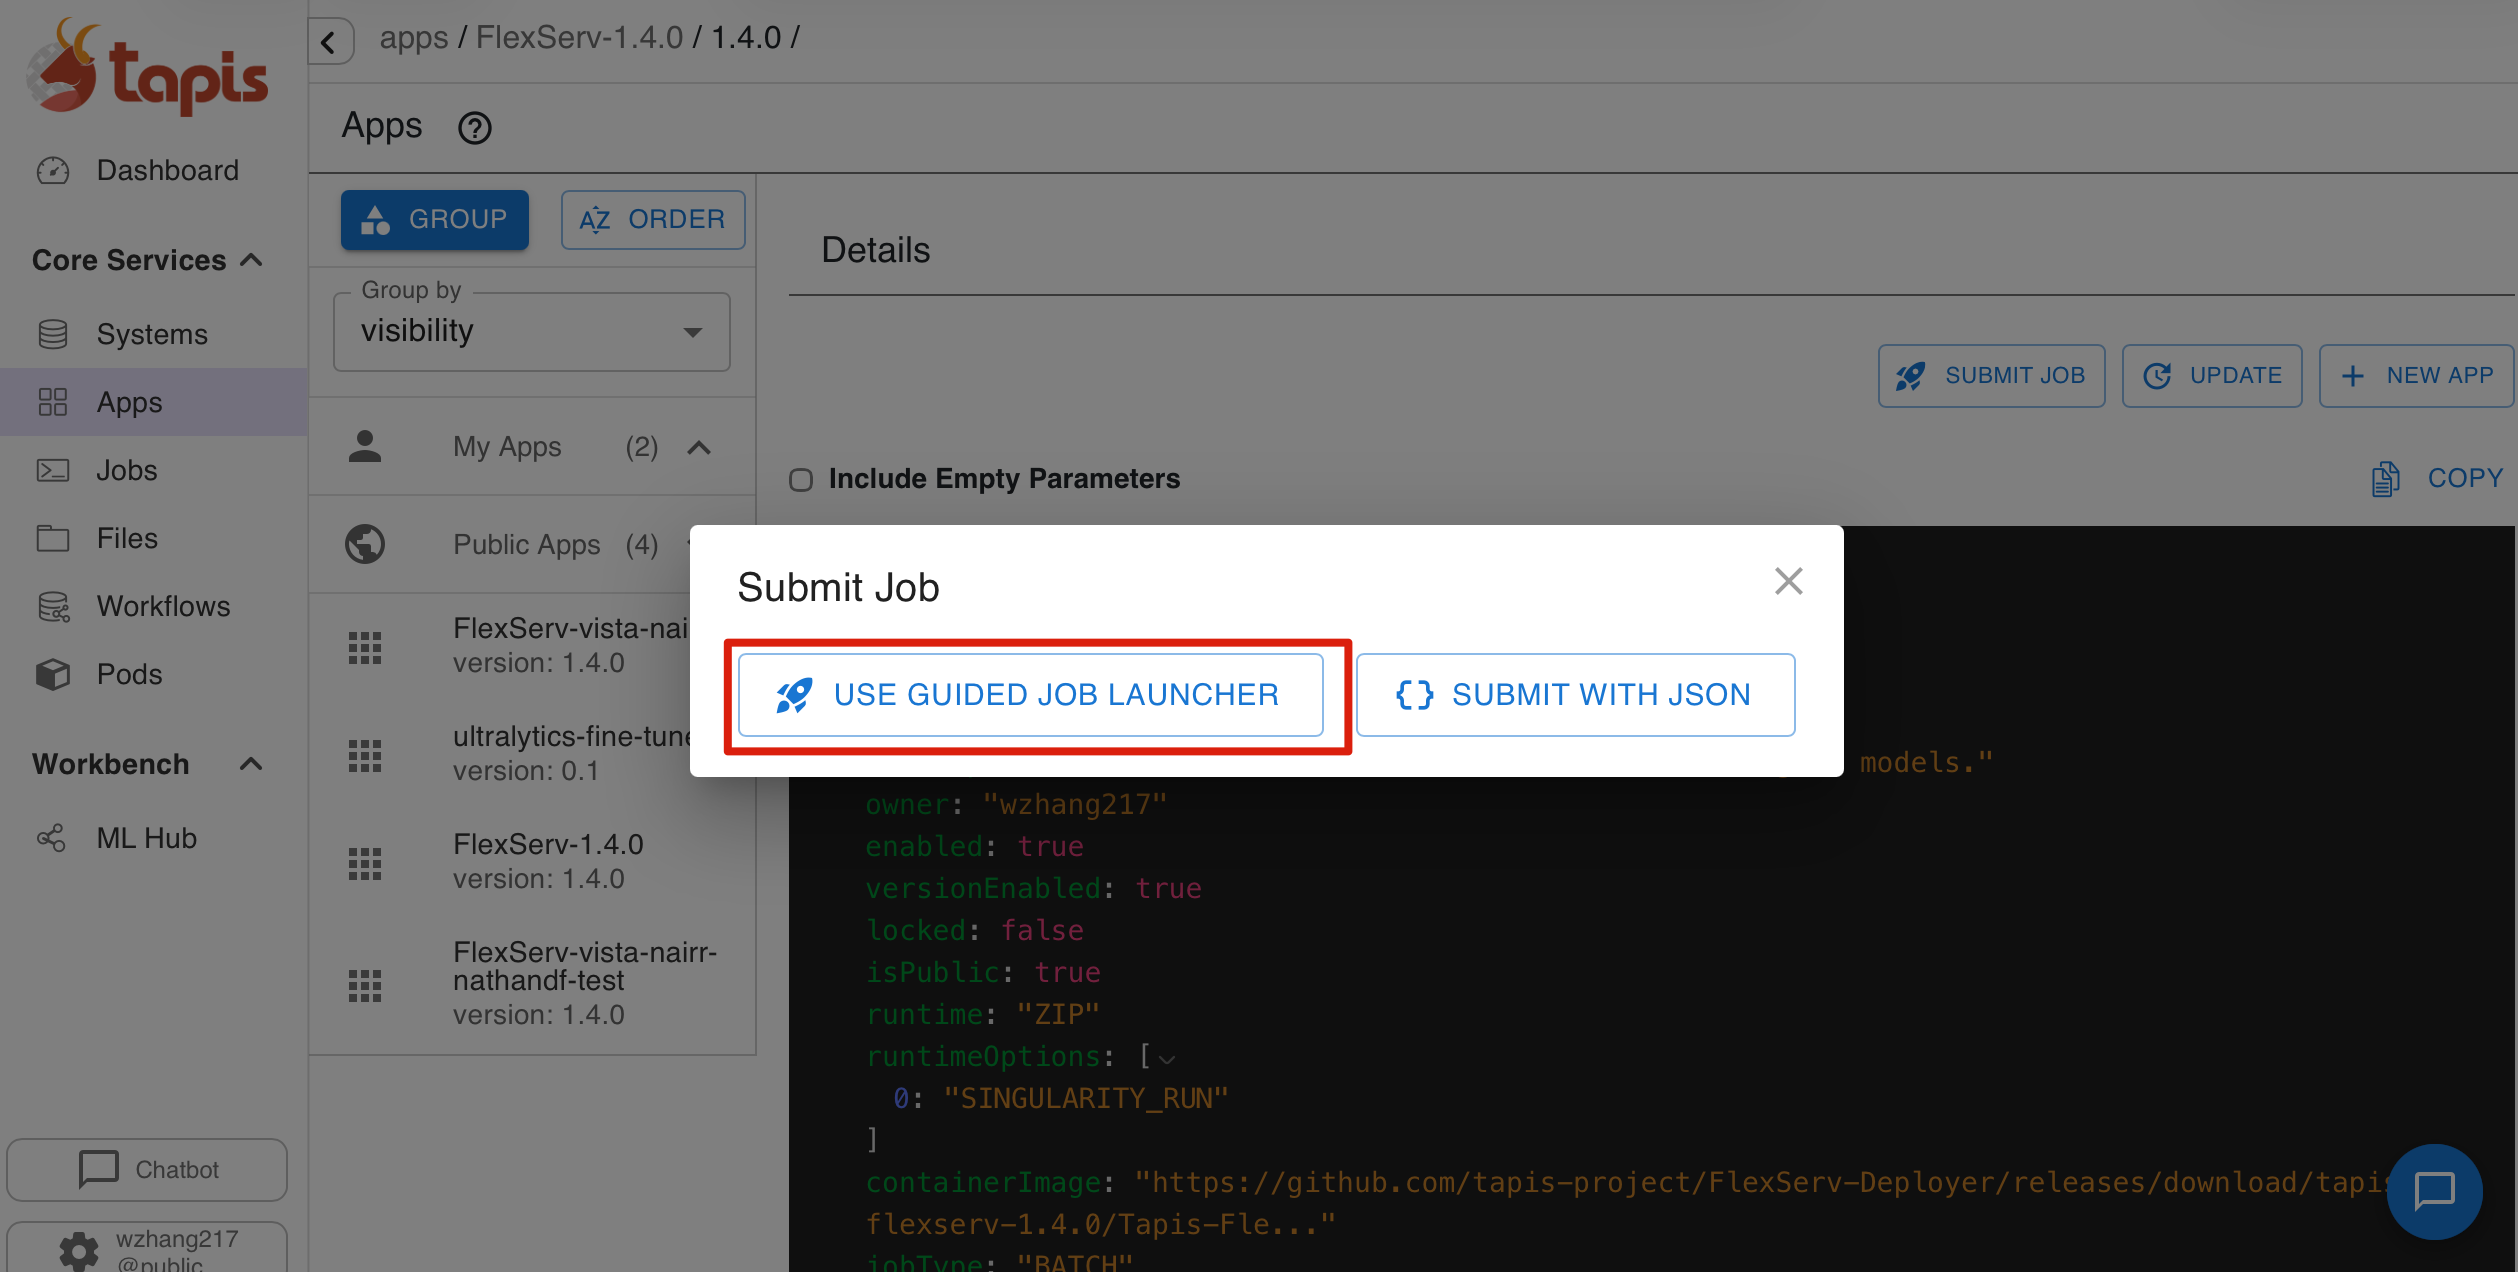
In the Tapis UI, navigate to the application FlexServ-1.4.0, click the Submit Job button, and select Use Guided Job Launcher.
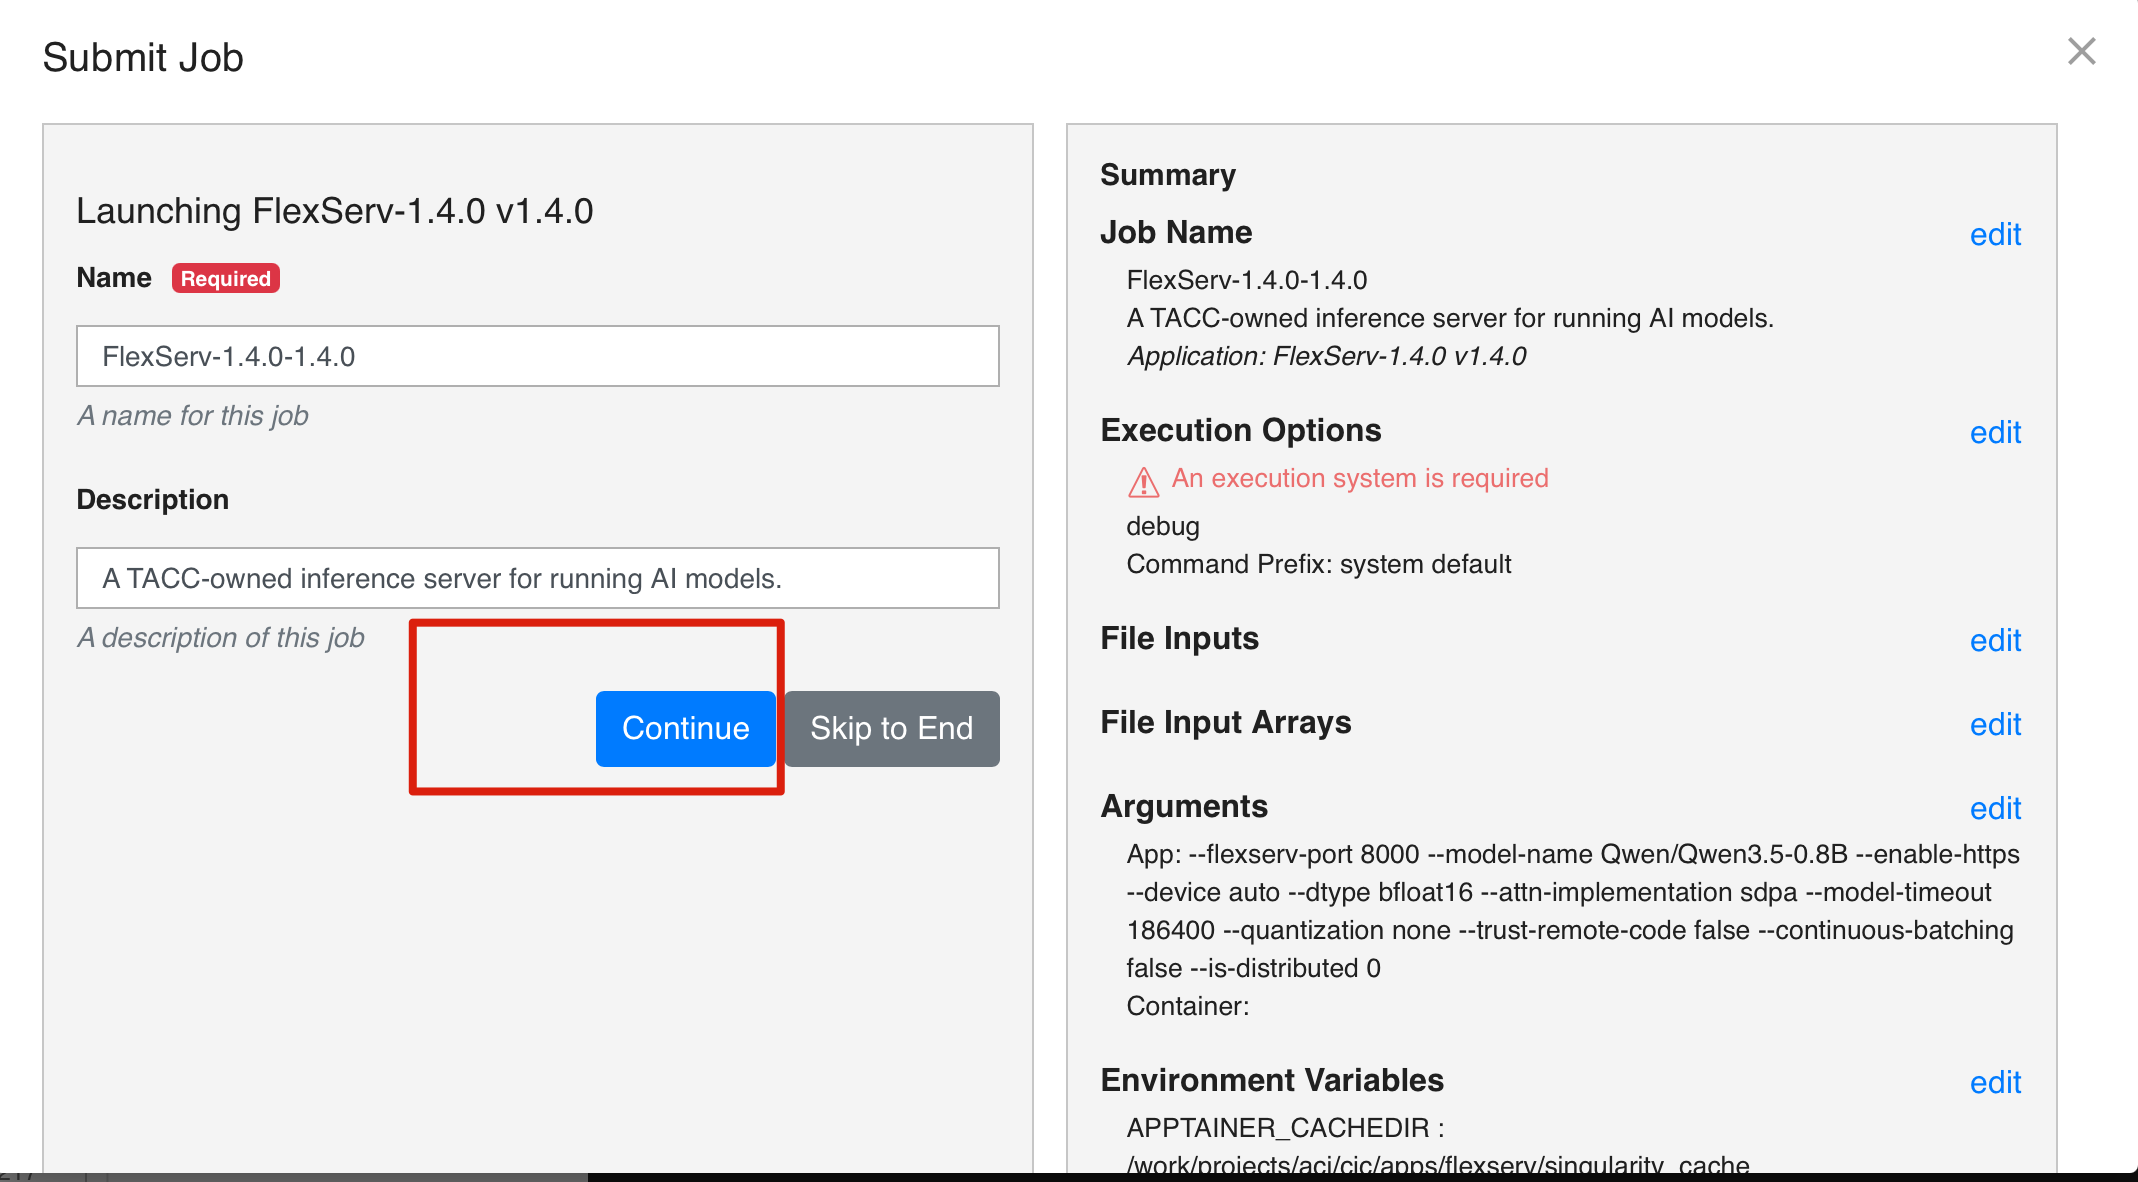
2. Configure the FlexServ Job
First you will see Job summary, press Continue.
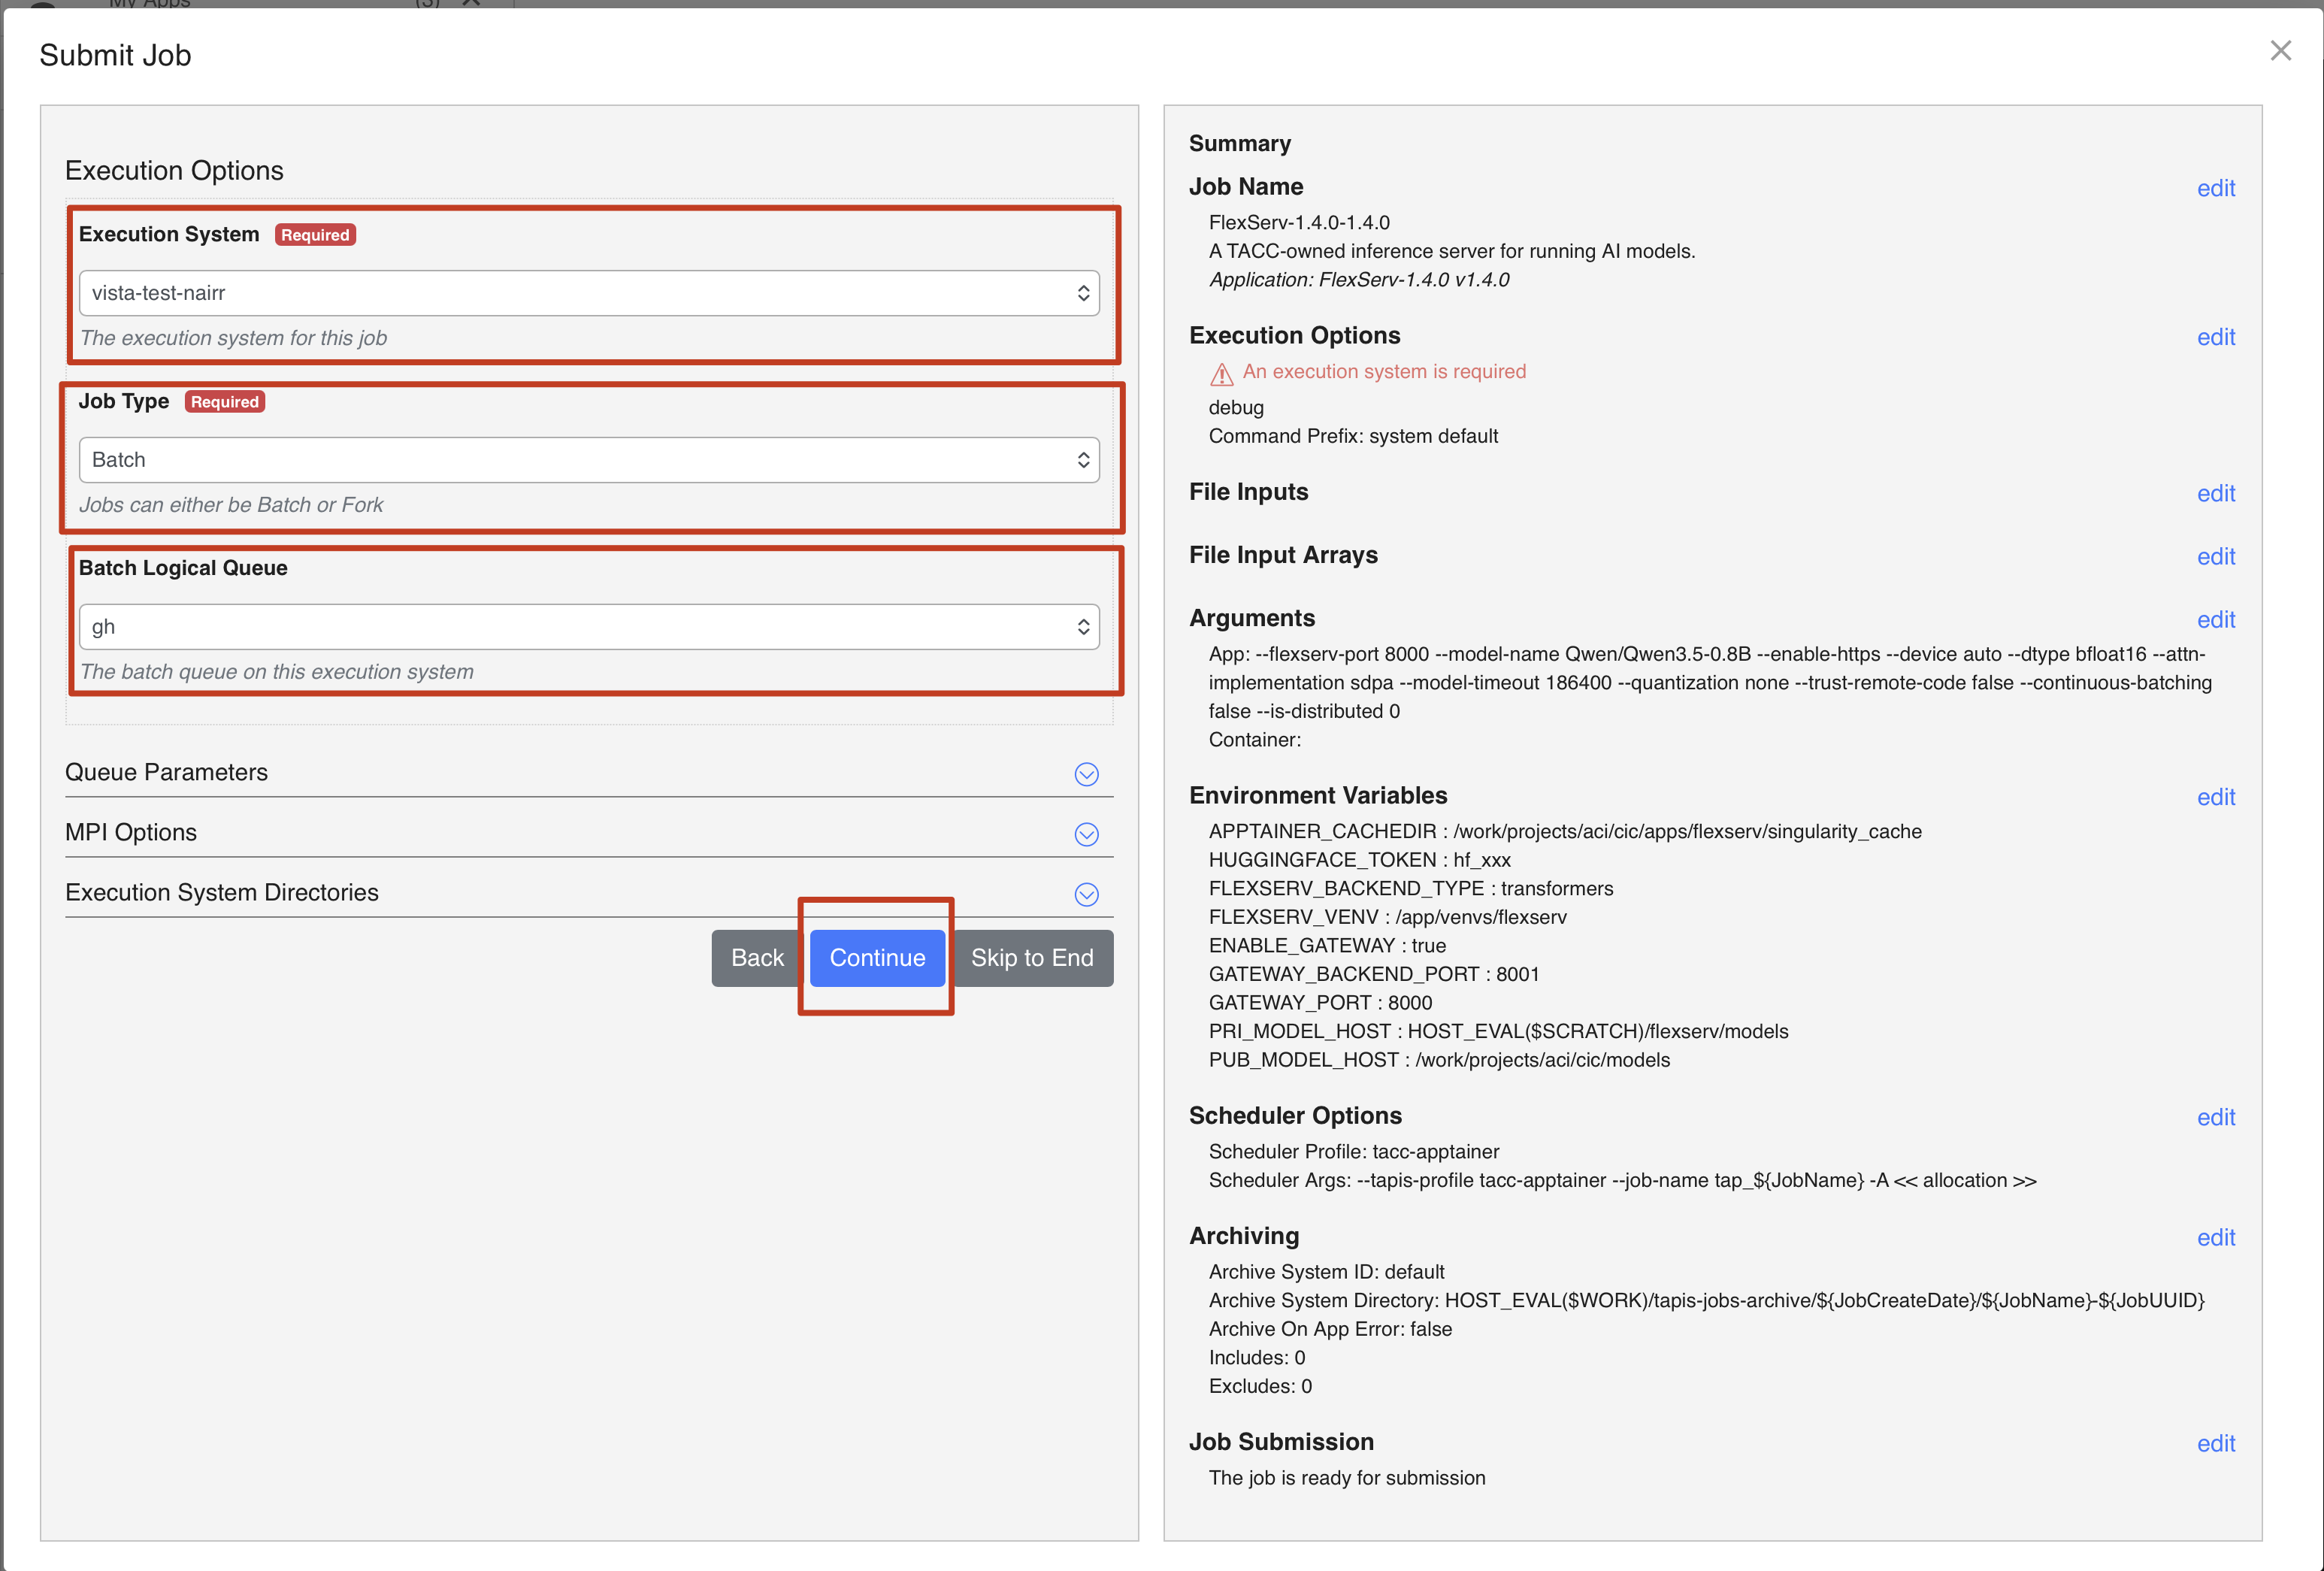
In Execution Options card:
- For Execution System, select
vista-test-nairr - For Job Type, select
Batch - For Batch Logical Queue, select
gh
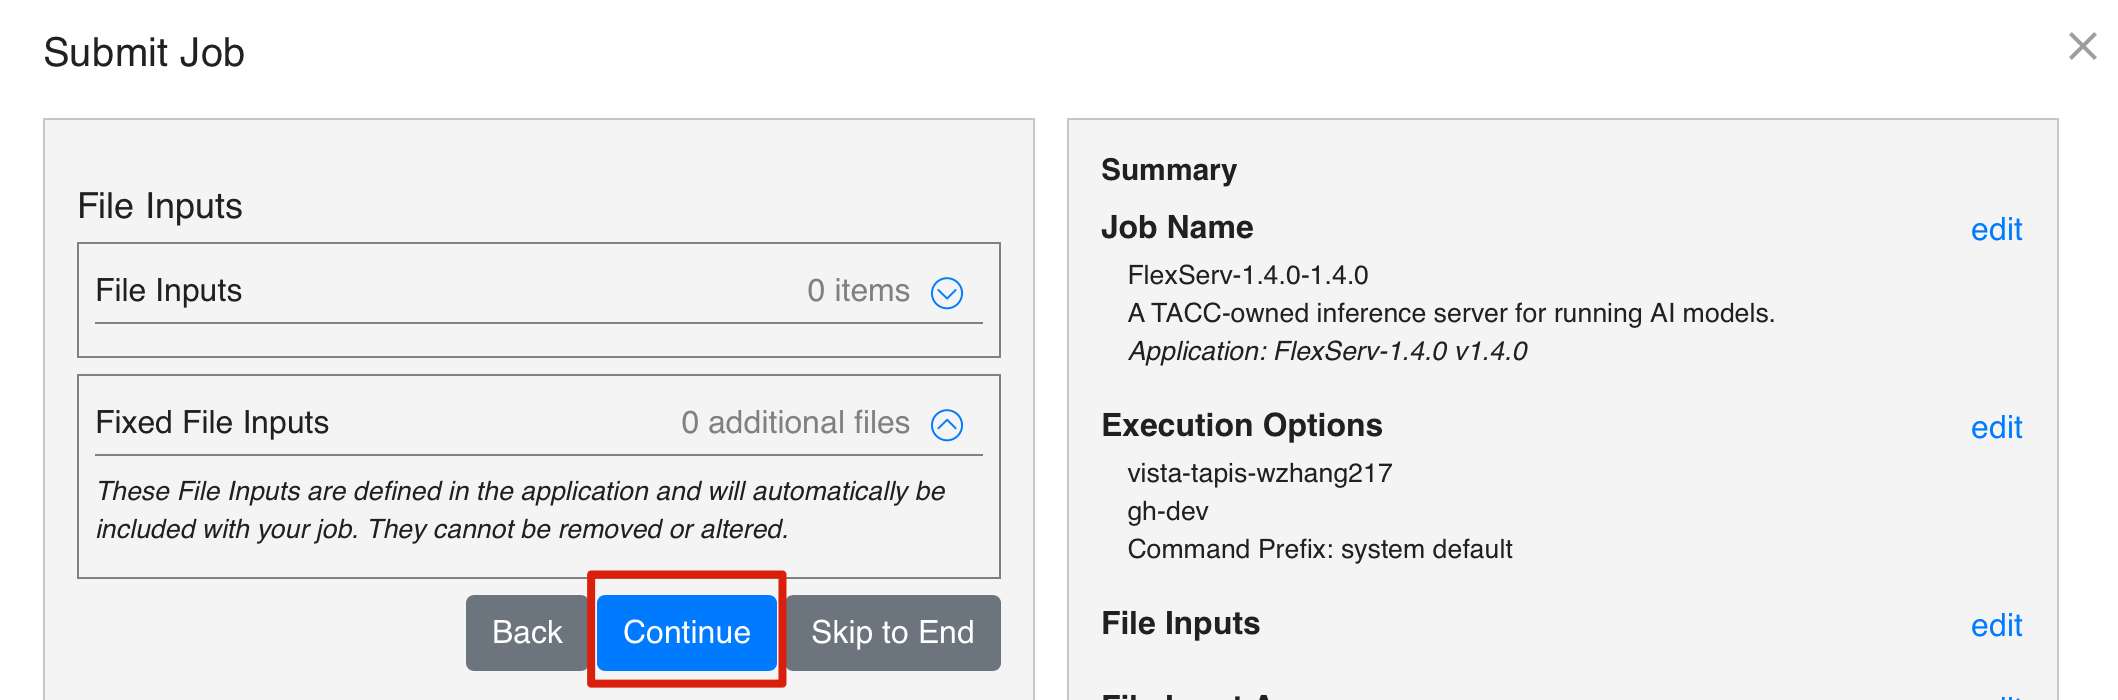
Press Continue
Continue
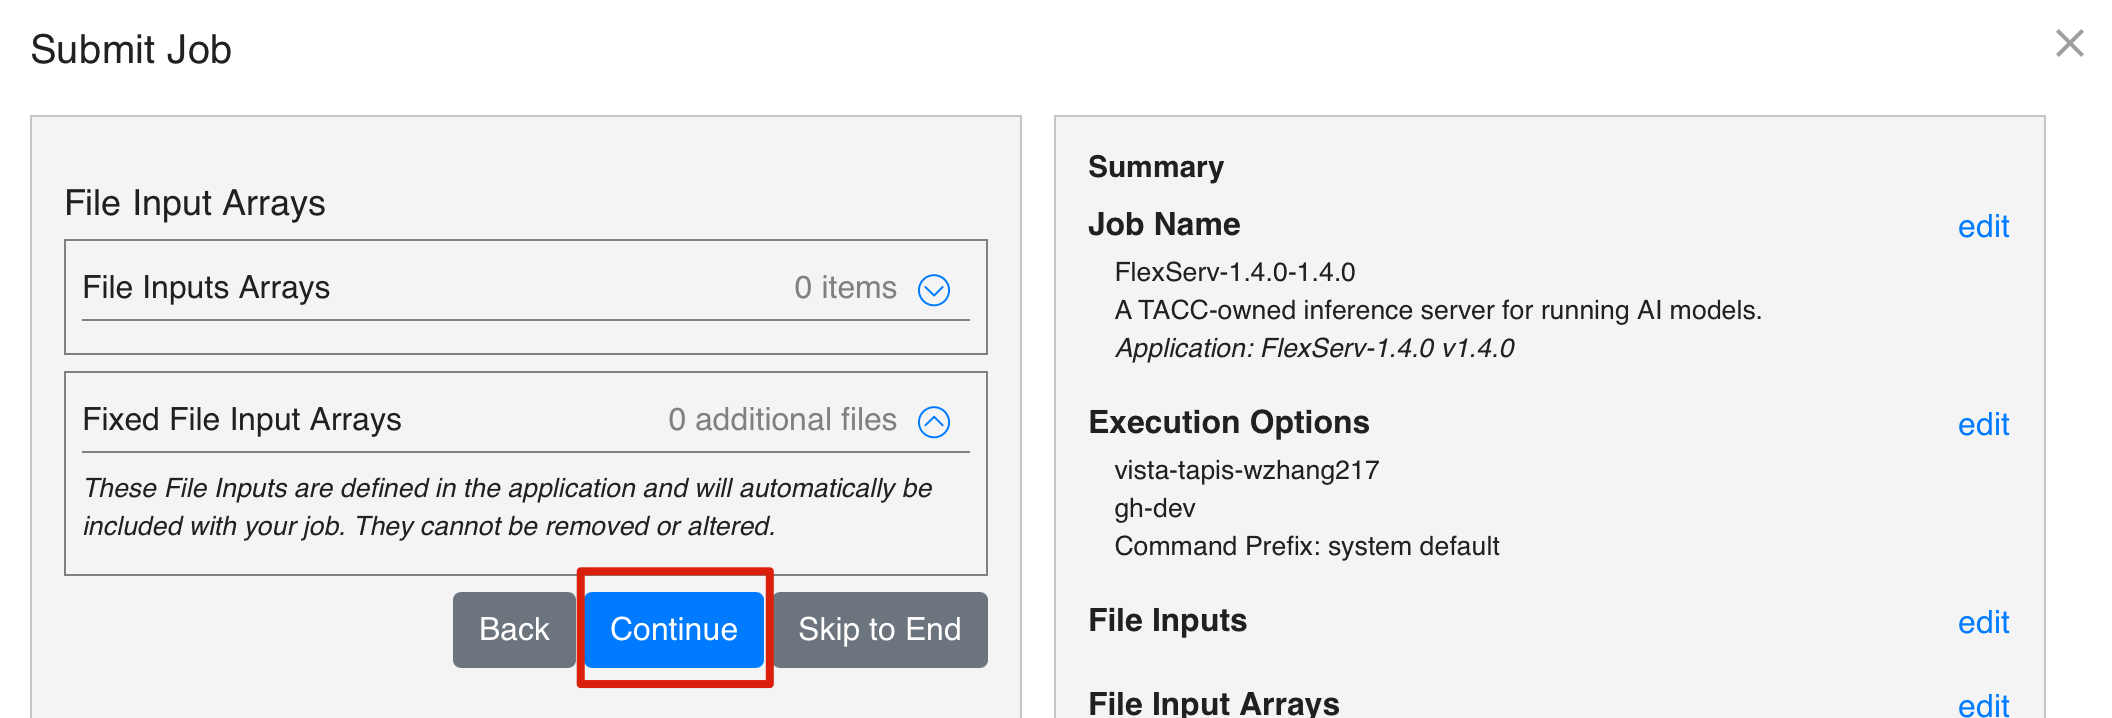
Continue
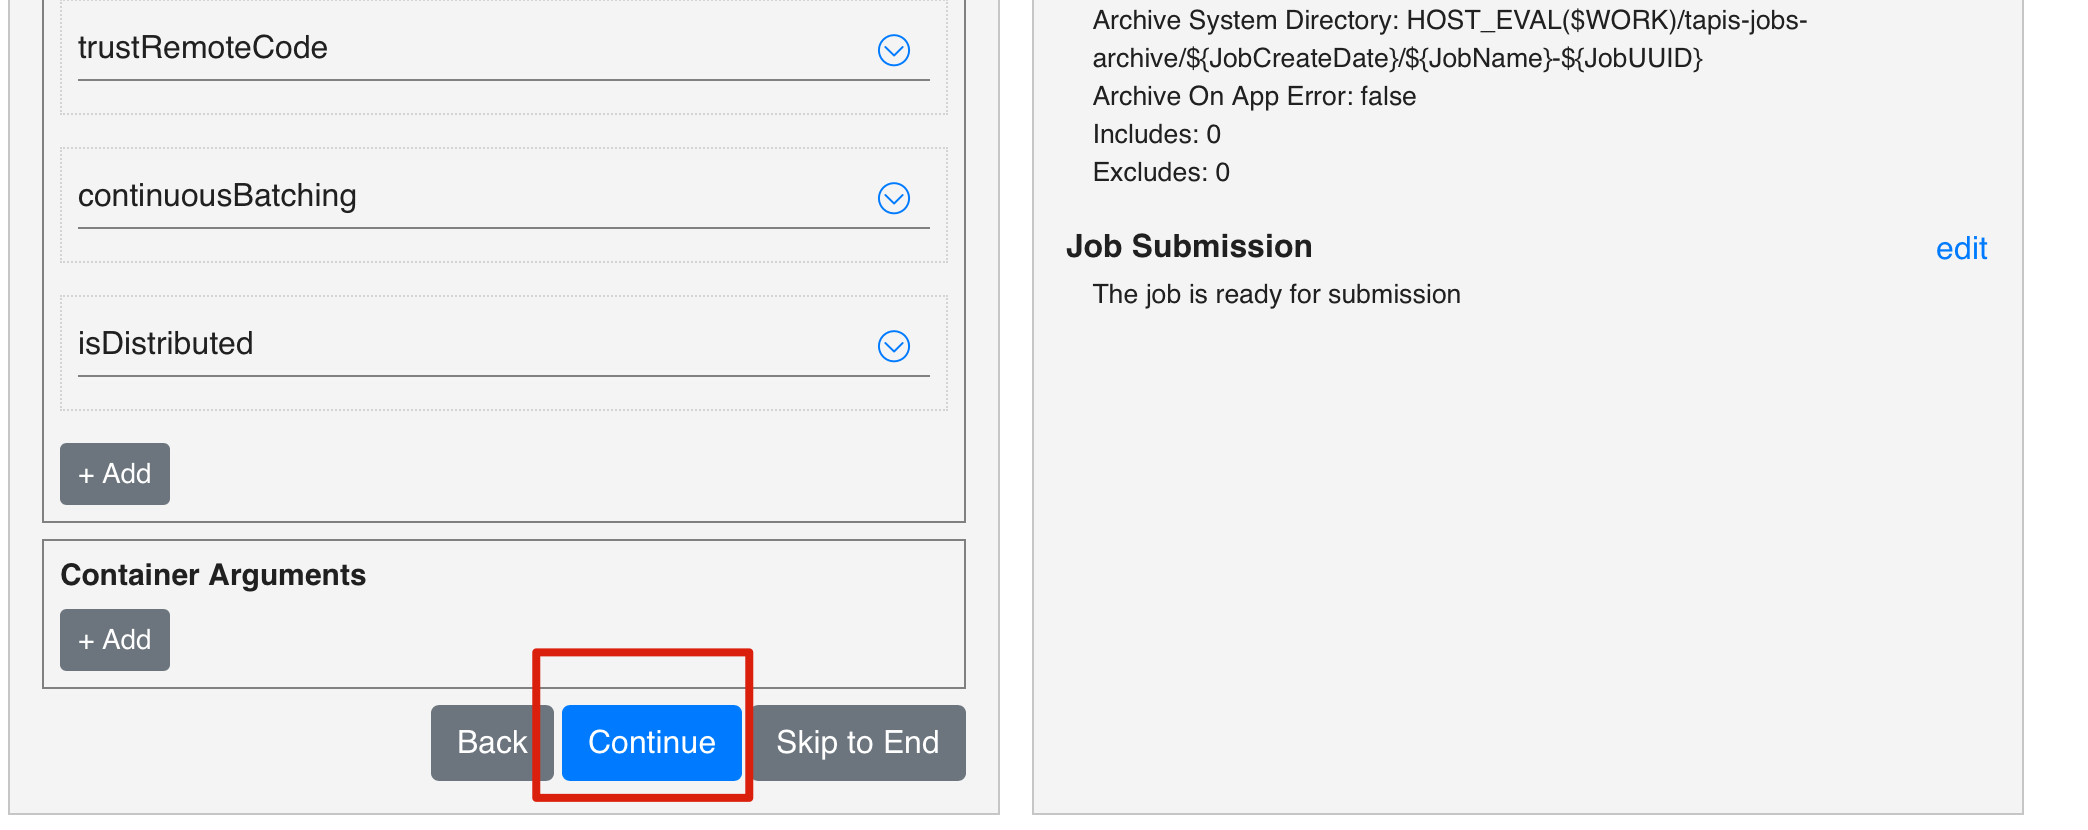
Continue
Continue
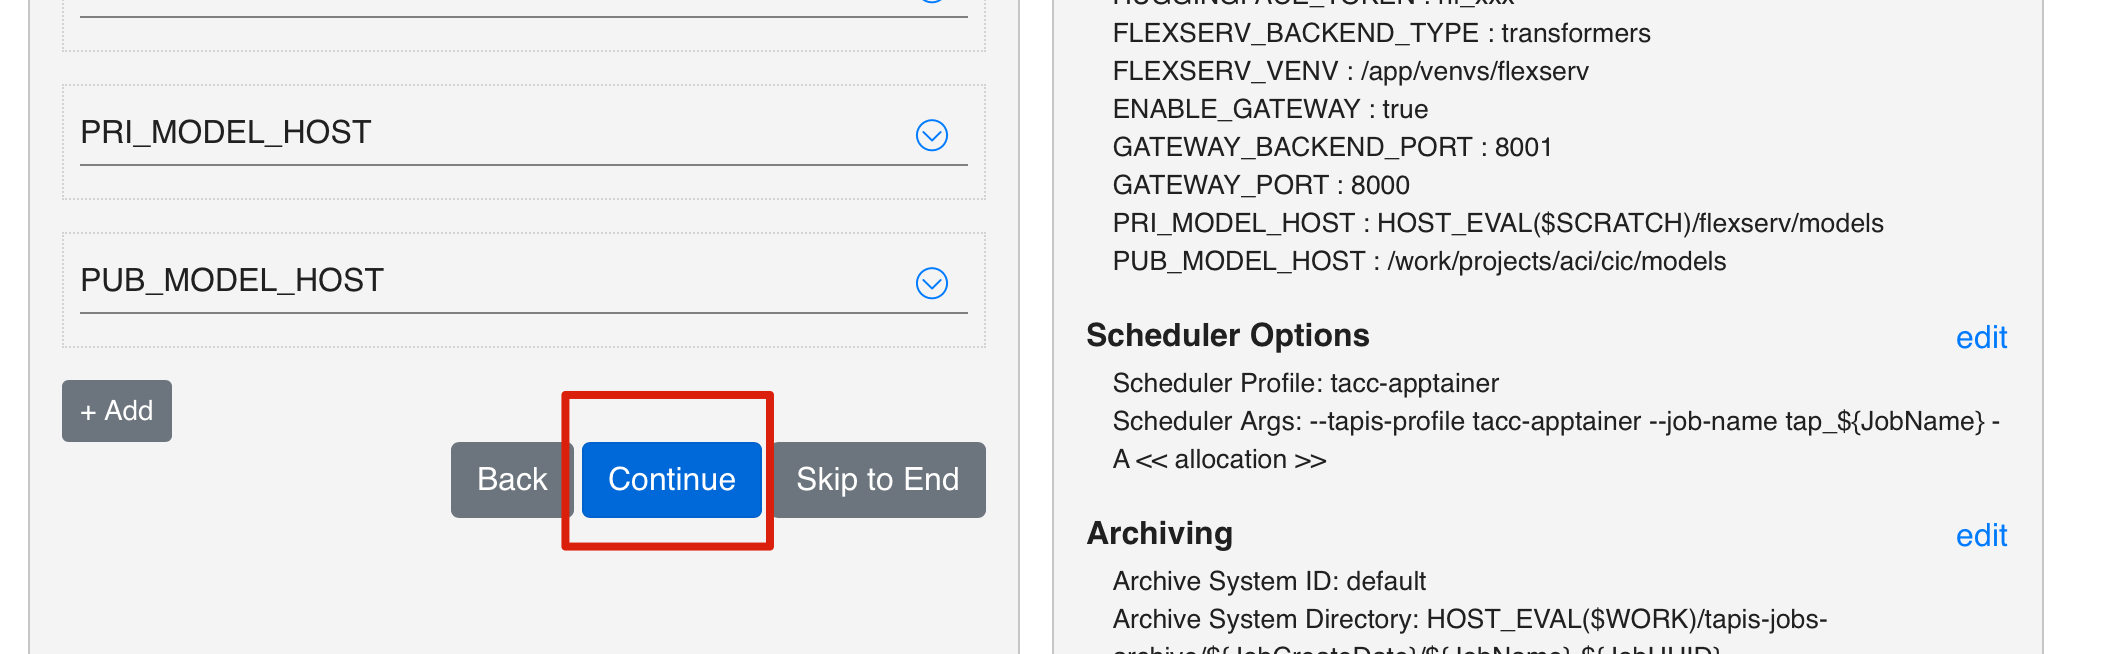
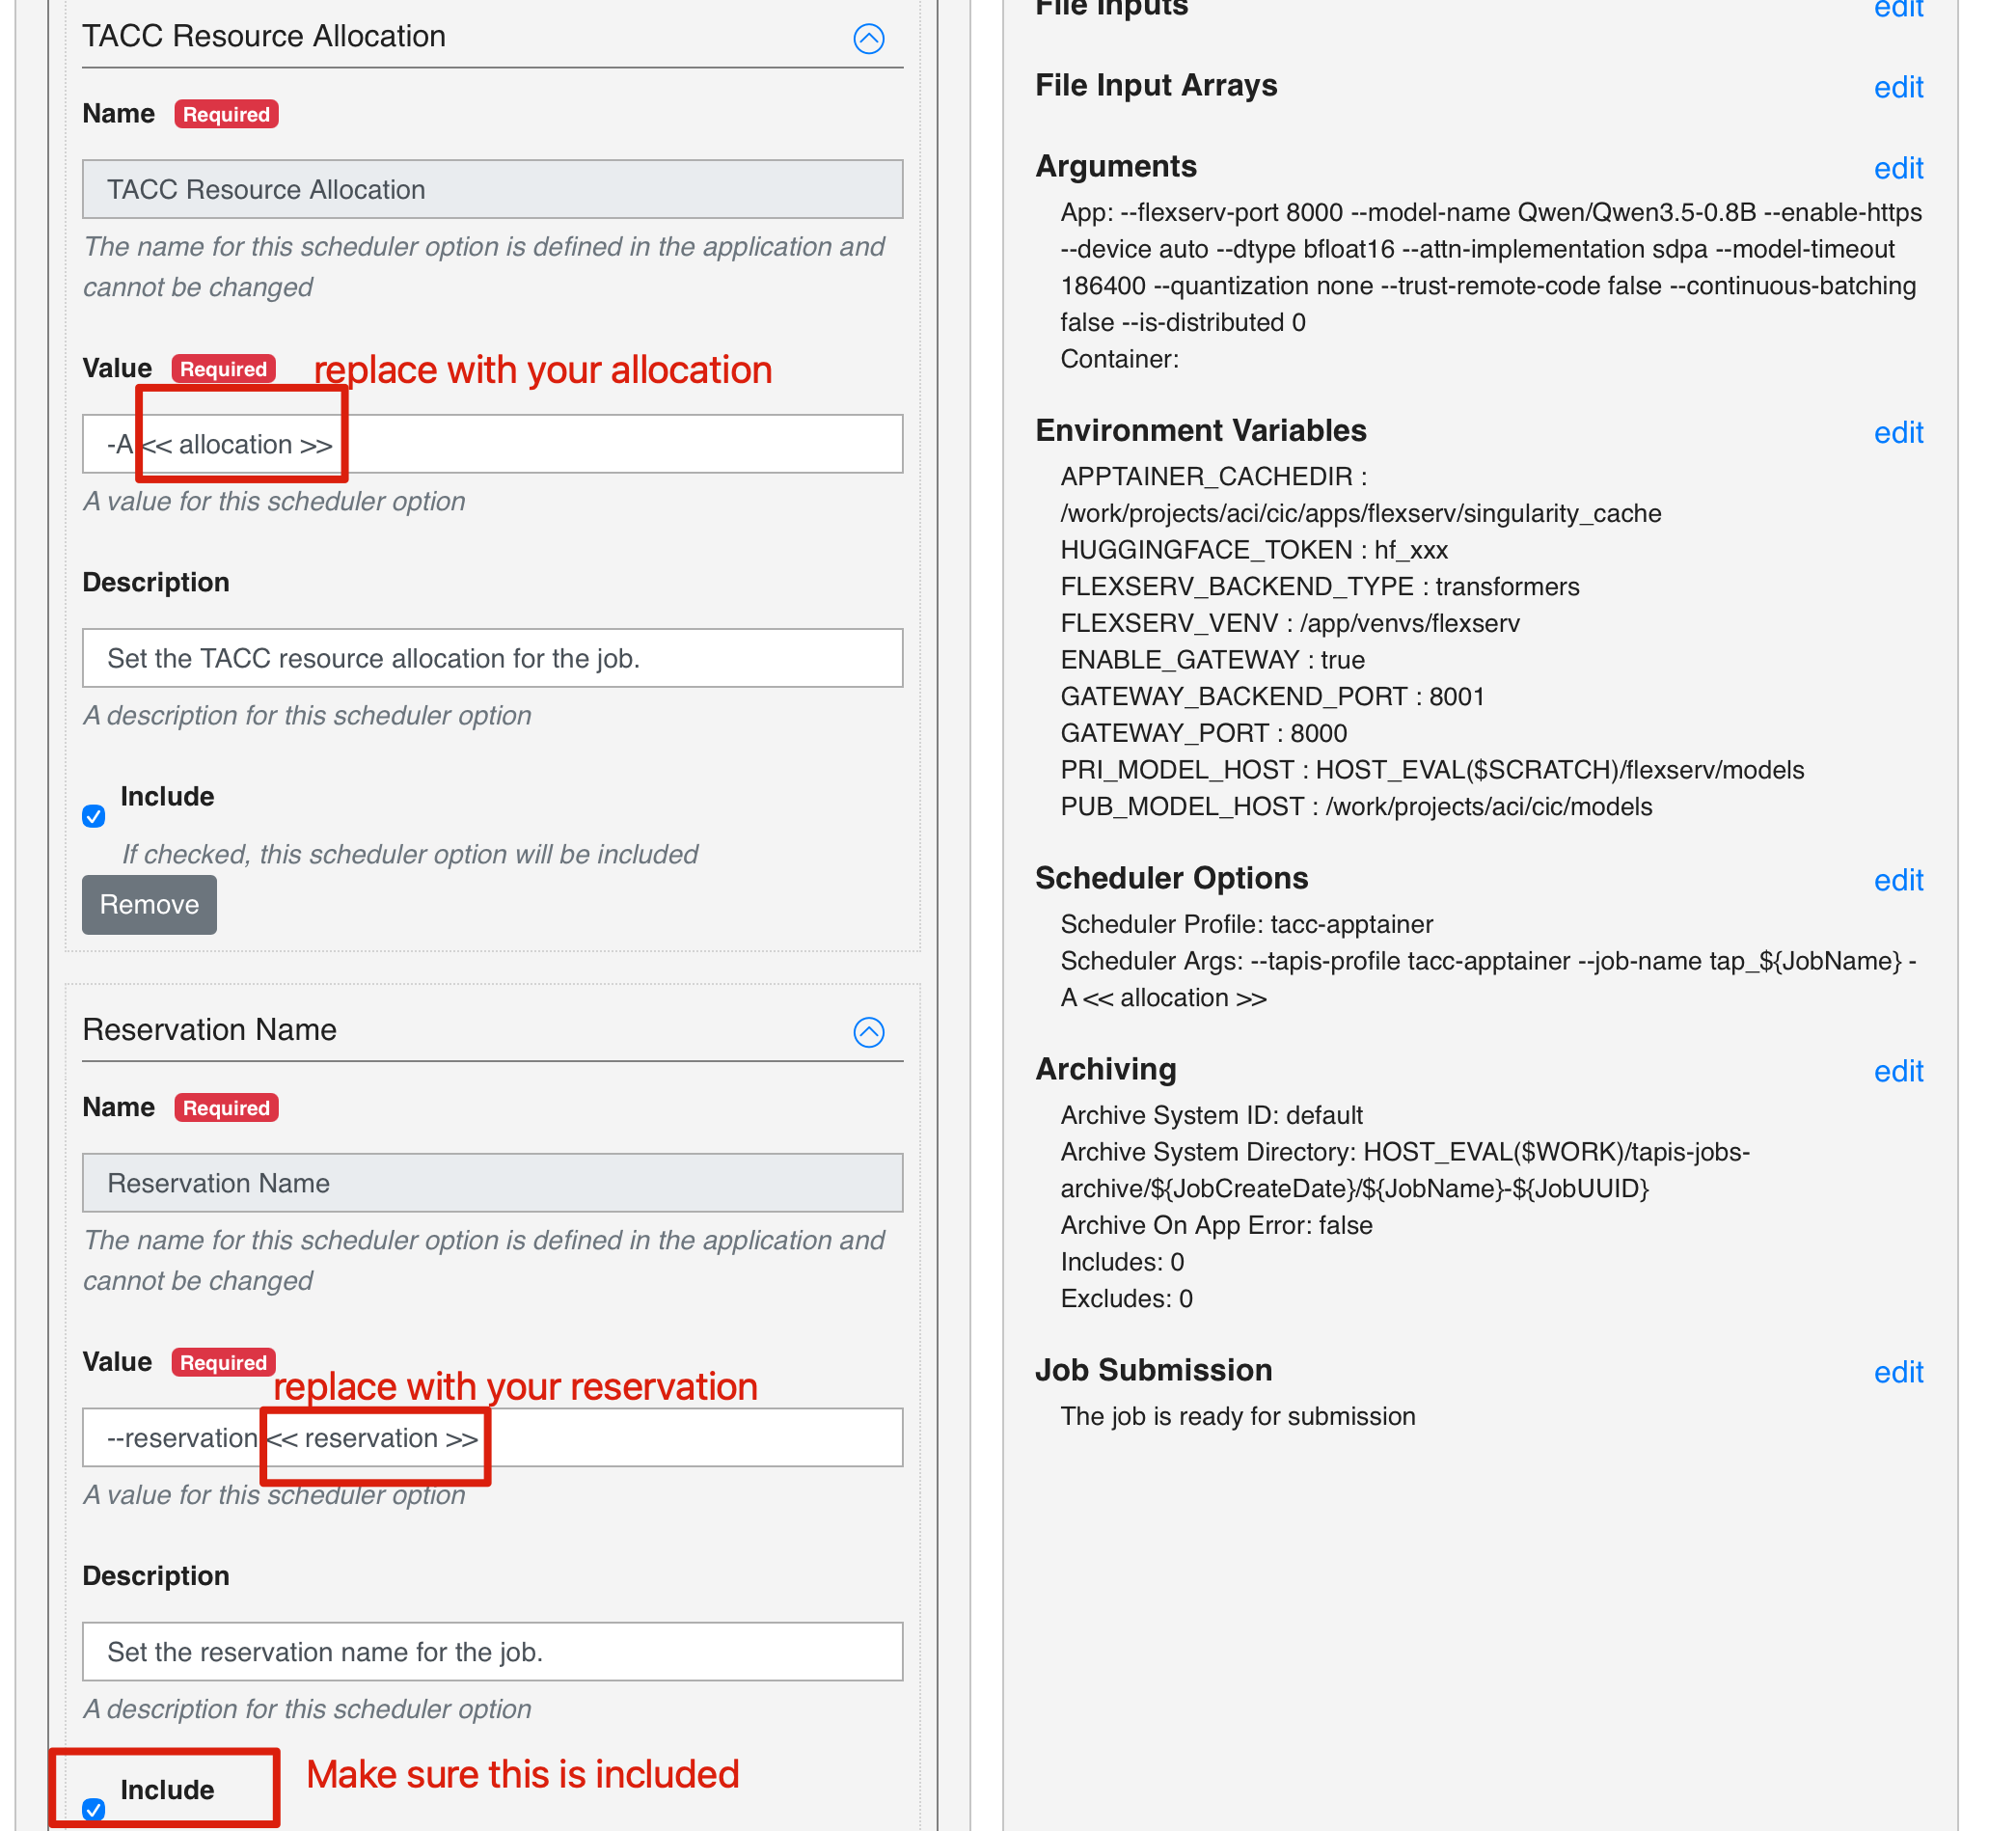
Expand TACC Resource Allocation and Reservation Name
- For TACC Resource Allocation, put a space and then
TRA24006after-A - For Reservation Name, put a space and then your reservation code after
--reservation
Note that the reservation code for Sunday sessions is Tapis+Tutorial-Sun and the reservation code for Monday sessions is Tapis+Tutorial-Mon.
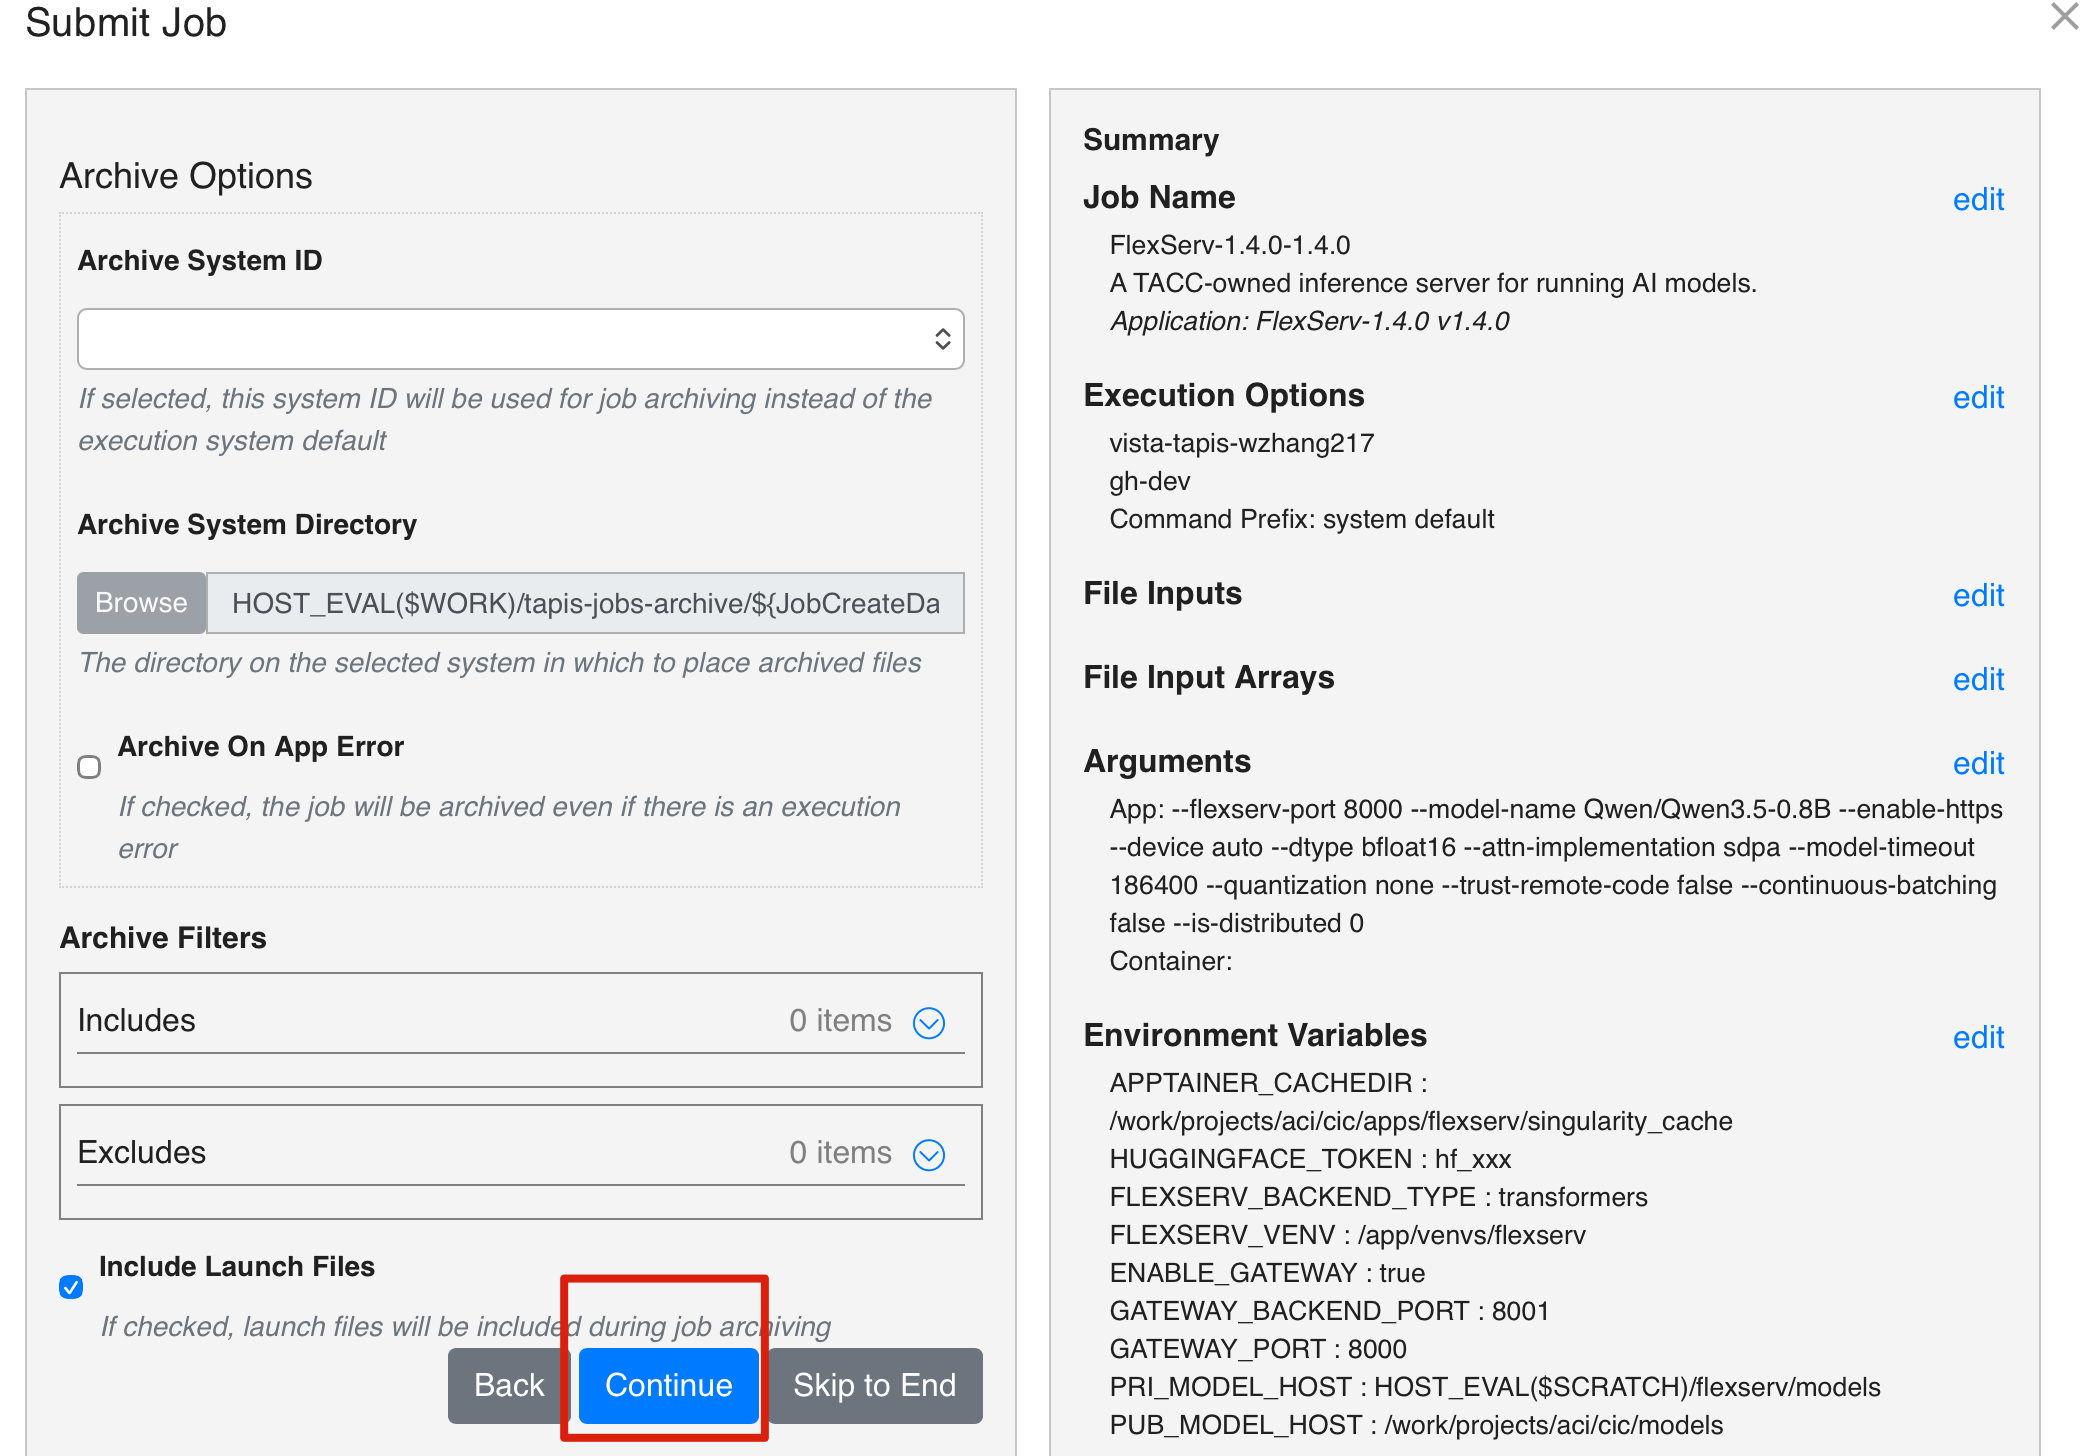
Continue
Put Continue

Continue
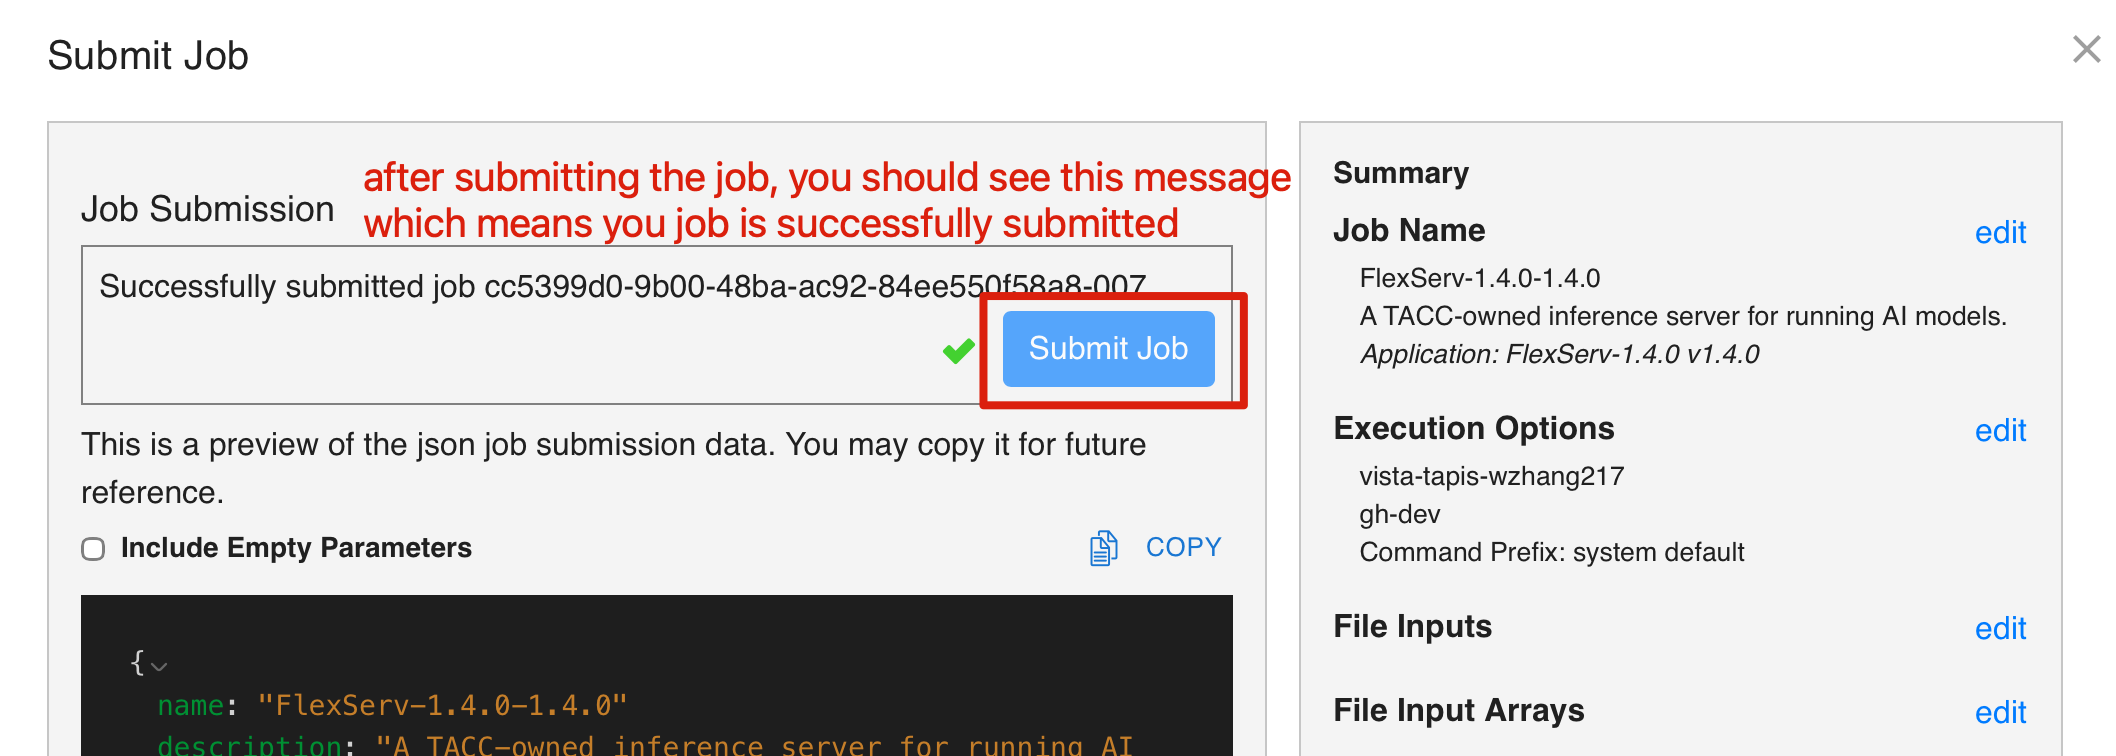
3. Submit Job
Once you went through all the processes, you can go ahead and submit the job. After you submit the job, you should see a confirmation message indicating that your job has been submitted successfully. You can close the job submission window and go to the Jobs tab in the left panel to see your submitted job.
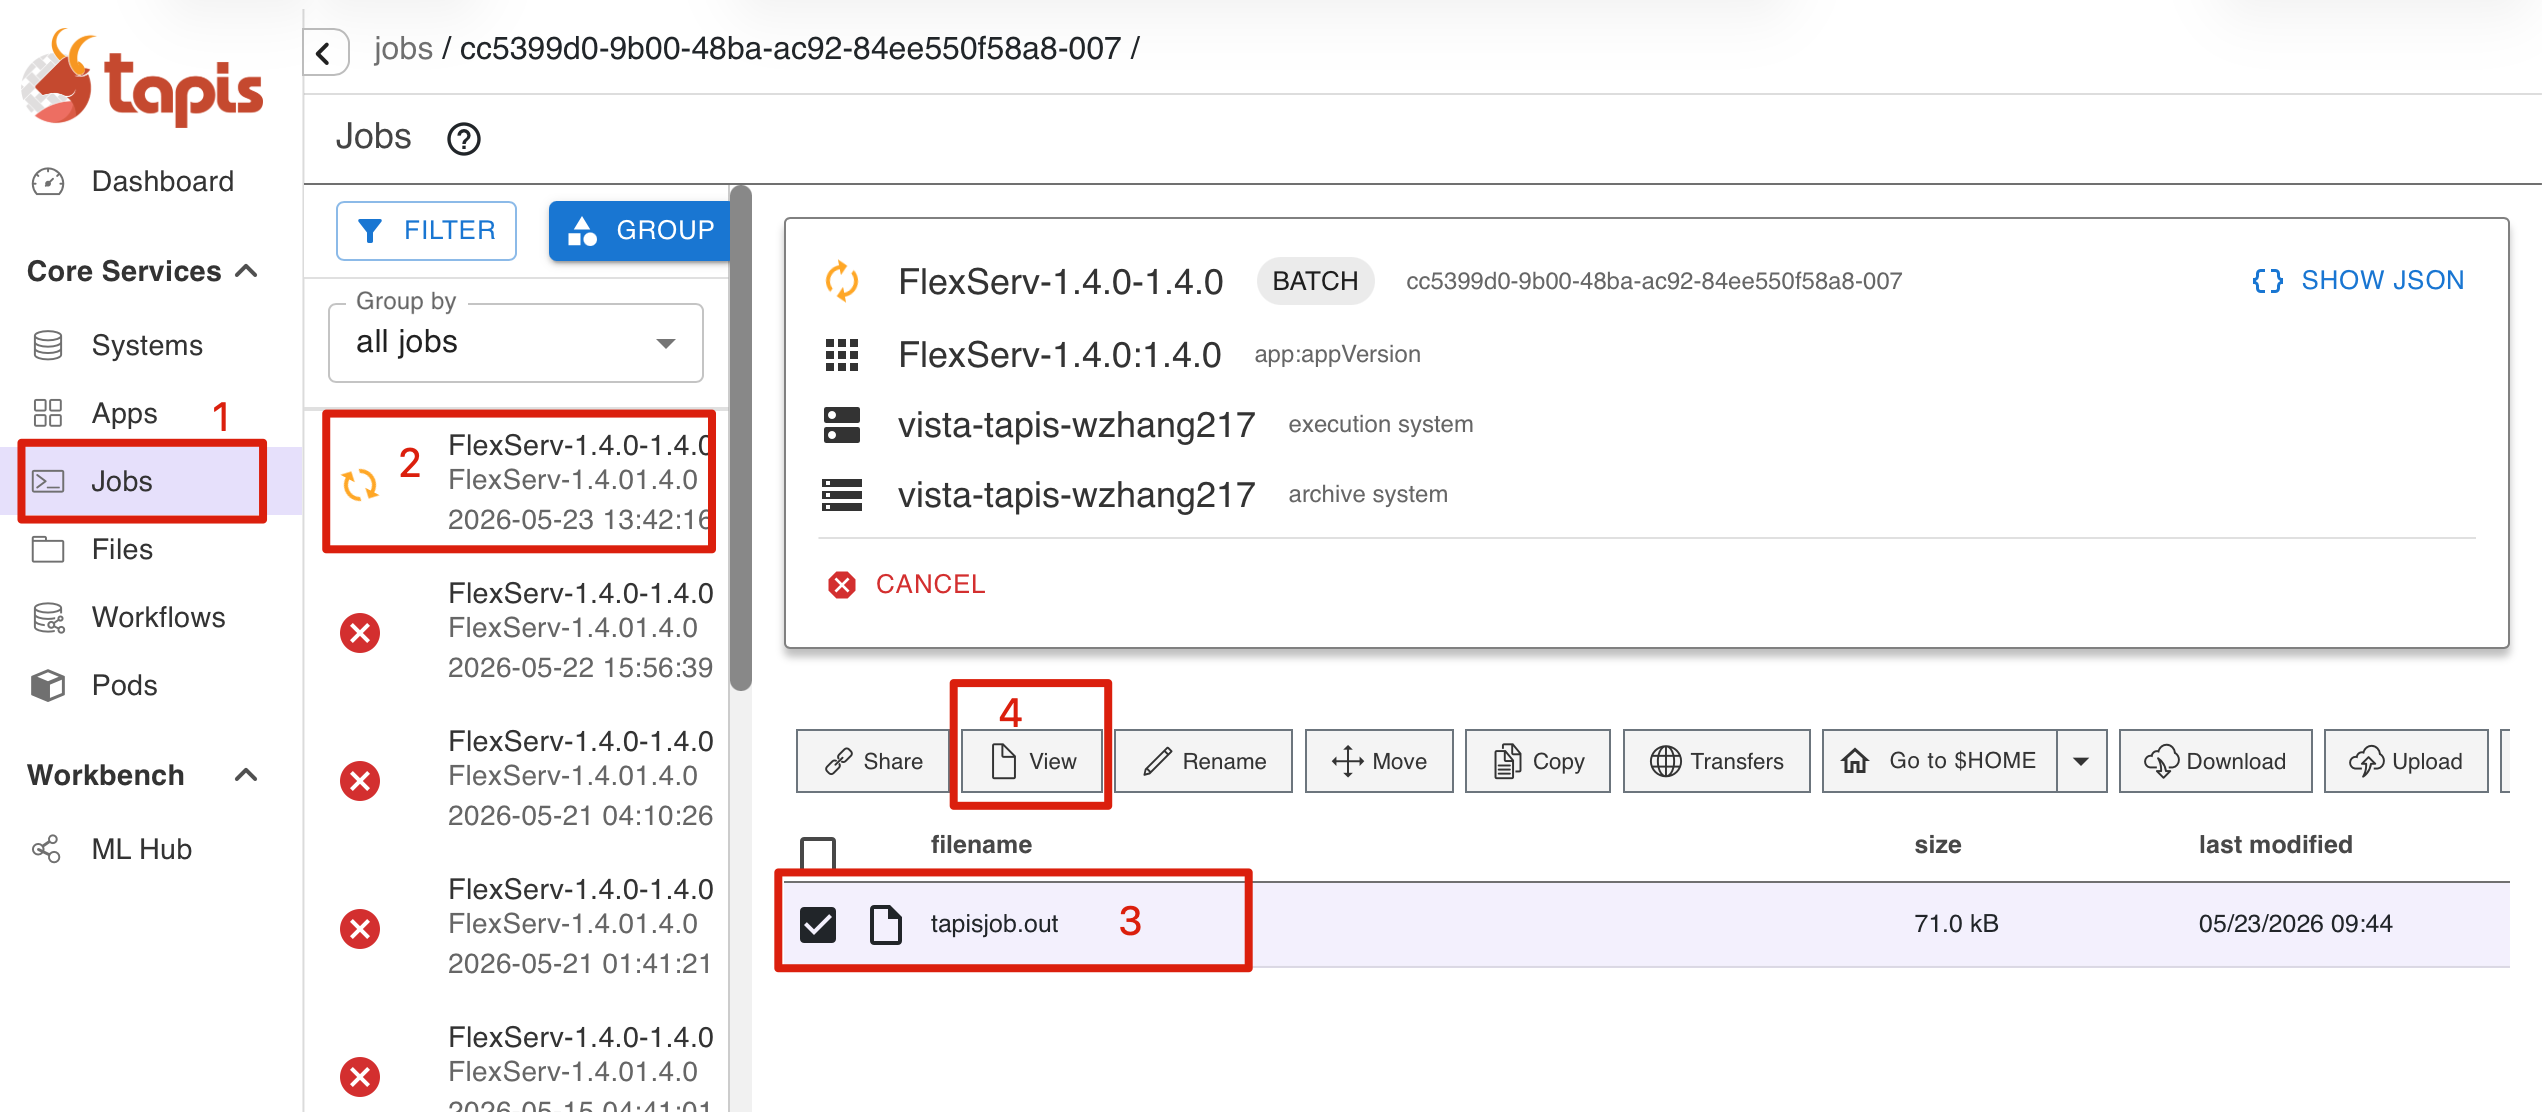
4. View Job
To view a submitted job, you can:
- Go to the Jobs tab in the left panel to see your submitted job.
- You can see an active job in the job list.
- If you job starts to run and you should be seeing the output file.
- You can select the file and click on View button to see the job output, where you should be able to find the FlexServ address and FlexServ token.
5. View Job Output file to get the Flex server port and Token
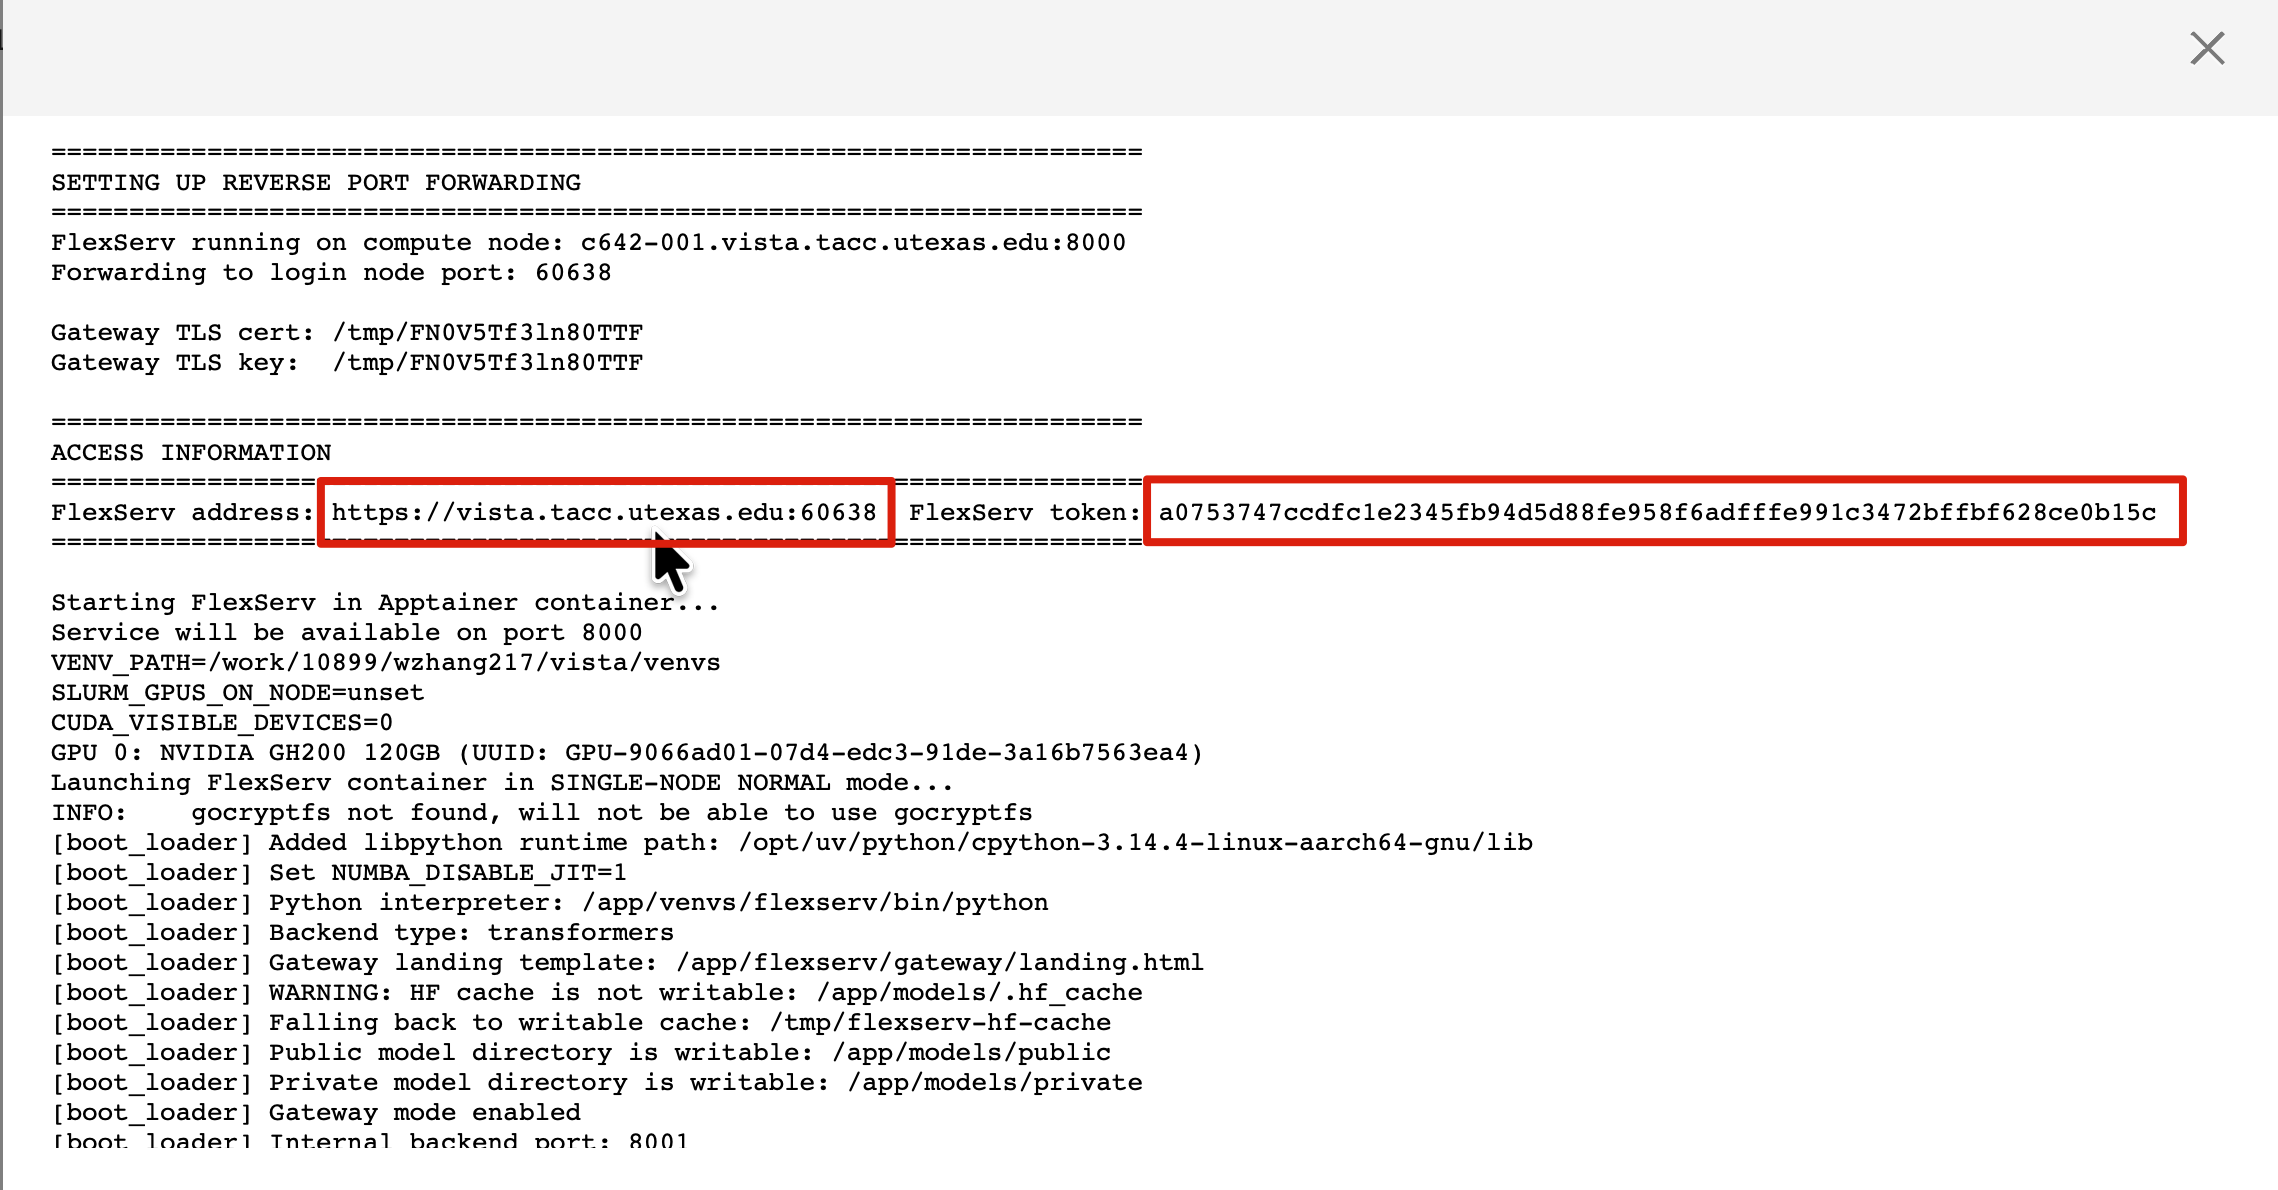
Once the tapisjob.out opens, look at the ACCESS INFORMATION Section to grab the FlexServ URL and also the FlexServ token. Save it to your notepad.
Stage 4.2: Play with FlexServ
With the FlexServ URL, you should be able to open the landing page of FlexServ, which shows you the FlexServ UI. The UI is provided through the FlexServ gateway, and the inference service is provided through our customized transformers inference backend, which largely relies on the transformers library from HuggingFace.
Step 4.2.1 Enter you tokens and check readiness.
Put the FlexServ Token on the FlexServ input box which is on the top right corner of the UI. If you have a HuggingFace token, you can also put your HuggingFace token in the input box next to it. Please visit this page to know how to get a HuggingFace token.
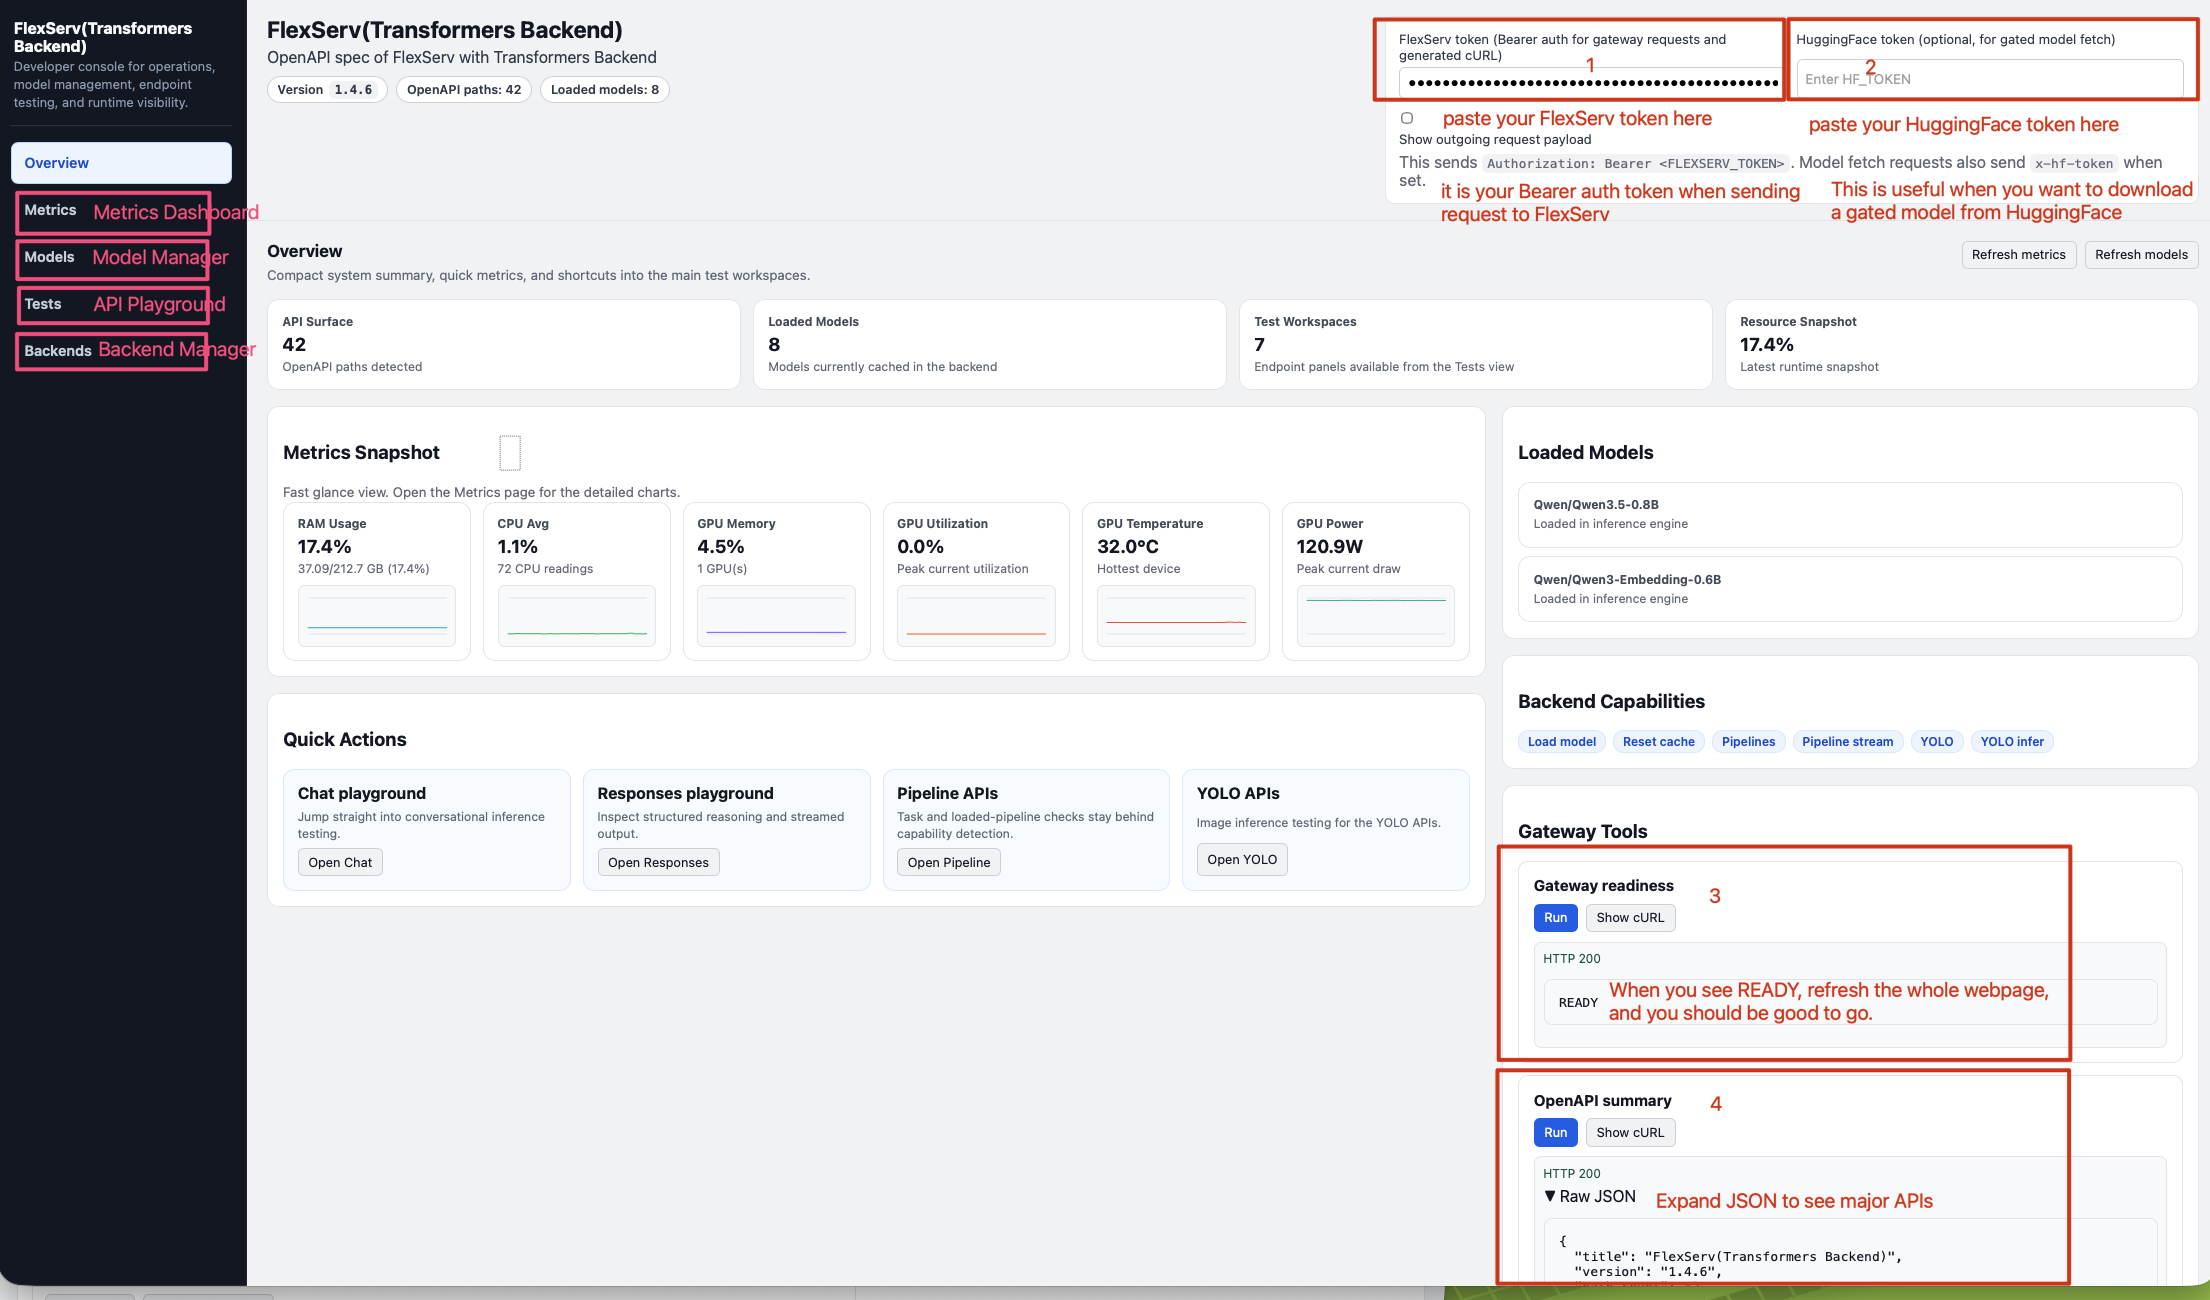
Click on the Run button in the Gateway Readiness area, and when you see READY in a HTTP 200 response, that means your backend is ready to work, and you can refresh the whole webpage, and you are good to go!
You are more than welcome to click on the Run button in the OpenAPI Summary area to see the summary of major FlexServ APIs.
Step 4.2.2 View Metrics in FlexServ
From the left side bar, select Metrics, you will see a series of metrics that can help you understand the usage of your CPU/GPU/MEMORY/VRAM on your compute node.
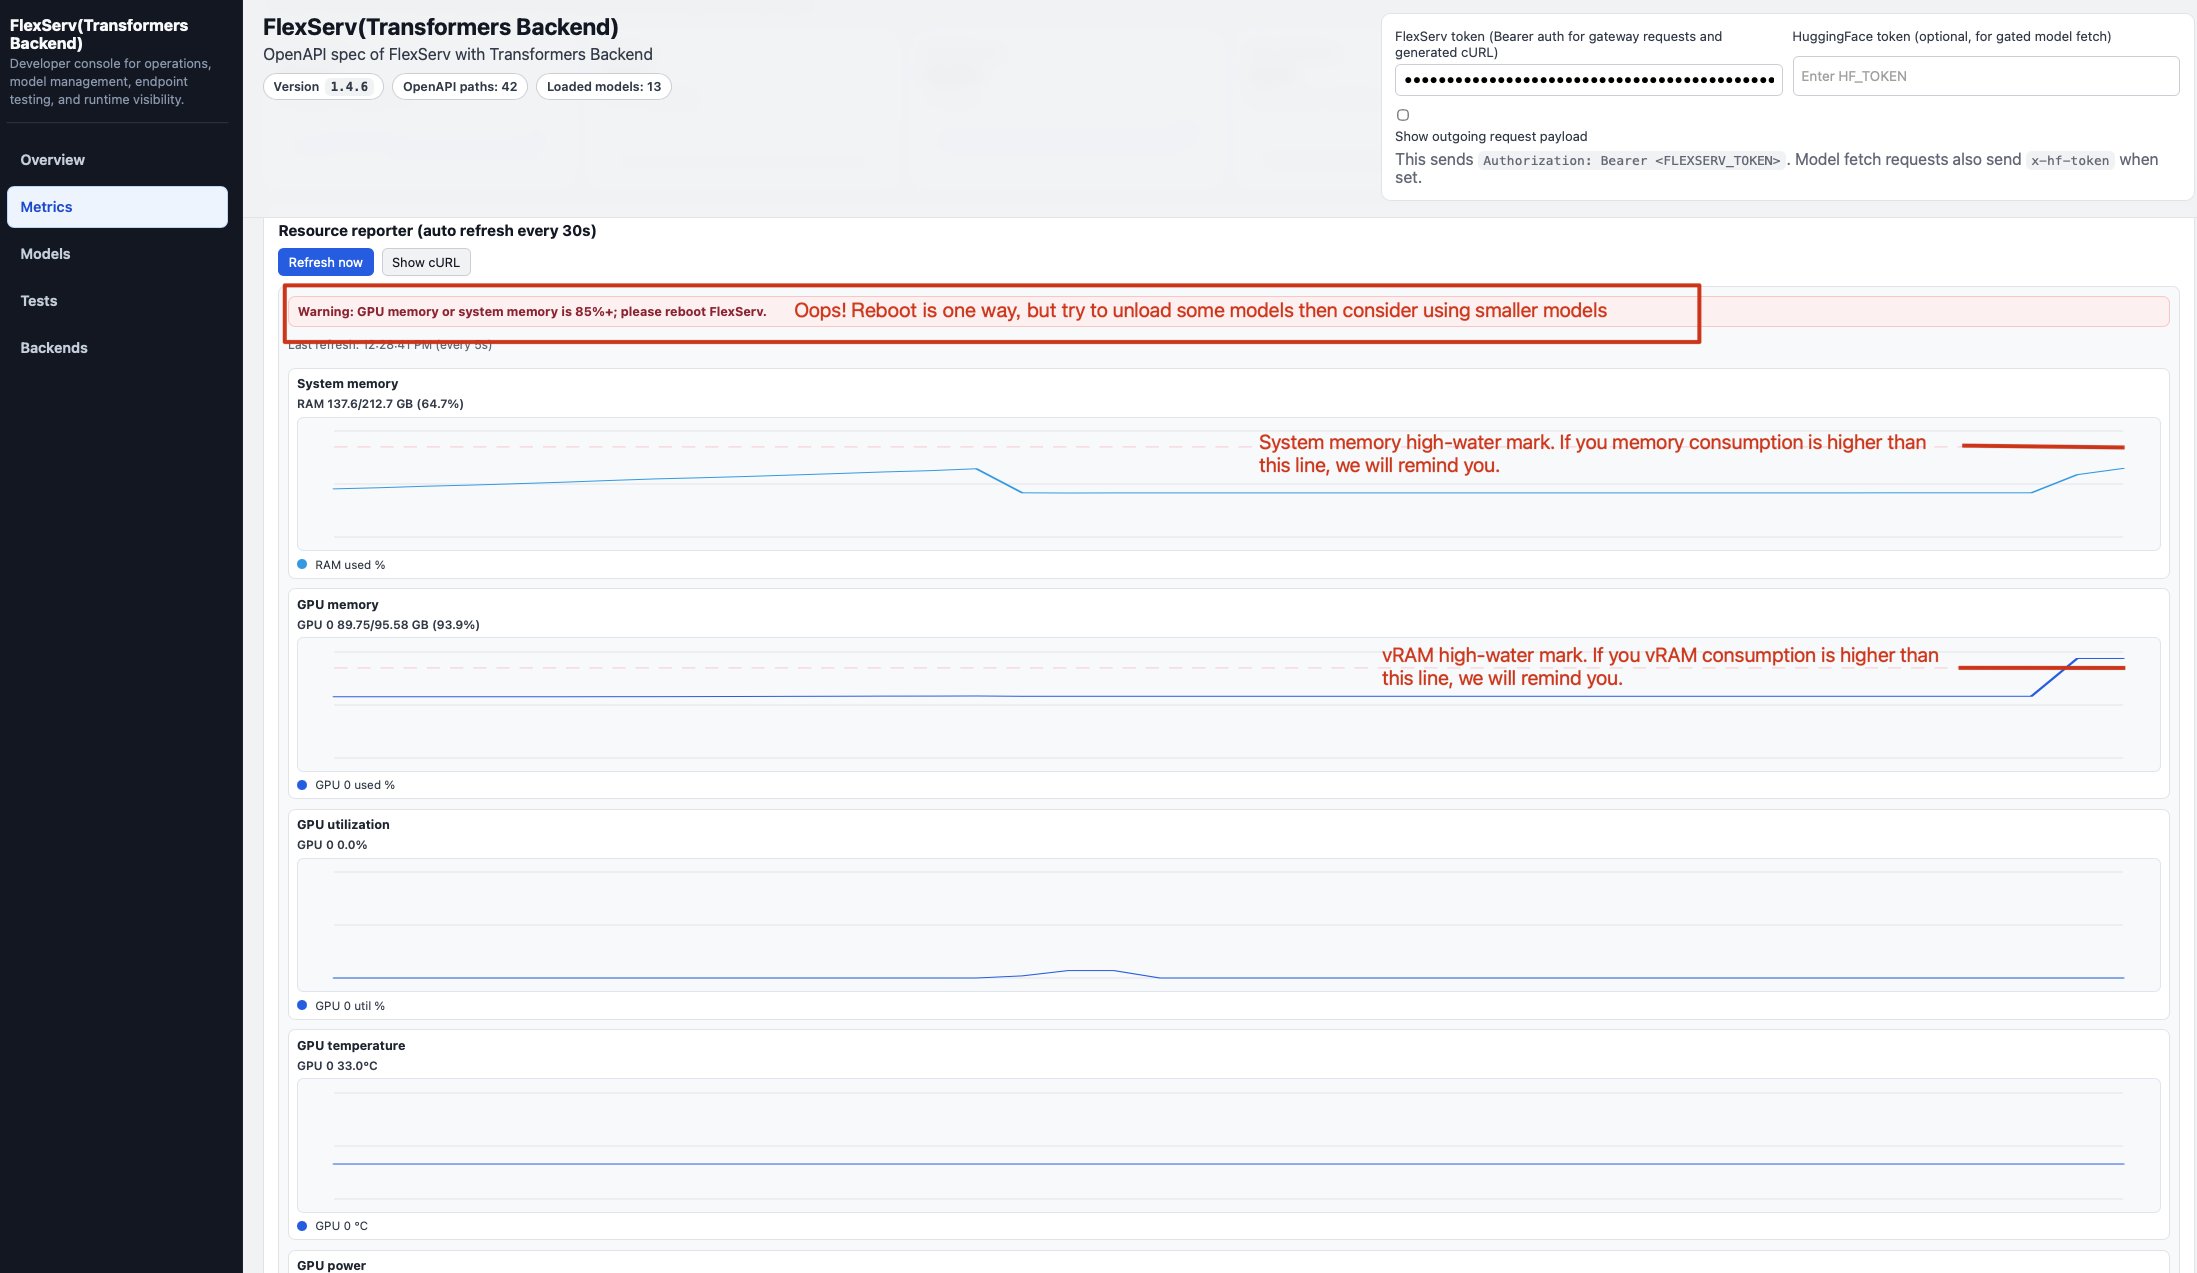
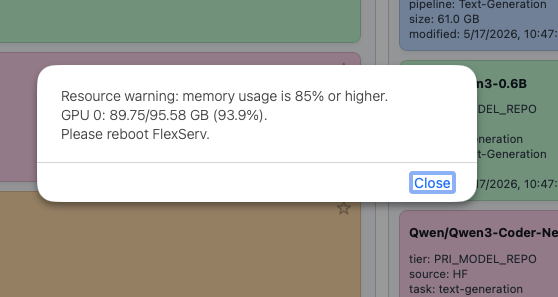
Many 30B models are very large (60GB+) and can take a significant amount of system memory and GPU memory. But this is not all. As you chat with LLM/VLM more and more, the GPU memory consumption can go up as the KVCache in the GPU increases. Please pay close attention on the System Memory and GPU Memory (vRAM), if any of them hits the high watermark, we will warn you with a message. Then it is time for you to unload all models and reload some smaller models.
Step 4.2.3 Meet FlexServ Model Manager
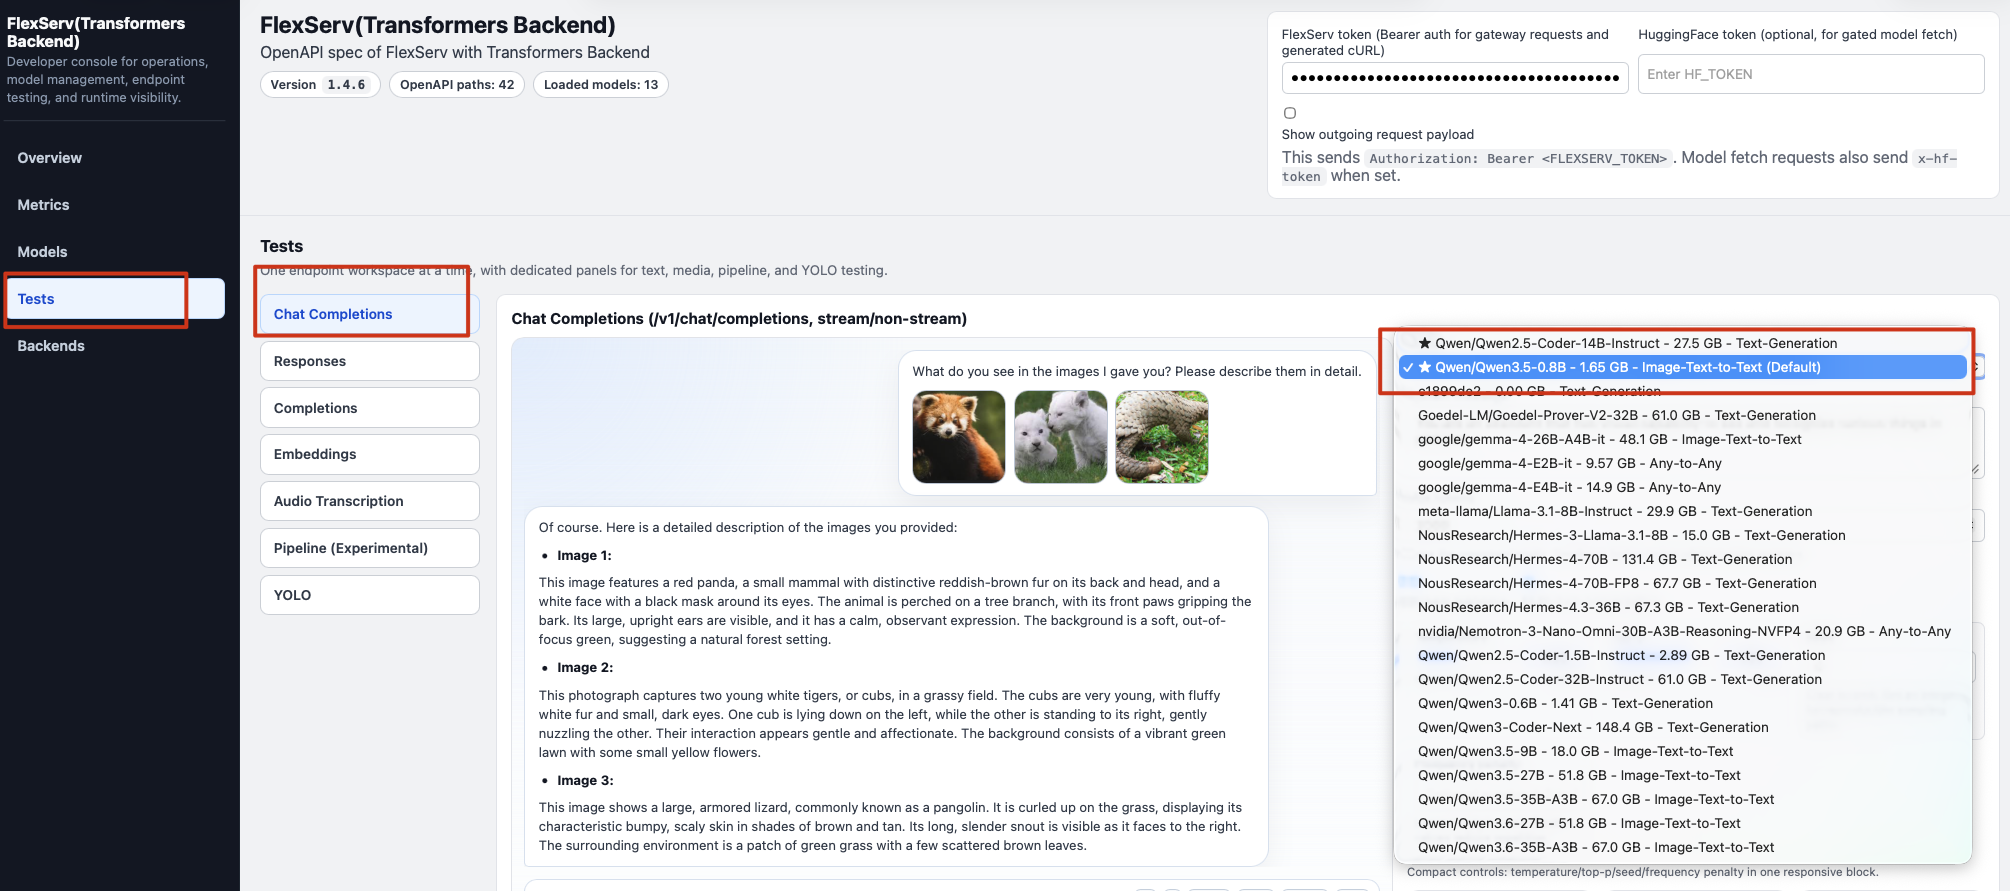
From the left side bar, click Models tab, and you will see the model manager UI of FlexServ.
The very first thing you need to do is to refresh the model pools by clicking on Refresh pools button.
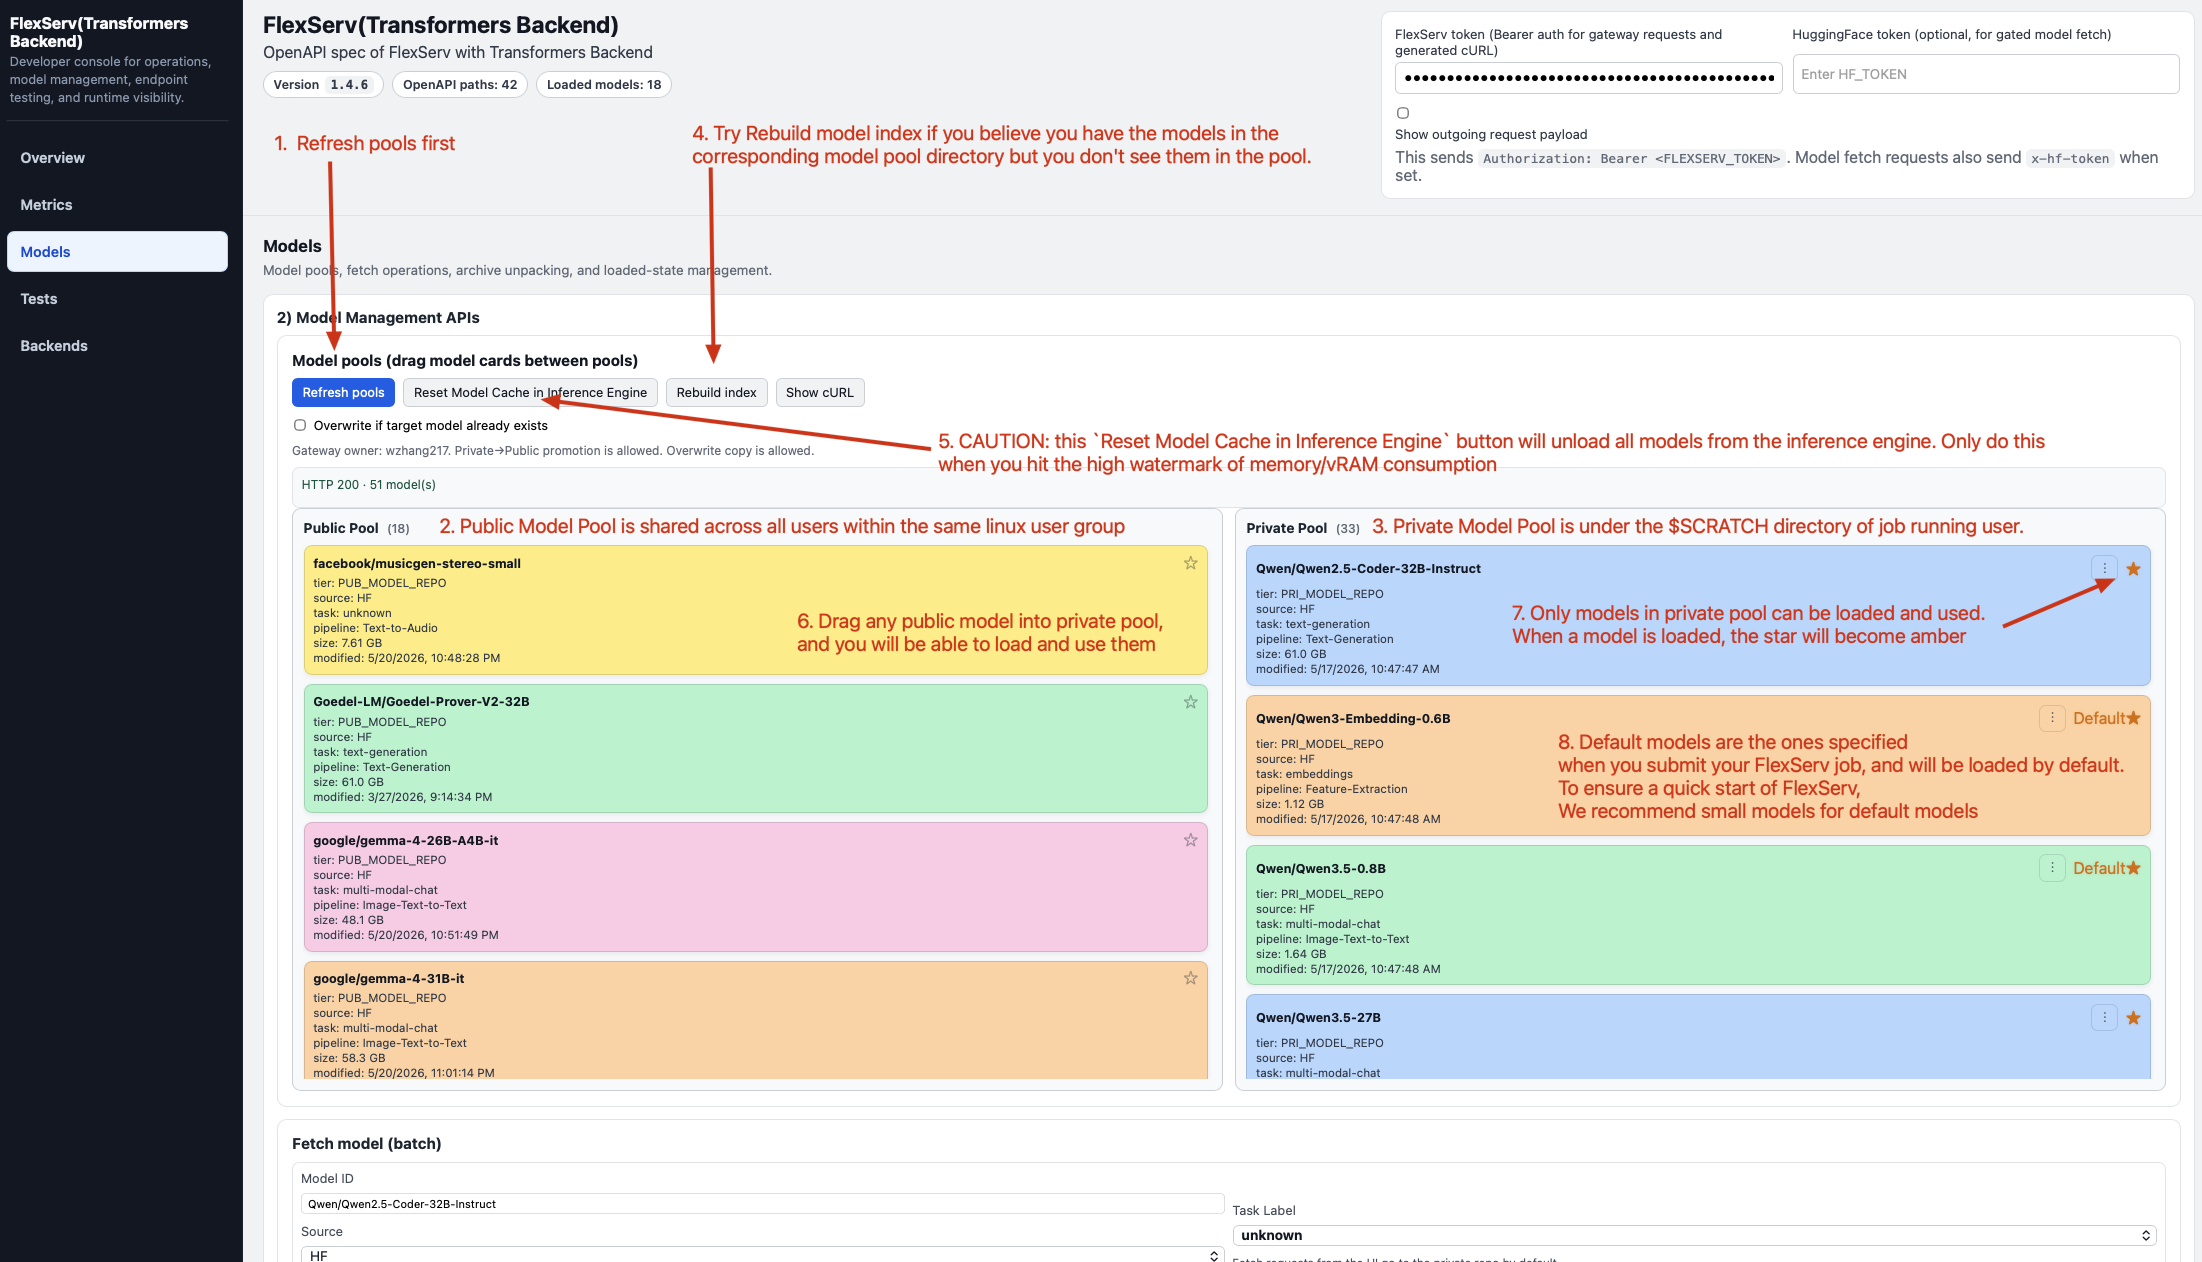
The Model Pools
In FlexServ, we have two model pools, the Public Pool and Private Pool. The public pool is mounted at a specific project directory which is shared to everyone in the same project, and the private pool is mounted to the flexserv/models directory of your $SCRATCH directory, which is pertinent to the each individual user. This means, none of the models in your private model pool is shared with other users.
Each model is shown as a model sticker in the UI, and you can view each of them as a sticky note of a model, which include some metadata regarding the model it represents (e.g. model name, source, pipeline tag, task, size in bytes). We choose the coloring of each model sticker based on its model ID.
We provide Reset Model Cache in Inference Engine button to unload all the models from the transformers backend. We also provide Rebuild Index button for you to rebuild the model index of both model pools.
Drag Models into Private Pool for Use
In order to run the tutorial properly, we need to make sure you have the following models in the private pool:
- hustvl/yolos-base
- facebook/musicgen-stereo-small
- Qwen/Qwen3.5-0.8B
- Qwen/Qwen3-0.6B
- Qwen/Qwen3-Embedding-0.6B
- openai/whisper-tiny
- suno/bark-small
- Qwen/Qwen2.5-Coder-14B-Instruct
- Qwen/Qwen2.5-Coder-32B-Instruct
- NousResearch/Hermes-4.3-36B
If you don’t see any of these models in your private model pool, you can find them in the public model pool and drag them into your private pool. This will copy the model you drag from the public pool to your private pool. Note that we can only drag one model at a time. When model transferring is in progress, you cannot drag another model until the current transferring process is finished.
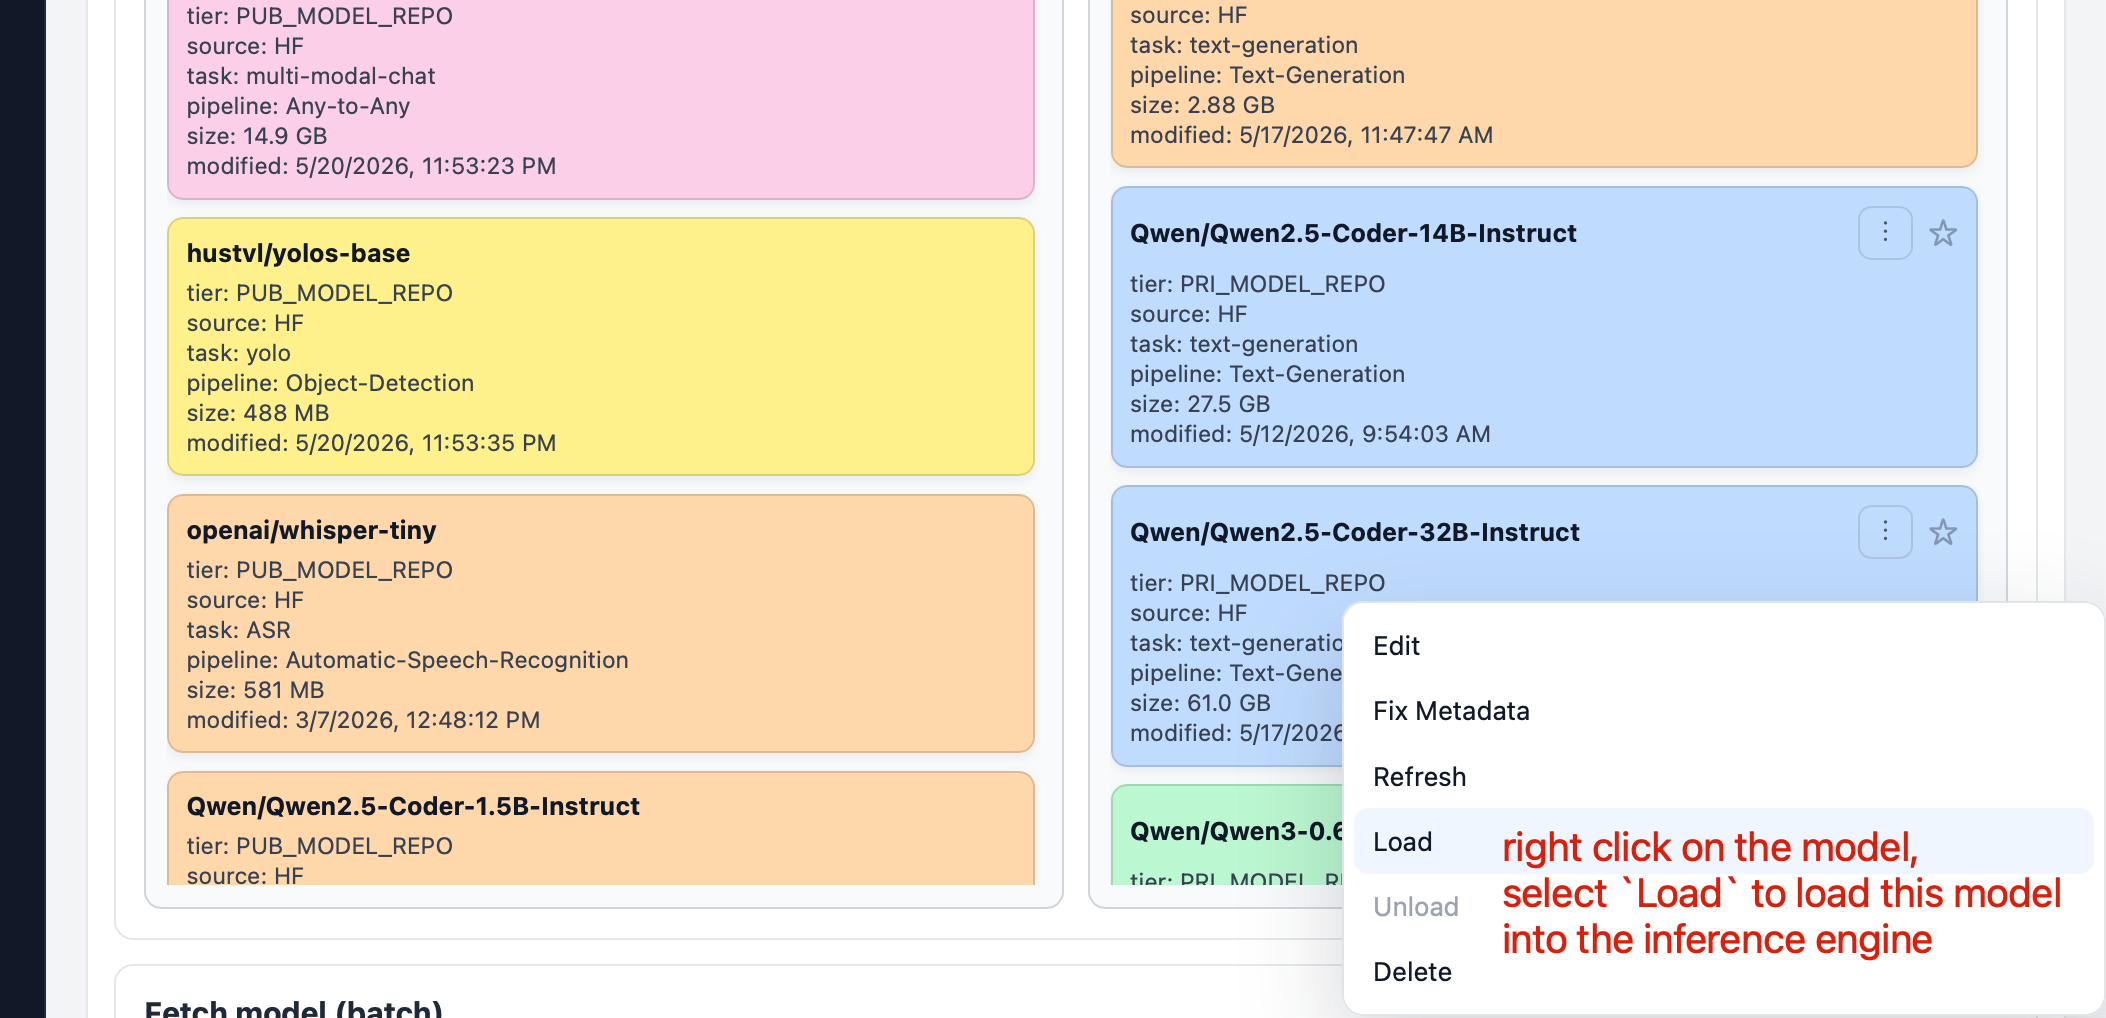
Also, please wait until the model is fully transferred to your private pool. Once the model is transferred, you can right click on the model and select Load to load the model into the transformers inference backend.
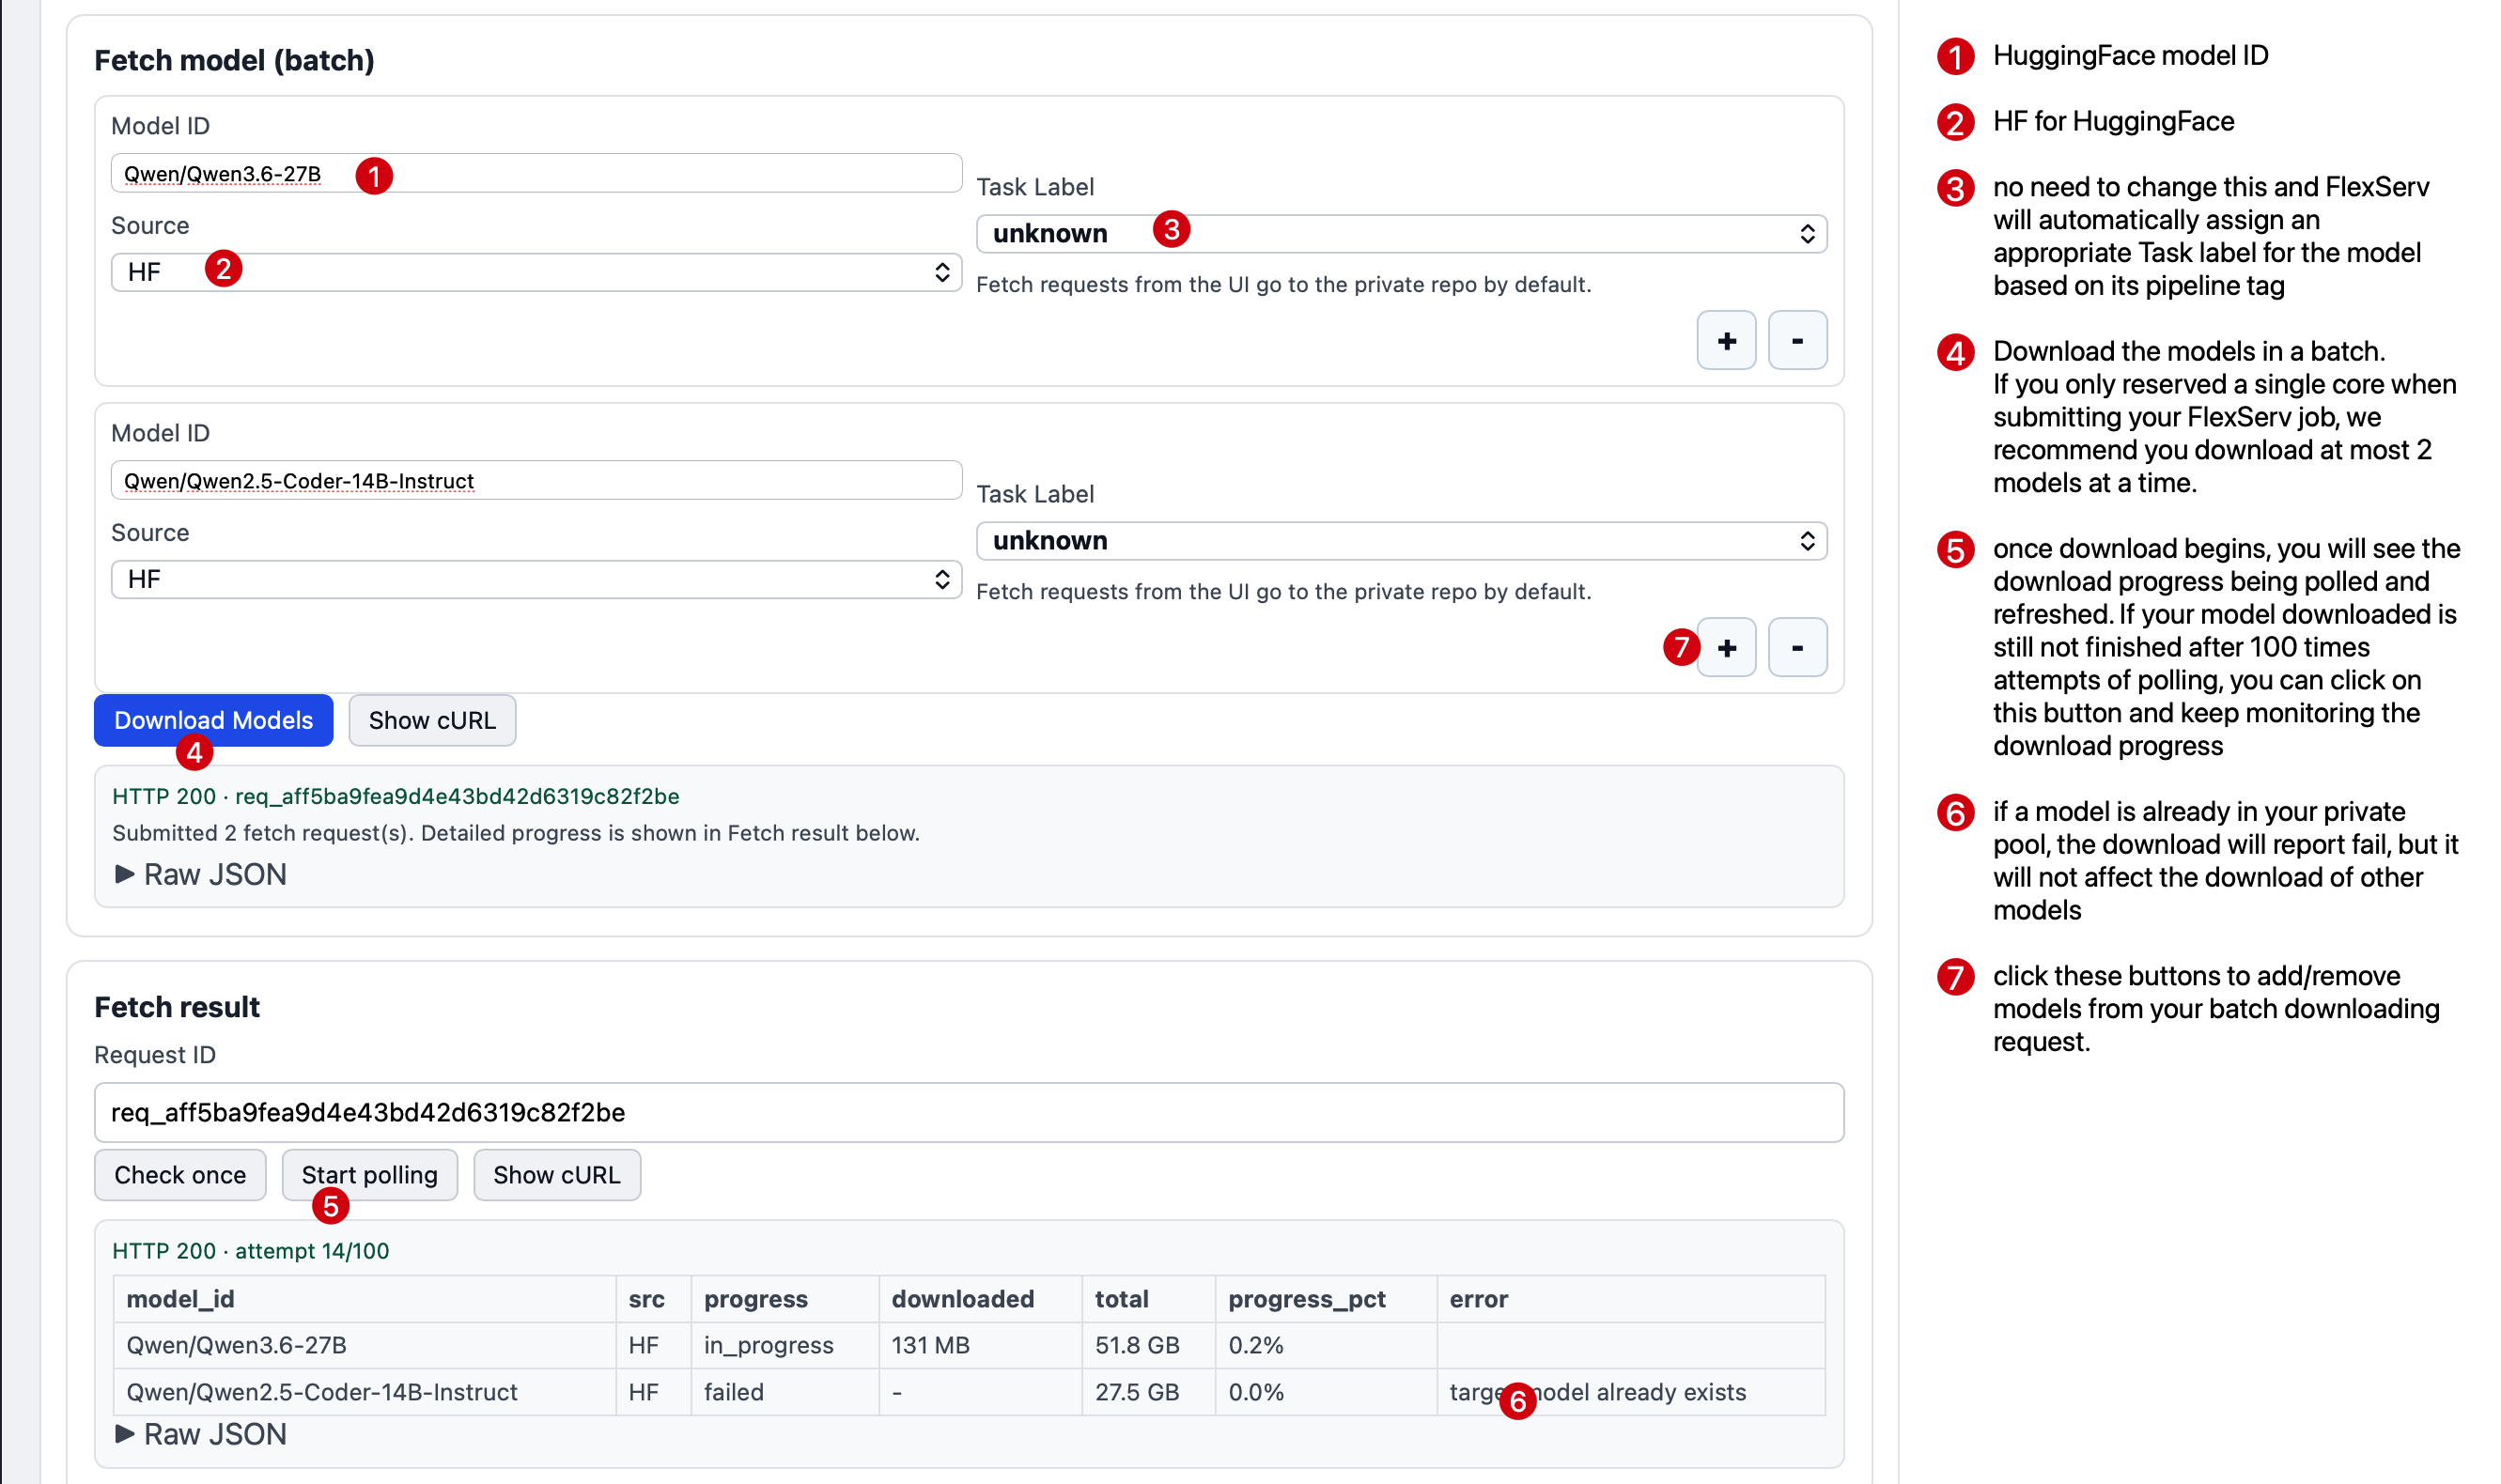
Download a Model
Now, go to the Fetch model section. We support batch model download from 3 different sources, including HuggingFace (HF), HTTP/HTTPS, and TAPIS Files. As long as the source provide a HuggingFace-compatible model artifact, we will be able to support that after the model is downloaded.
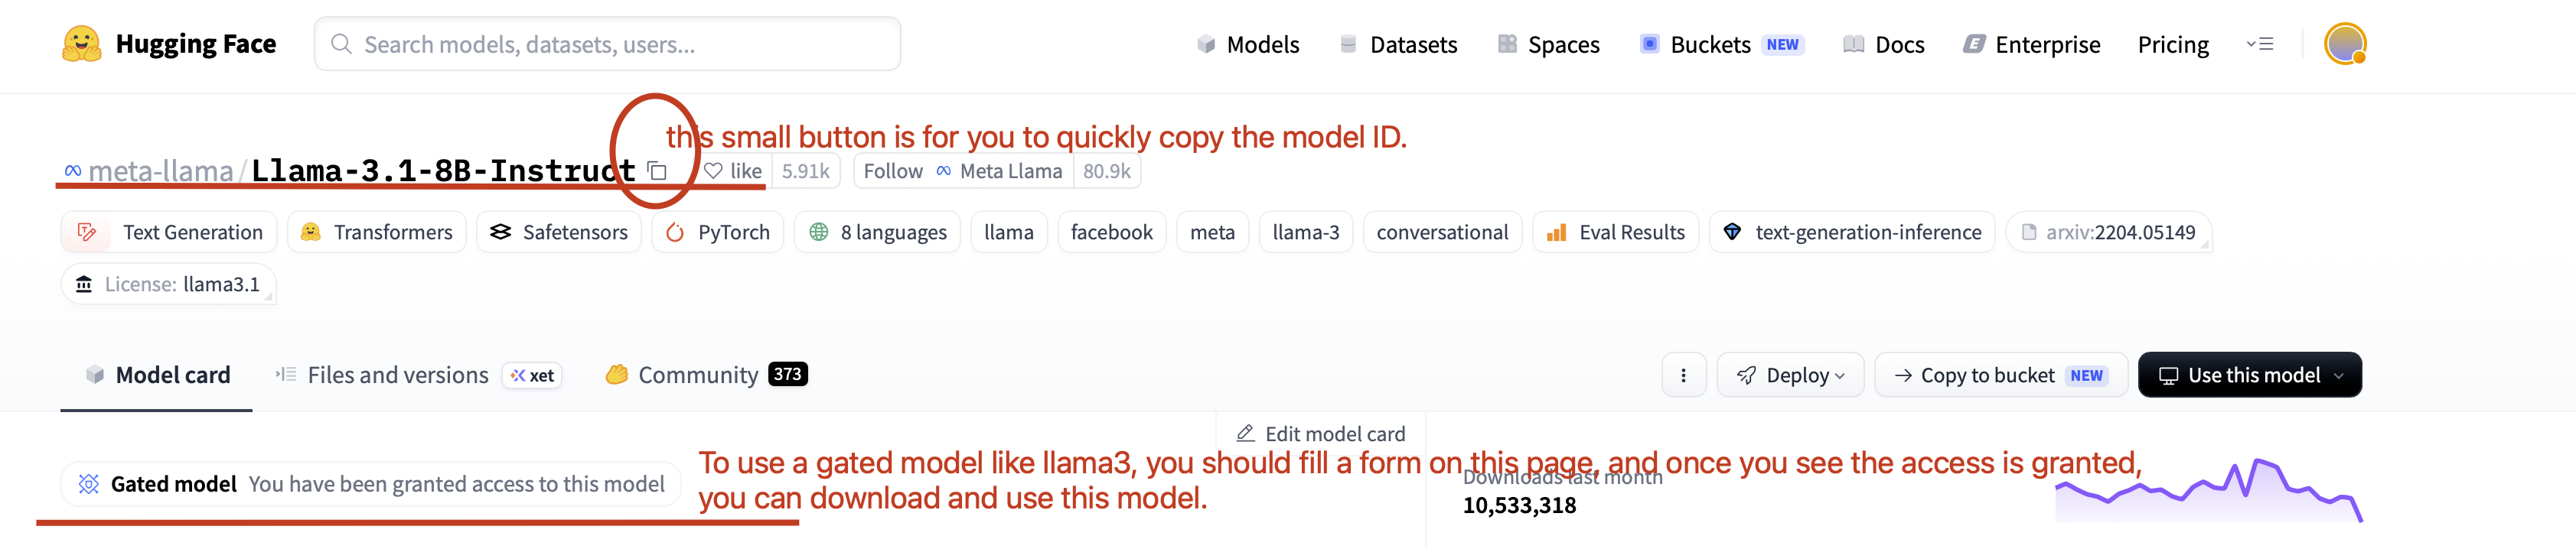
The most common way to use a model is to find and download a model from HuggingFace. Go to https://huggingface.co and click on Models on the navigation bar which is on top of the page. Then in the input box beside Models, enter llama and you should be able to see a list of models being filtered out, where you can find the Llama-3.1-8B-Instruct model.

Click on that model, and you will get into the model info page. Models like Llama3 is a gated model since its publisher only allow you to use it with your signature. Therefore, if you never asked for access, you will be asked for filling a form to apply for the access. Usually you will get access within a limited amount of time. Once access is granted, you will see a prompt indicating that you have been granted for the access of this model.
Click on the small icon beside the model ID, you will be able to copy the model ID.
If you don’t want to use a gated model, you can pick some other open-weight models, like Qwen/Qwen3.6-27B.
In the Fetch Model section of the model manager UI, you can paste the model ID into the Model ID box, and keep other boxes as default. If you want to download more than 1 model at a single shot, you can click on the + sign to add one more request for an additional model.
Click on Download Models, and the download will begin and you will see the model fetching progress.
In addition to downloading a model from the public pool, you can also drag a model from the public pool into your private model pool. This is the easiest way to use a model tested and approved by your organization.
Unpacking Your Own Model to FlexServ
We also support unpack archived models (e.g. tar.gz, zip) directly to the model repository of FlexServ, and this unpack button will unpack the archive for you. However, for self-owned models, we require you to build a model index file to be included in the archive. This is an advanced feature, and we will not cover the details but we will provide a guidance later on our website.

Load Your Model For Inference
Once you have a model in your private model pool, you can right click on it, and select Load menu item, so you can load the model into the transformers inference backend of FlexServ.
 Once the model loading starts, you will see a progress bar.
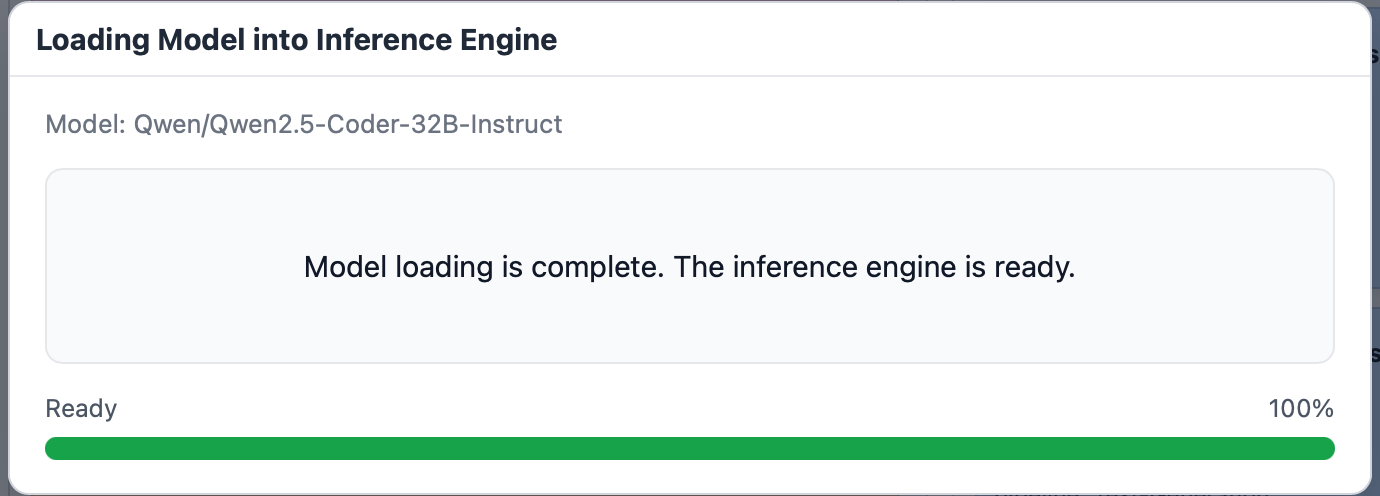 When loading finishes, you should see the start becomes amber indicating that it is loaded now.

Note: If you encounter any issue when loading the model, you can try the following depending on the situation:
- if you see error message indicating that some files are missing (No such file or directory), that means some of the model files are not downloaded successfully or have been deleted by accident or periodical data retention on $SCRATCH directory. In this case, you can simply right click the model and select Delete in the menu re-transfer it from the public pool or re-download one using the model fetching functionality.
- if you see error message indicating that the model loading fails due to out of memory issue, you can try to load a smaller model, or you can try to unload all models and load the model again. You can also check the metrics page to see if your GPU memory or system memory is hitting the high watermark. If so, unloading some models or all models should help with that.
- if you see error message indicating that the model loading fails due to some unexpected error, you can try to refresh the webpage and load the model again.
Step 4.2.4: Multi-model Chat with FlexServ
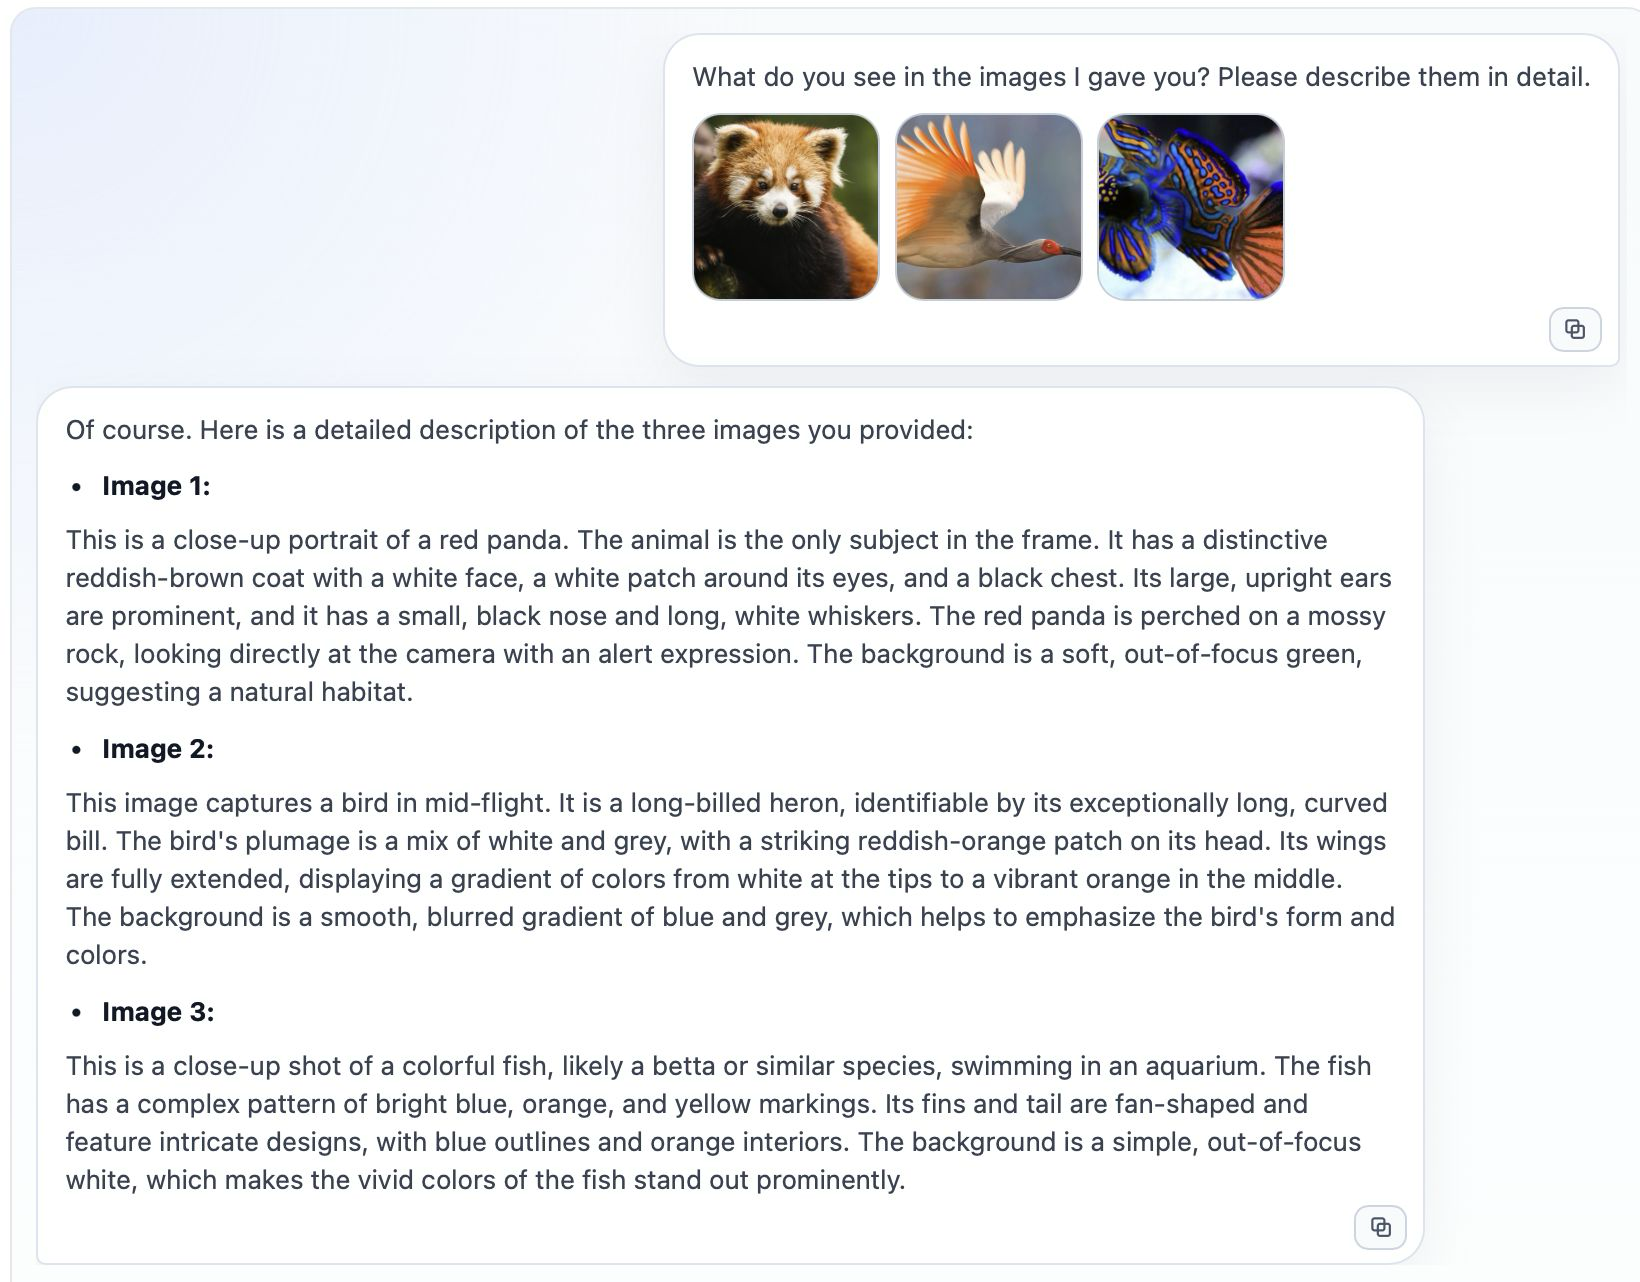
Congratulations! Now you are ready to chat! Click Tests tab and you will get to the FlexServ API playground.
The Chat Completions feature in FlexServ UI is based on the use of /v1/chat/completions API in FlexServ, which is an OpenAI-compatible API widely used in most of the agentic software today. Our UI feature allows you to have a conversation with the model while also sending images as part of the conversation. This is particularly useful for scenarios where you want to ask questions about images or have a discussion that involves visual context. You can upload an image, and the model will be able to see the image and provide responses based on both the text and the visual information. Note that you have to select Image-text-to-text models for multi-modal chat. But you can also use the Text-to-text models for plain-text based chat or conversation, such as code generation or question answering without sending any images.
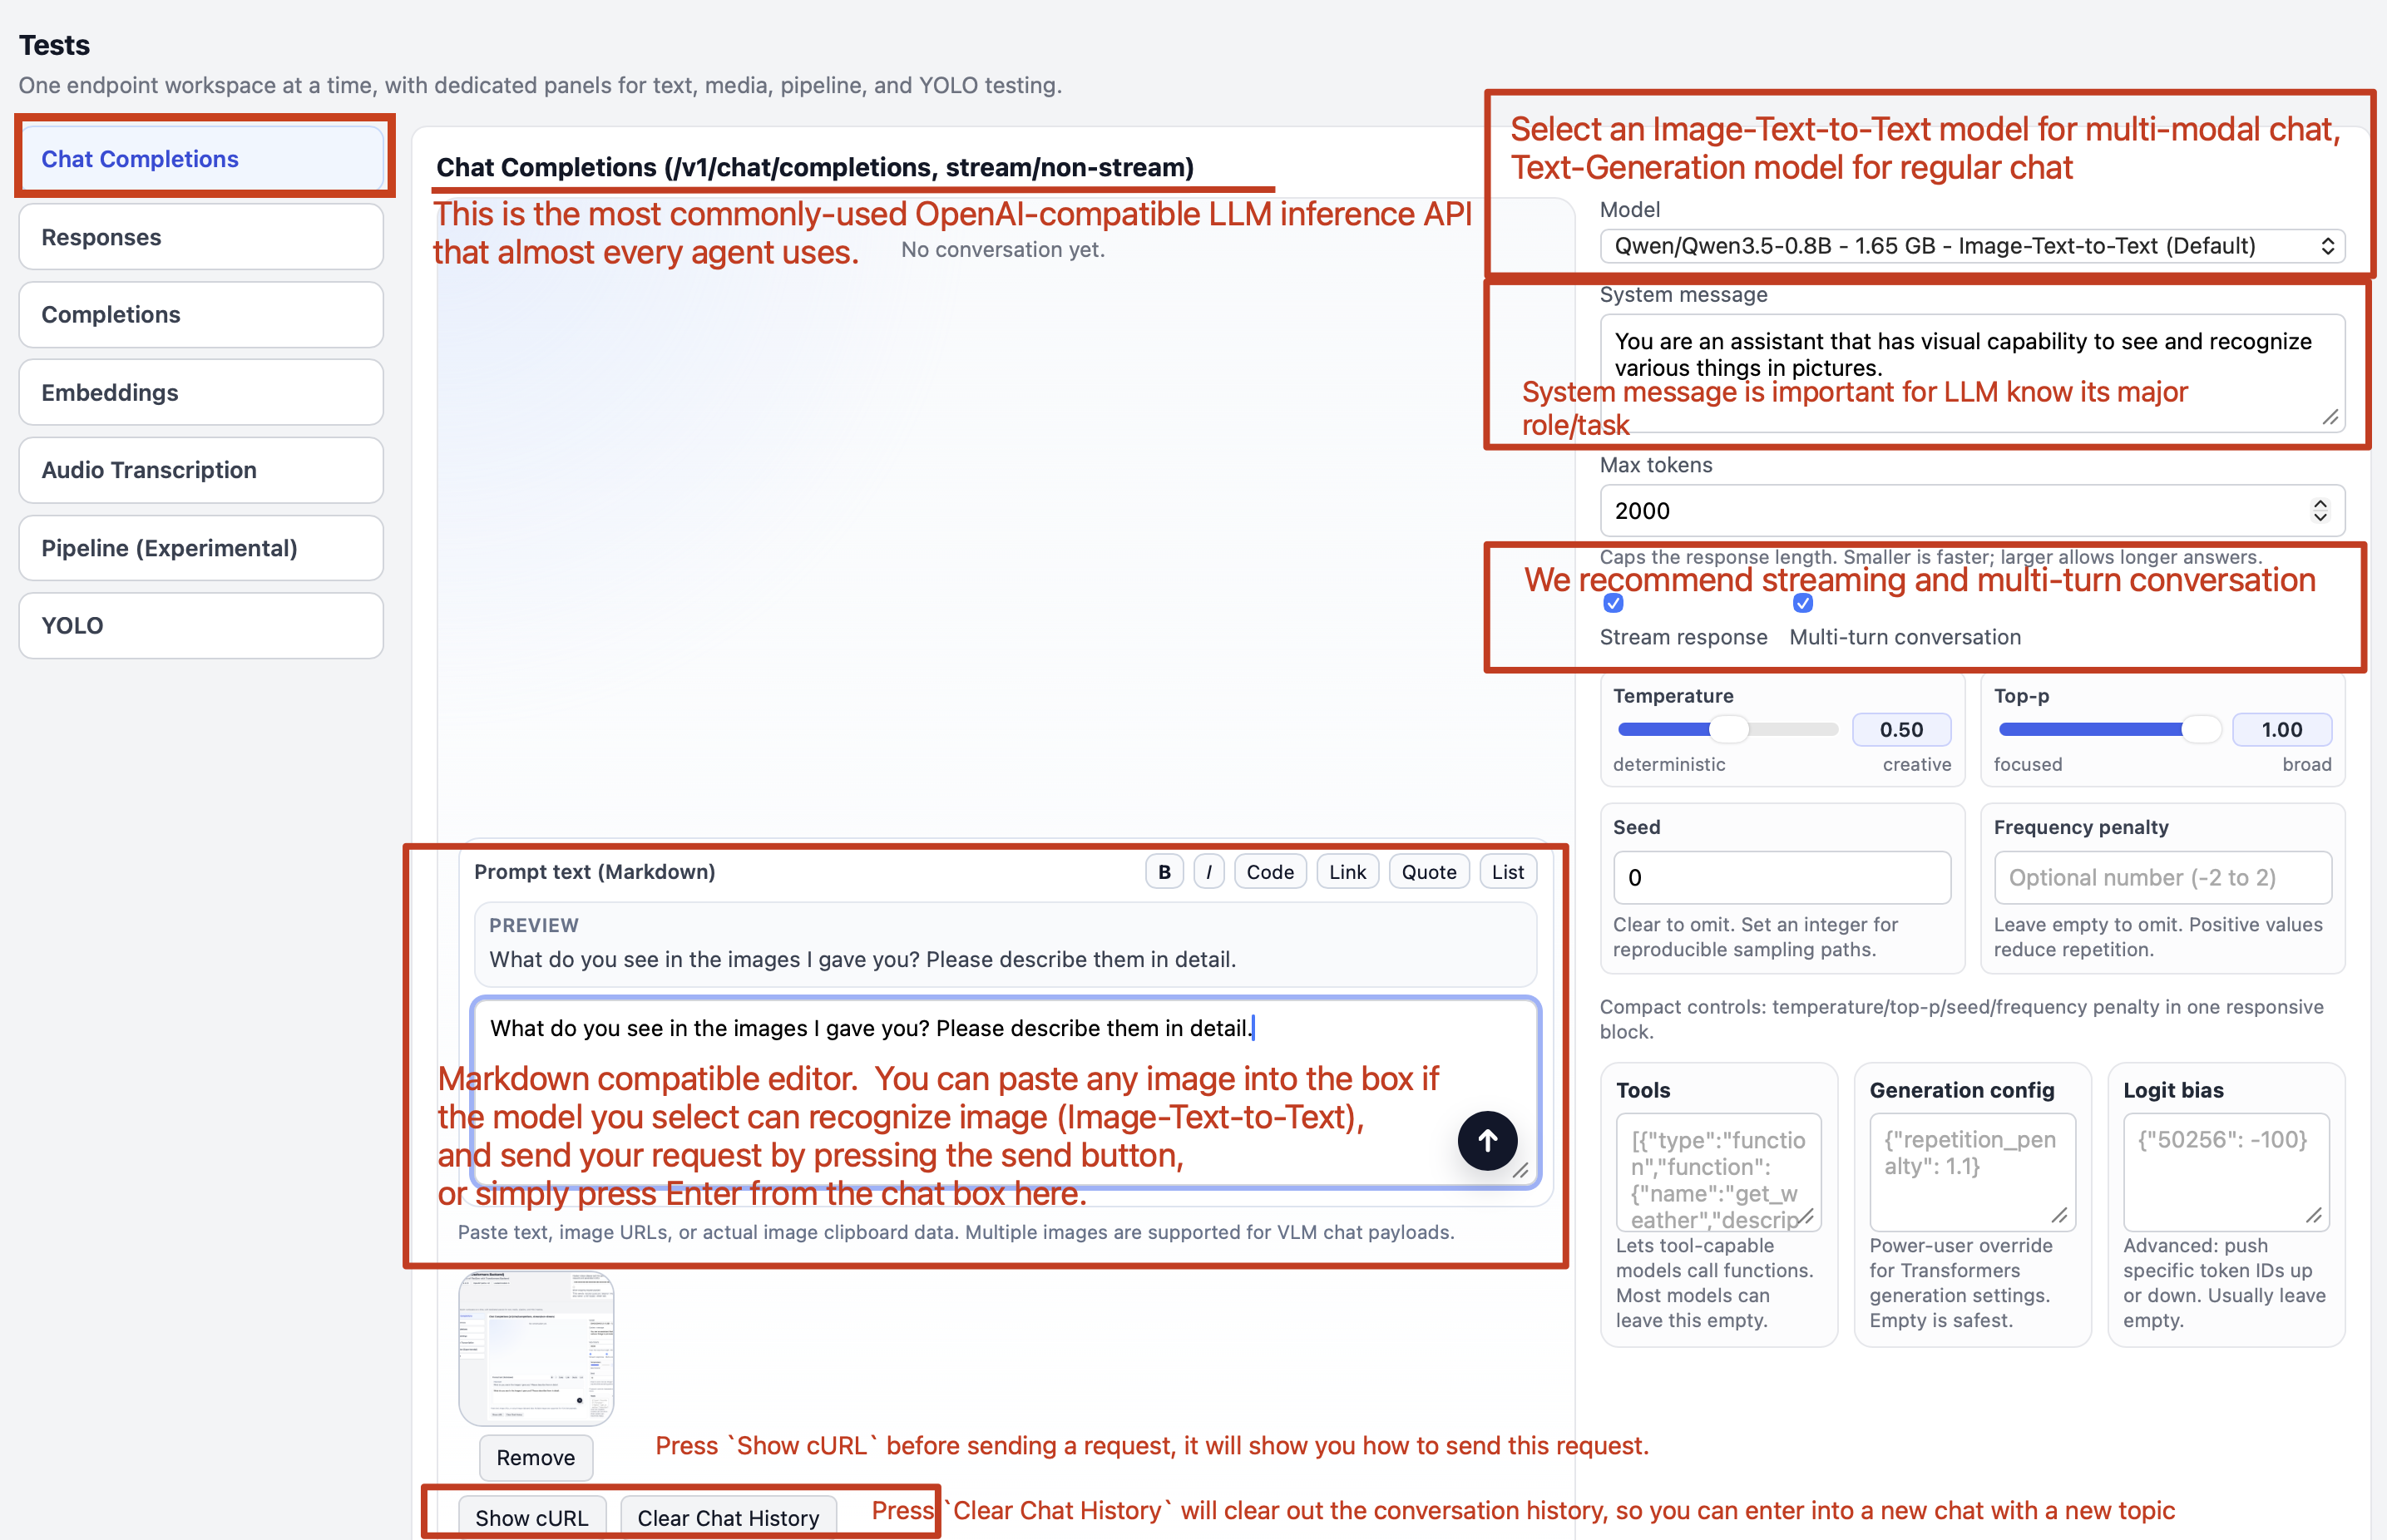
For sending images in the chat, you can click in our Markdown editor, and simply paste either the URI or a screenshot from your clipboard, and the image will be shown around the editor.
You can simply choose a Image-text-to-text model like Qwen/Qwen3.5-0.8B and throw a screenshot of the FlexServ UI, and see what this model can say about our FlexServ UI.
Press the big round send button you will start chatting with your selected model. Also, if you don’t want FlexServ UI to memorize your conversation history, you can uncheck the multi-turn conversation checkbox, and the UI will not memorize your chat history in your local storage that your browser provides. But the chat conversation history is totally local to your browser and hence is with decent privacy, and we DO NOT collect any of your data. So feel free and safe to use the multi-turn conversation feature. We provide button to clear the conversation history and you can also clear your web-browser data to clear everything.
Also note that we provide intuitive UI controls for your to easily tune some of the most important parameters for your chat, such as temperature, top_p, seed, and max_tokens. You can adjust those parameters to see how the model response changes accordingly.
If everything goes well, you should be able to see the response from the model in the chat window, and the model should be able to understand the image you sent and provide a relevant response based on both the text and the image. You can continue the conversation by sending more text or images, and the model will keep track of the context to provide coherent responses.
Step 4.2.5: Text Generation with Responses API in FlexServ
This feature is based on the use of /v1/responses API in FlexServ, which is another less popular OpenAI-compatible API endpoint for generating responses from the model. Again, our UI provide your a markdown editor to input your prompt, and you can perform the text generation by clicking the big round send button. You can also adjust the parameters such as temperature, top_p, seed, and max_output_tokens to see how the model response changes accordingly. The generated response will be shown in the response window, and you can continue to have a conversation with the model by sending more prompts.
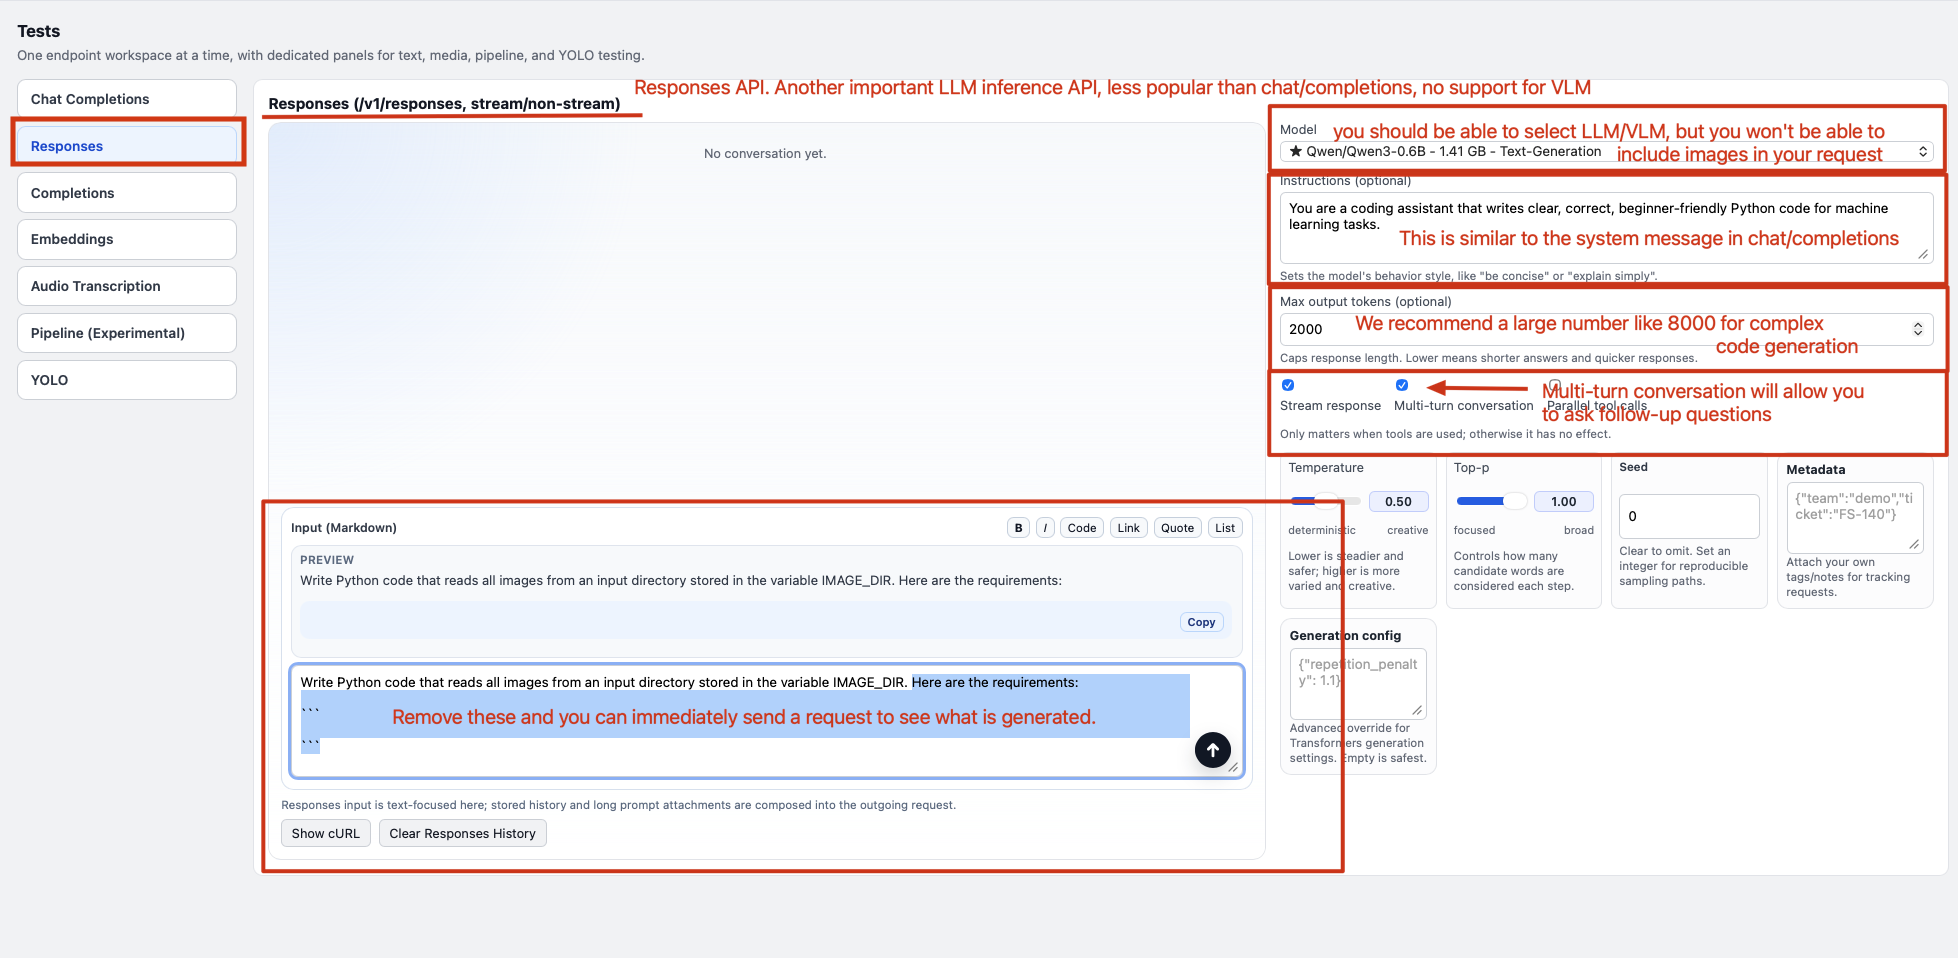
Note that we currently only support text-based generation with the /v1/responses API, and the multi-modal chat feature is only available in the /v1/chat/completions API, so if you want to have multi-modal conversation with images, you will need to use the chat interface instead of the response interface. But this response interface will be playing a critical role for another of our demo in the afternoon, which is to use FlexServ for code generation and get a real image recognition program generated for you to run on Vista, so stay tuned for that!!
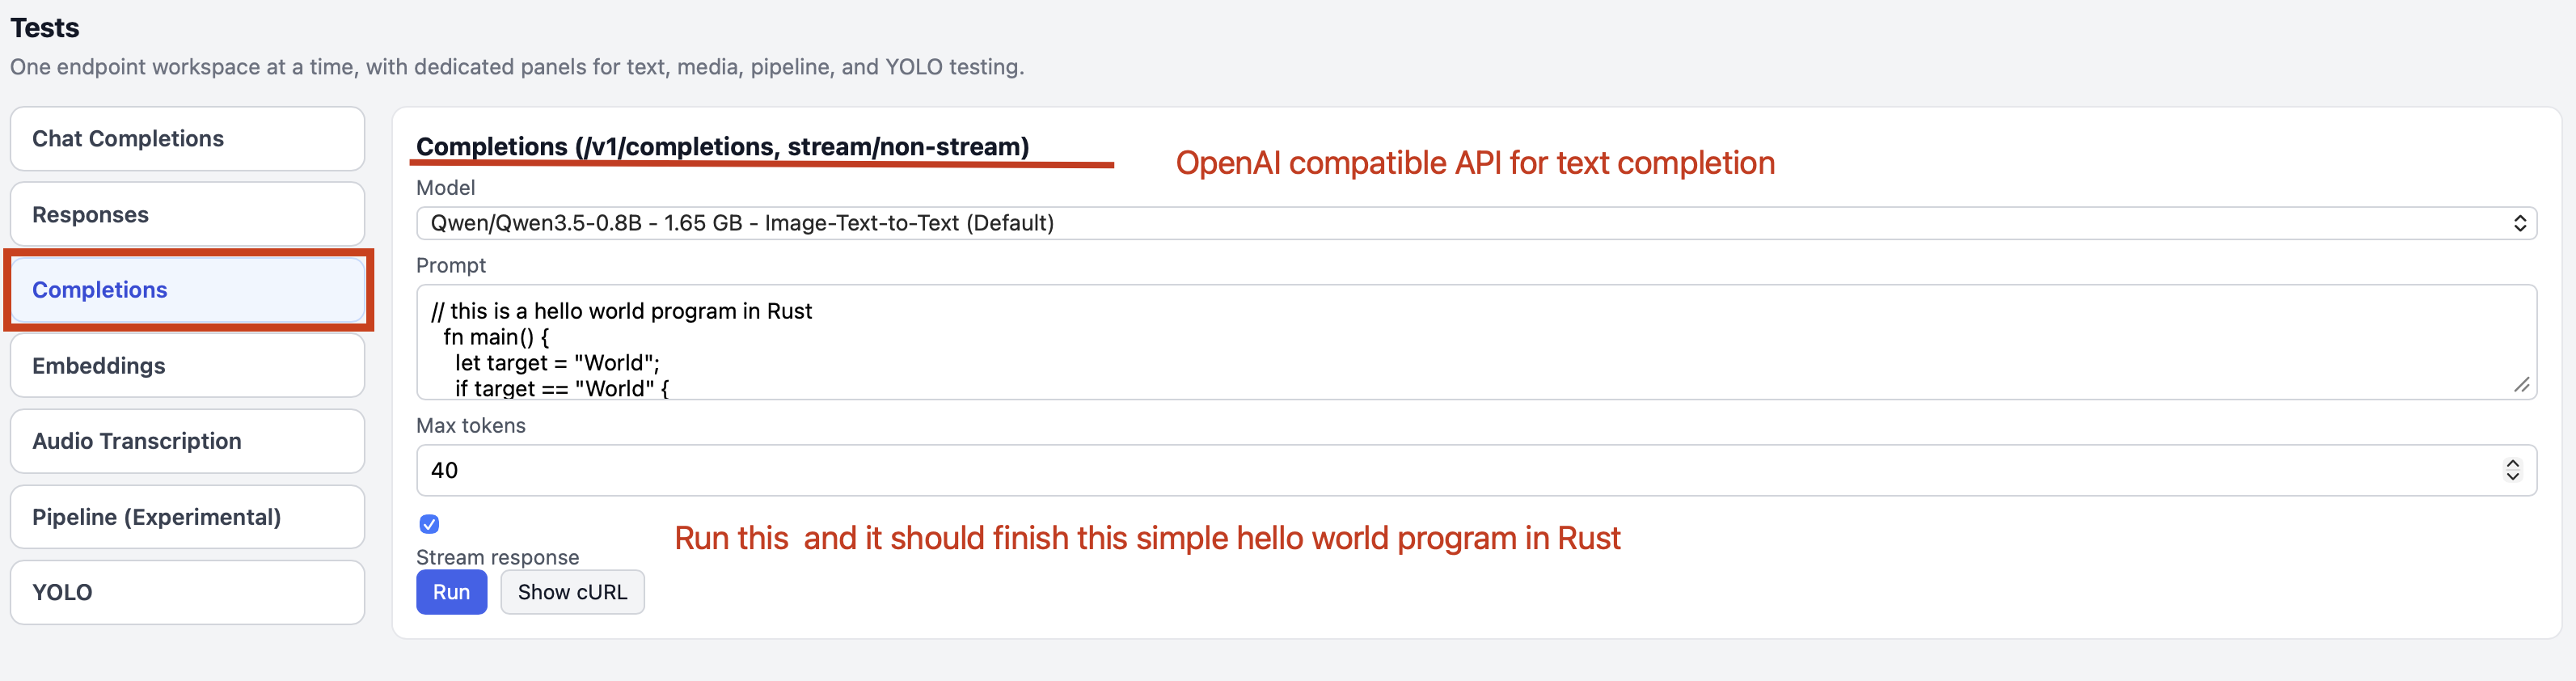
Step 4.2.6: Text Completion with Completions API in FlexServ
Text completion is another important feature in FlexServ, and it is based on the use of /v1/completions API in FlexServ. This is a much simpler feature right now but if you have any unfinished thoughts or sentences, you can use this feature to let the model help you complete the text. You can input your incomplete text in the editor, click Run button, and the model will generate the completed text for you.
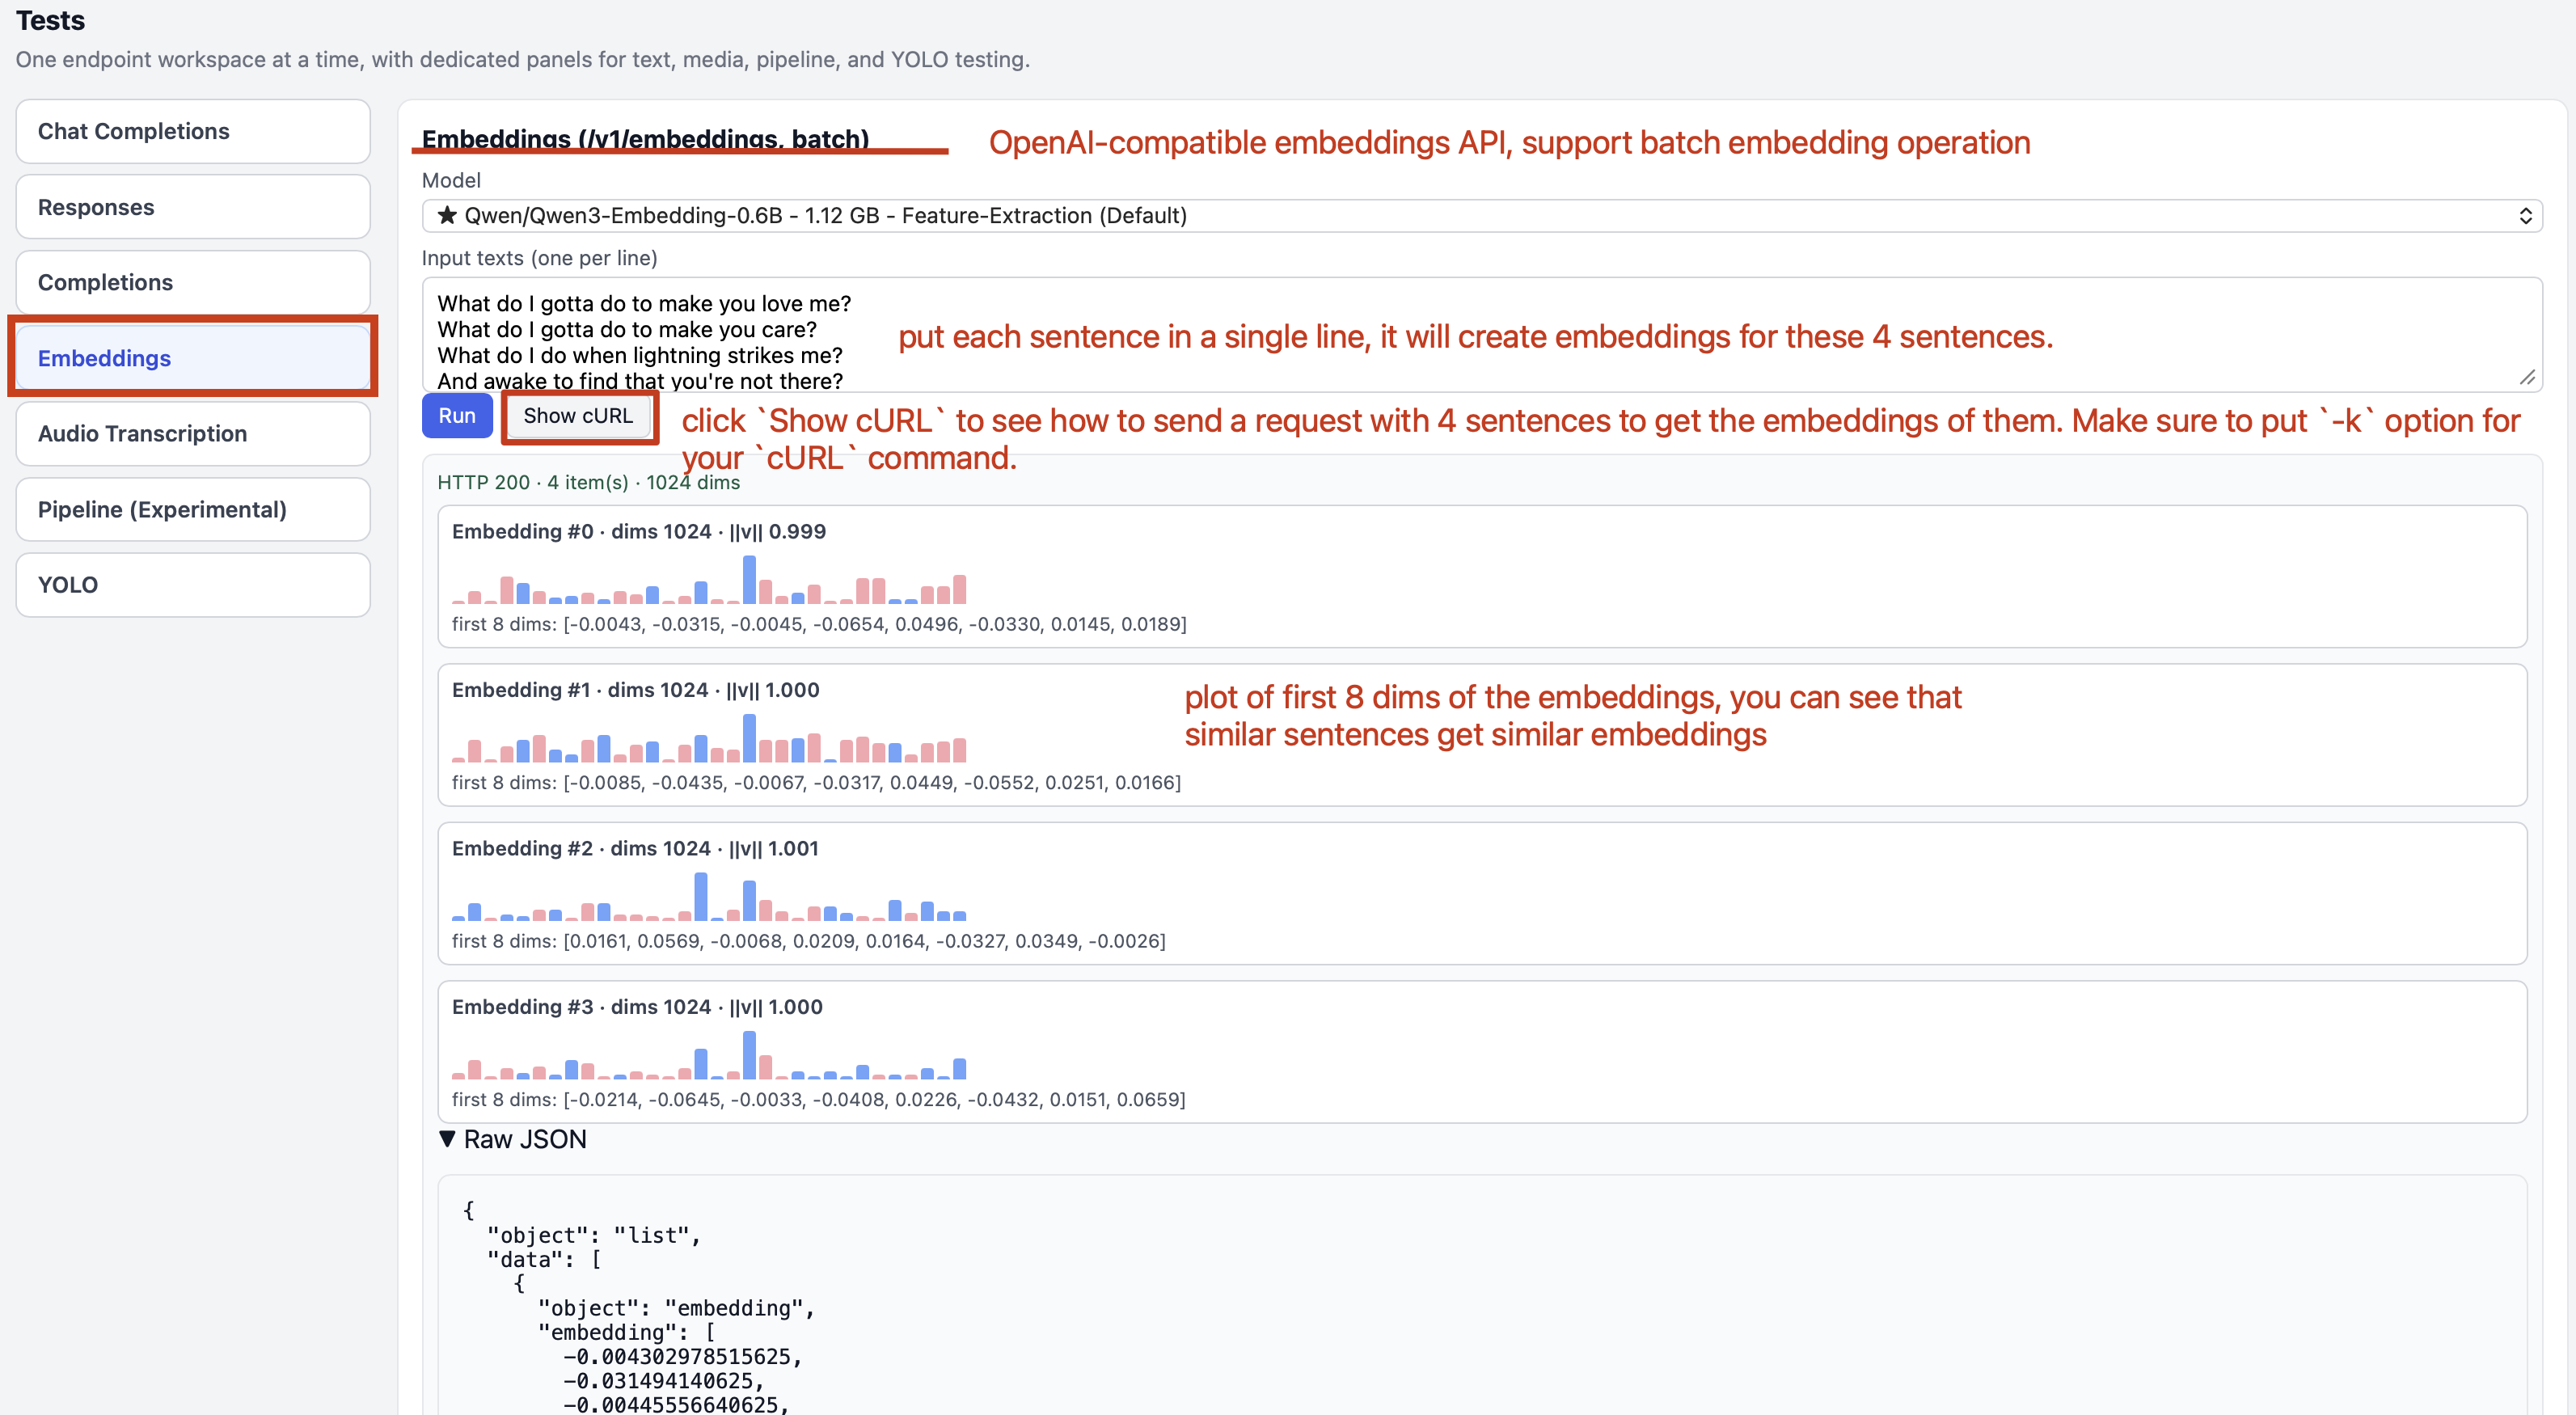
Step 4.2.7: Generating Embeddings with FlexServ
Embedding generation is essential for many AI applications, such as semantic search, clustering, and recommendation systems. With FlexServ, you can easily generate embeddings for your text data using the /v1/embeddings API. On FlexServ UI, you can put the sentences you wish to generate embeddings for, one on each line. By clicking Run, you will get the embeddings by clicking on Raw JSON and you can visually view the embeddings with our embedding visualization on the page.
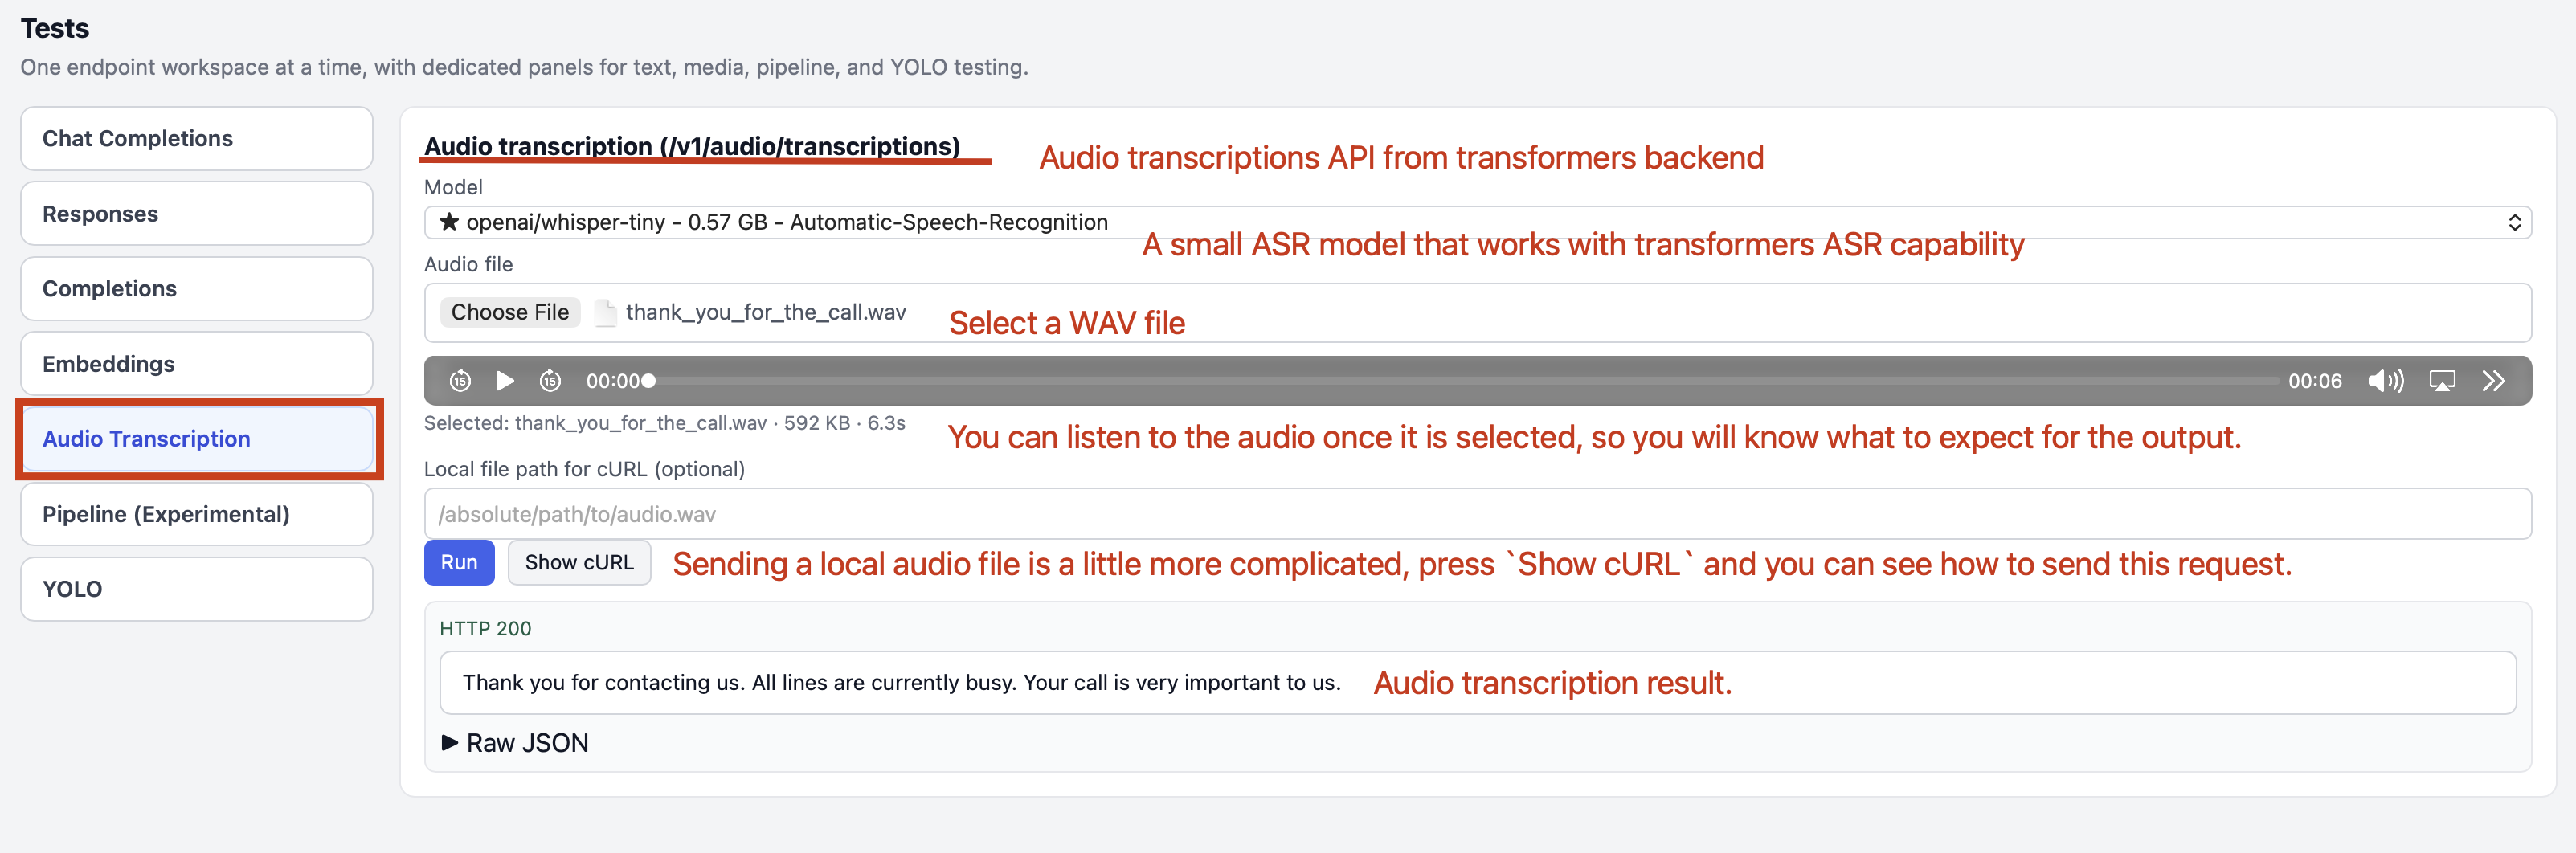
Step 4.2.8: Audio Transcription with FlexServ
Audio transcription is yet another exciting feature in FlexServ, which allows you to transcribe your audio files into text using the power of ASR models. With FlexServ, you can easily upload your audio files and get the transcriptions in a matter of seconds. This is particularly useful for scenarios such as meeting transcription, podcast transcription, and any other situation where you have audio data that you want to convert into text for easier analysis and reference. You can simply upload your audio file in the UI, click Run, and you will get the transcription result in the response window. You can also play your audio file in the UI to confirm that the transcription result matches with your audio content.
Step 4.2.9: Getting cURL Command for the same request in FlexServ UI
Across different sections on the UI, you shall see Show cURL button, which will show you the cURL command for the request you are making on the UI. This is particularly useful for users who want to use their own custom scripts to interact with FlexServ server, and they can simply copy the cURL command and modify it in their scripts to send requests to the FlexServ server without having to go through the UI. This also makes it easier for users to integrate FlexServ into their existing workflows and applications by providing them with a straightforward way to interact with the server programmatically. If you encounter any SSL verification issue with cURL command, just put -k option to disable that verification.

Step 4.2.10: Yolo Inference API
CV models like Ultralytics yolo models are widely used for object detection use cases. Traditionally, users can call the Python API to run these models in their pipeline. But now, with FlexServ, you can use this model via our RESTful Yolo inference API. This is particularly useful if you want to create an app or an agentic system that needs to call this Yolo inference but don’t necessarily have to install related packages in your software distribution.
You can click on Refresh YOLO models button and you will see a list of available yolo models. From the model dropdown list, you can see a list of models related to the corresponding tasks, including Object Detection, Segmentation, Pose Extraction, Oriented Boxes, Classification.
Want to see how yolo model works with the following sample image?

For example, in Object Detection task, you select yolo26n model, and you can save the above sample image to you local disk. Then you select the downloaded image and then click on Run Image Inference button, you should be able to see the inference result.
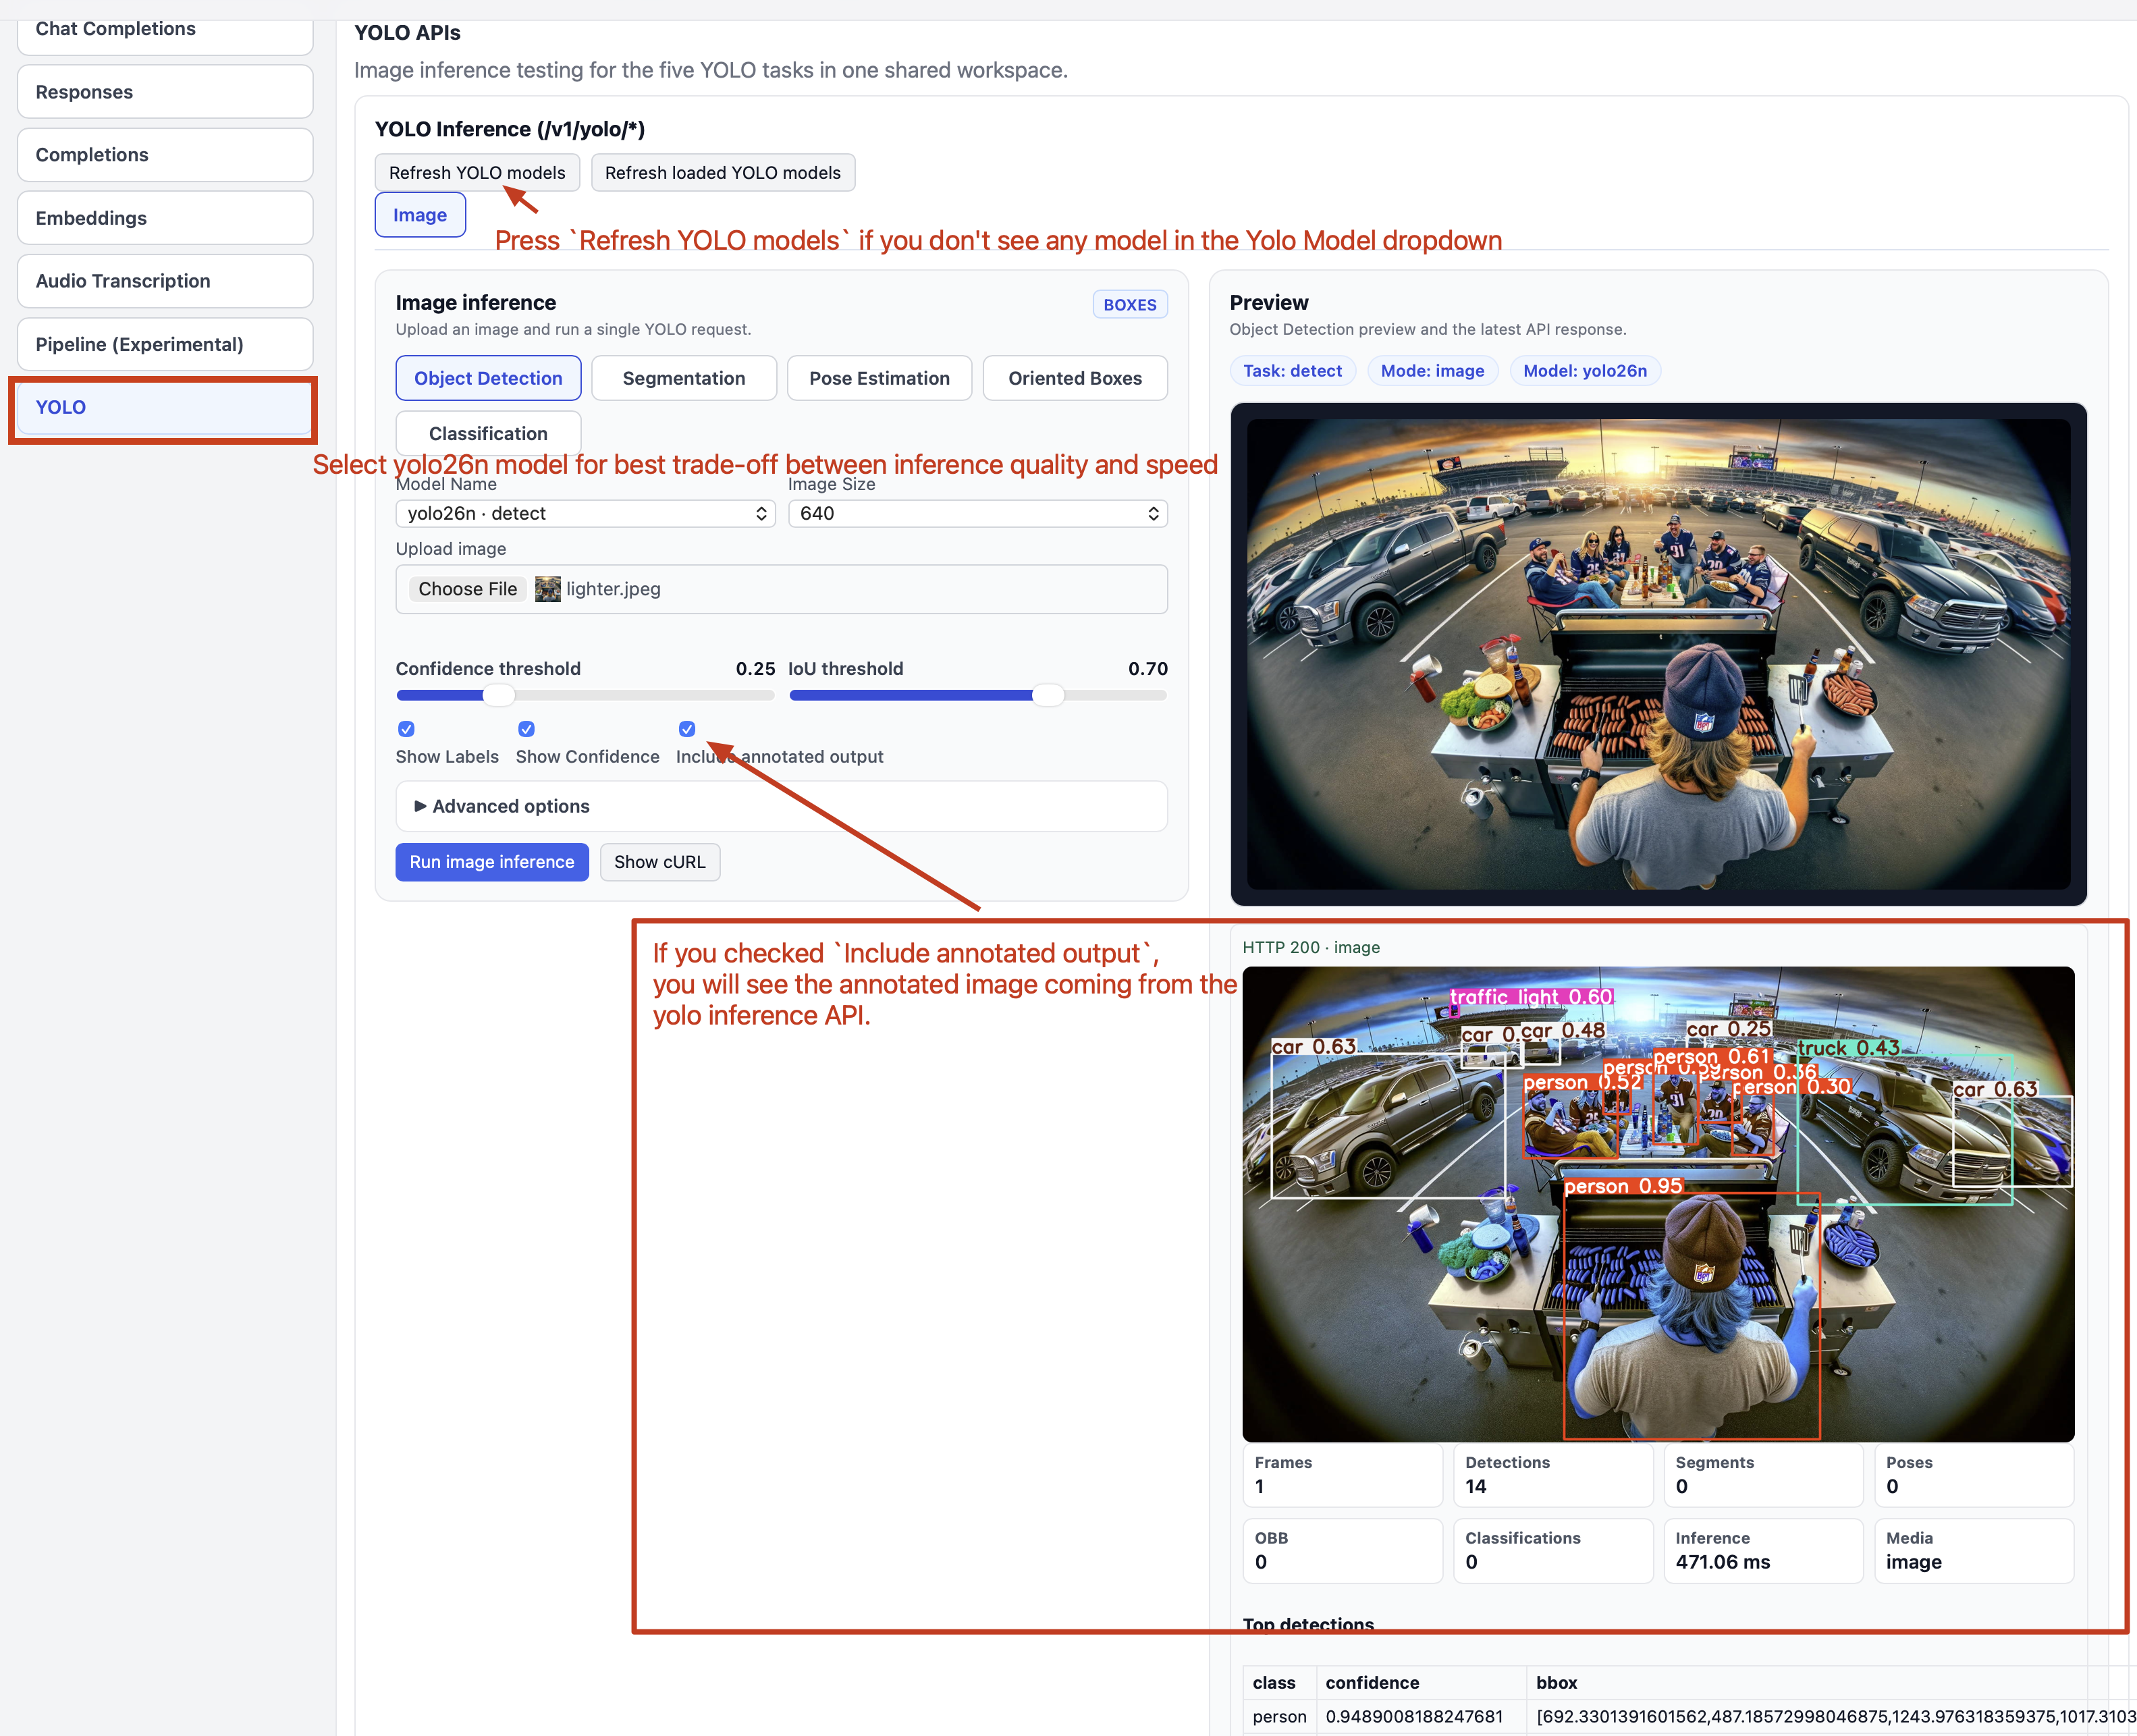
Note that once you run yolo26n model, you will see this model in your private model pool.
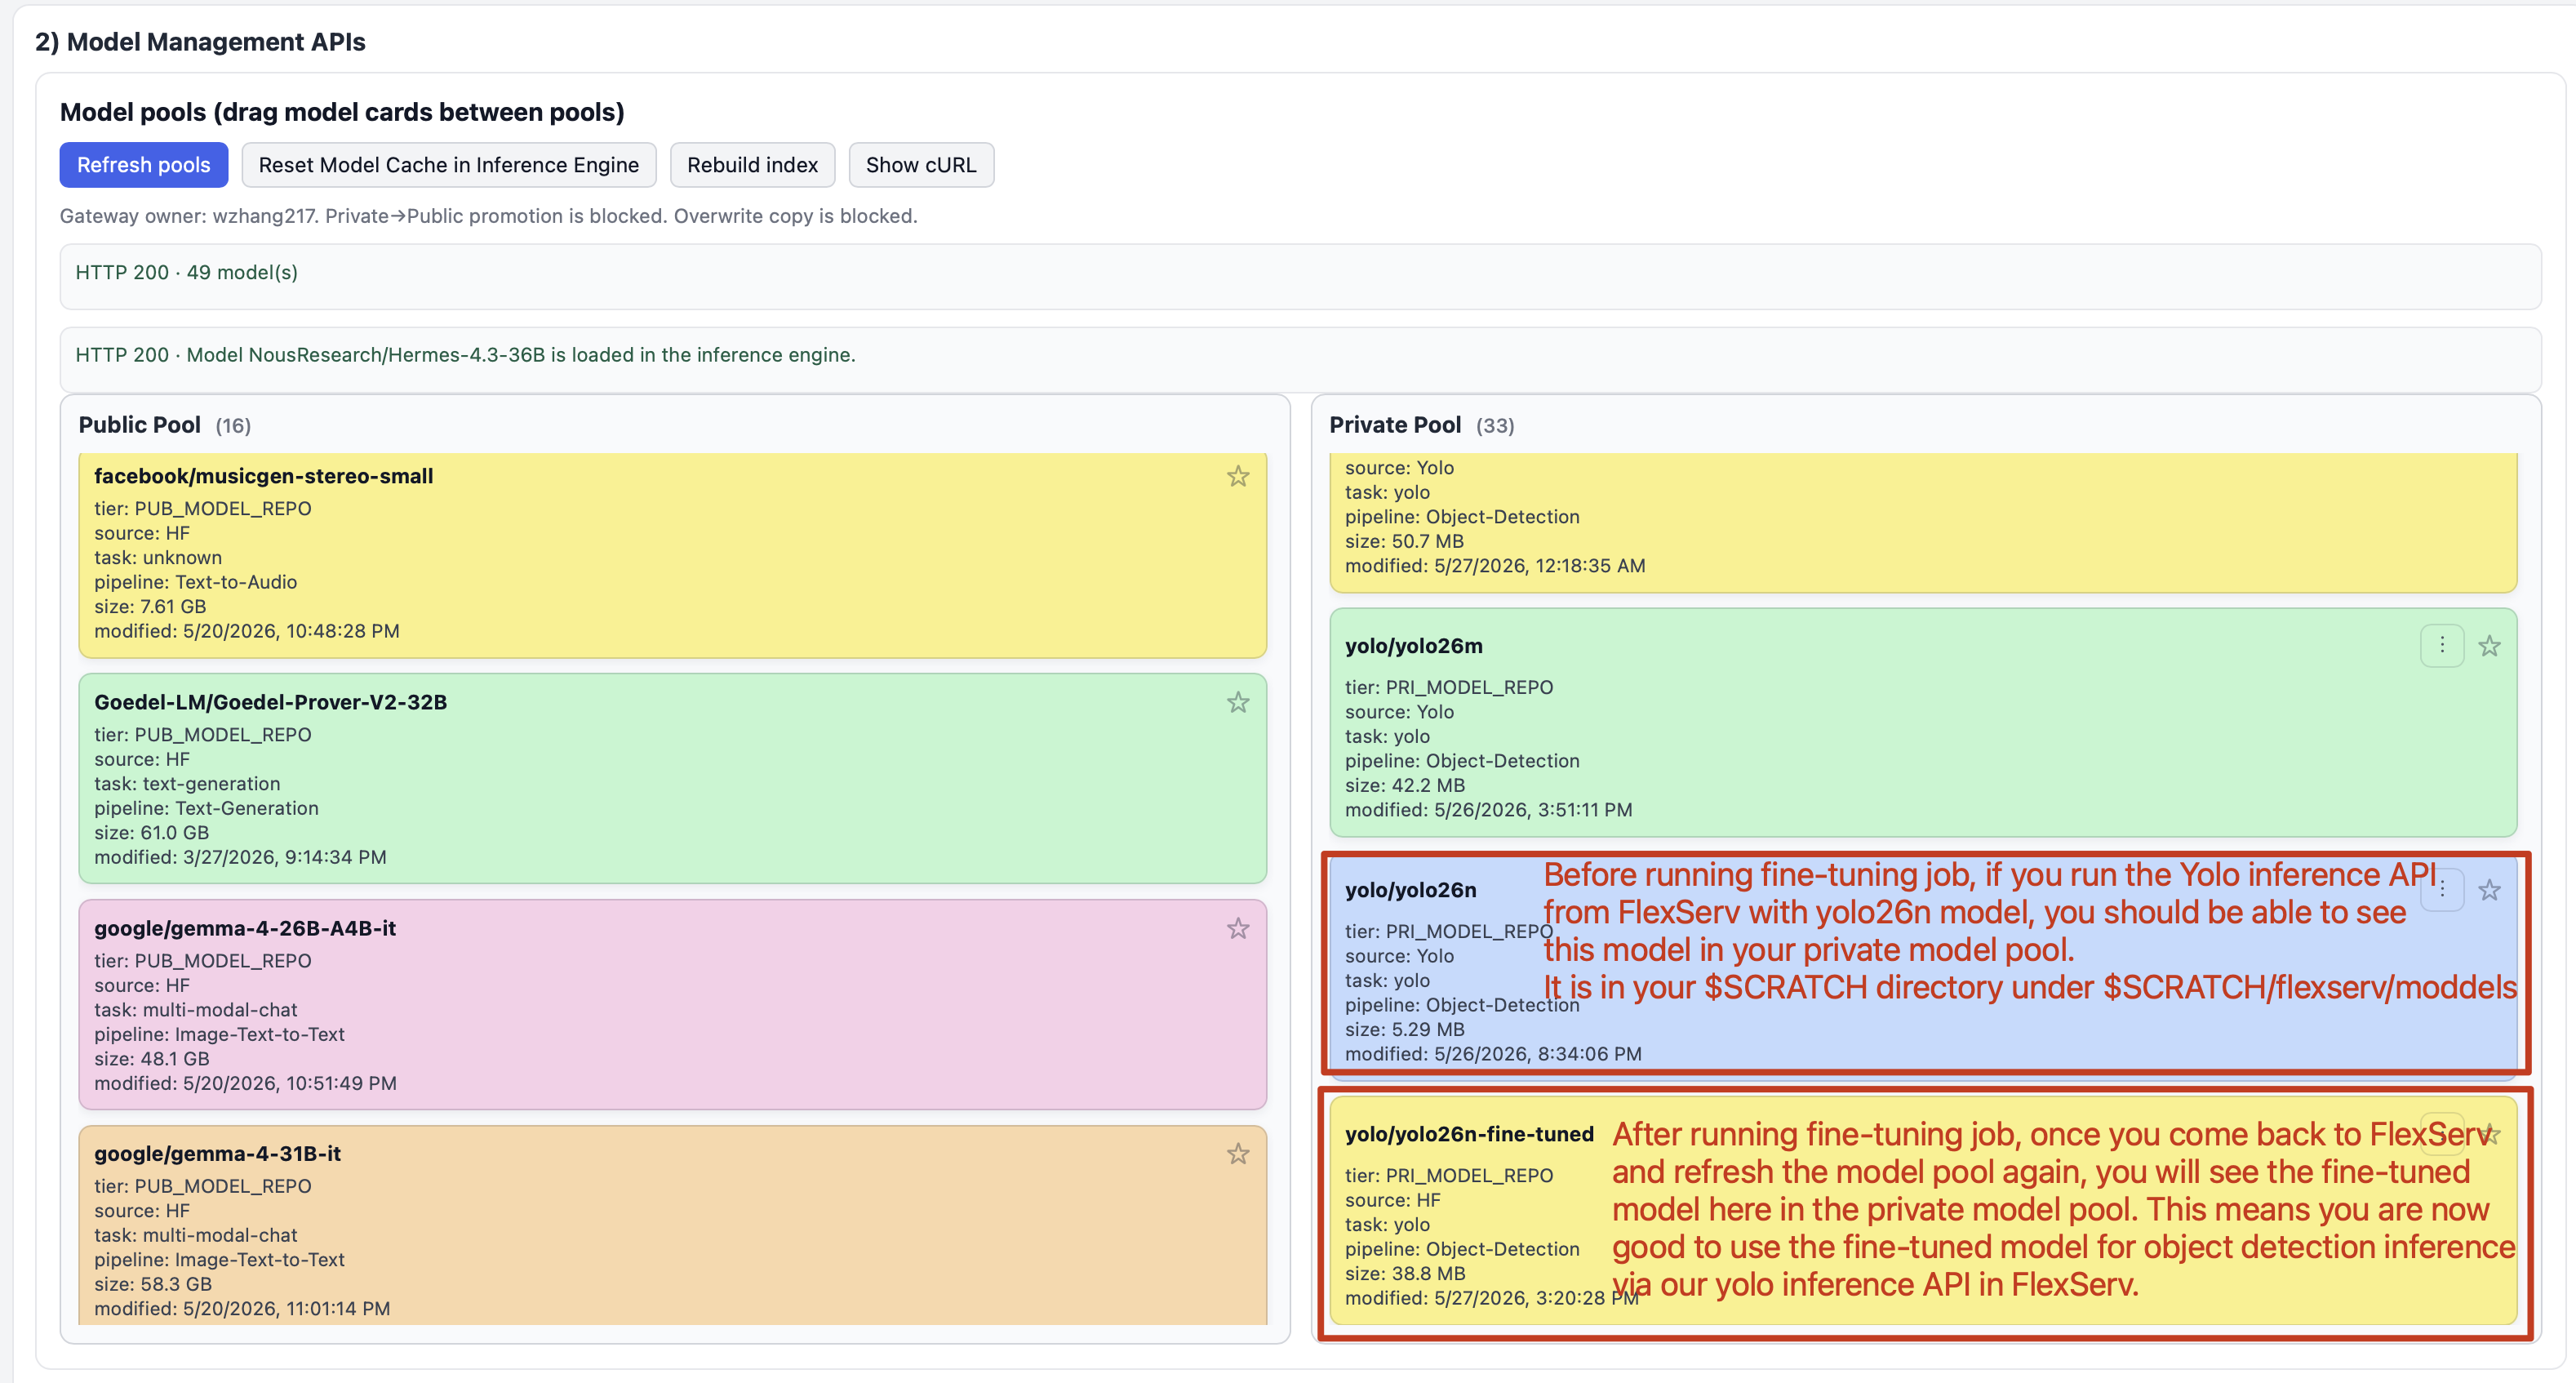
Ignore the fine-tuned model for now, we will talk about it tomorrow.
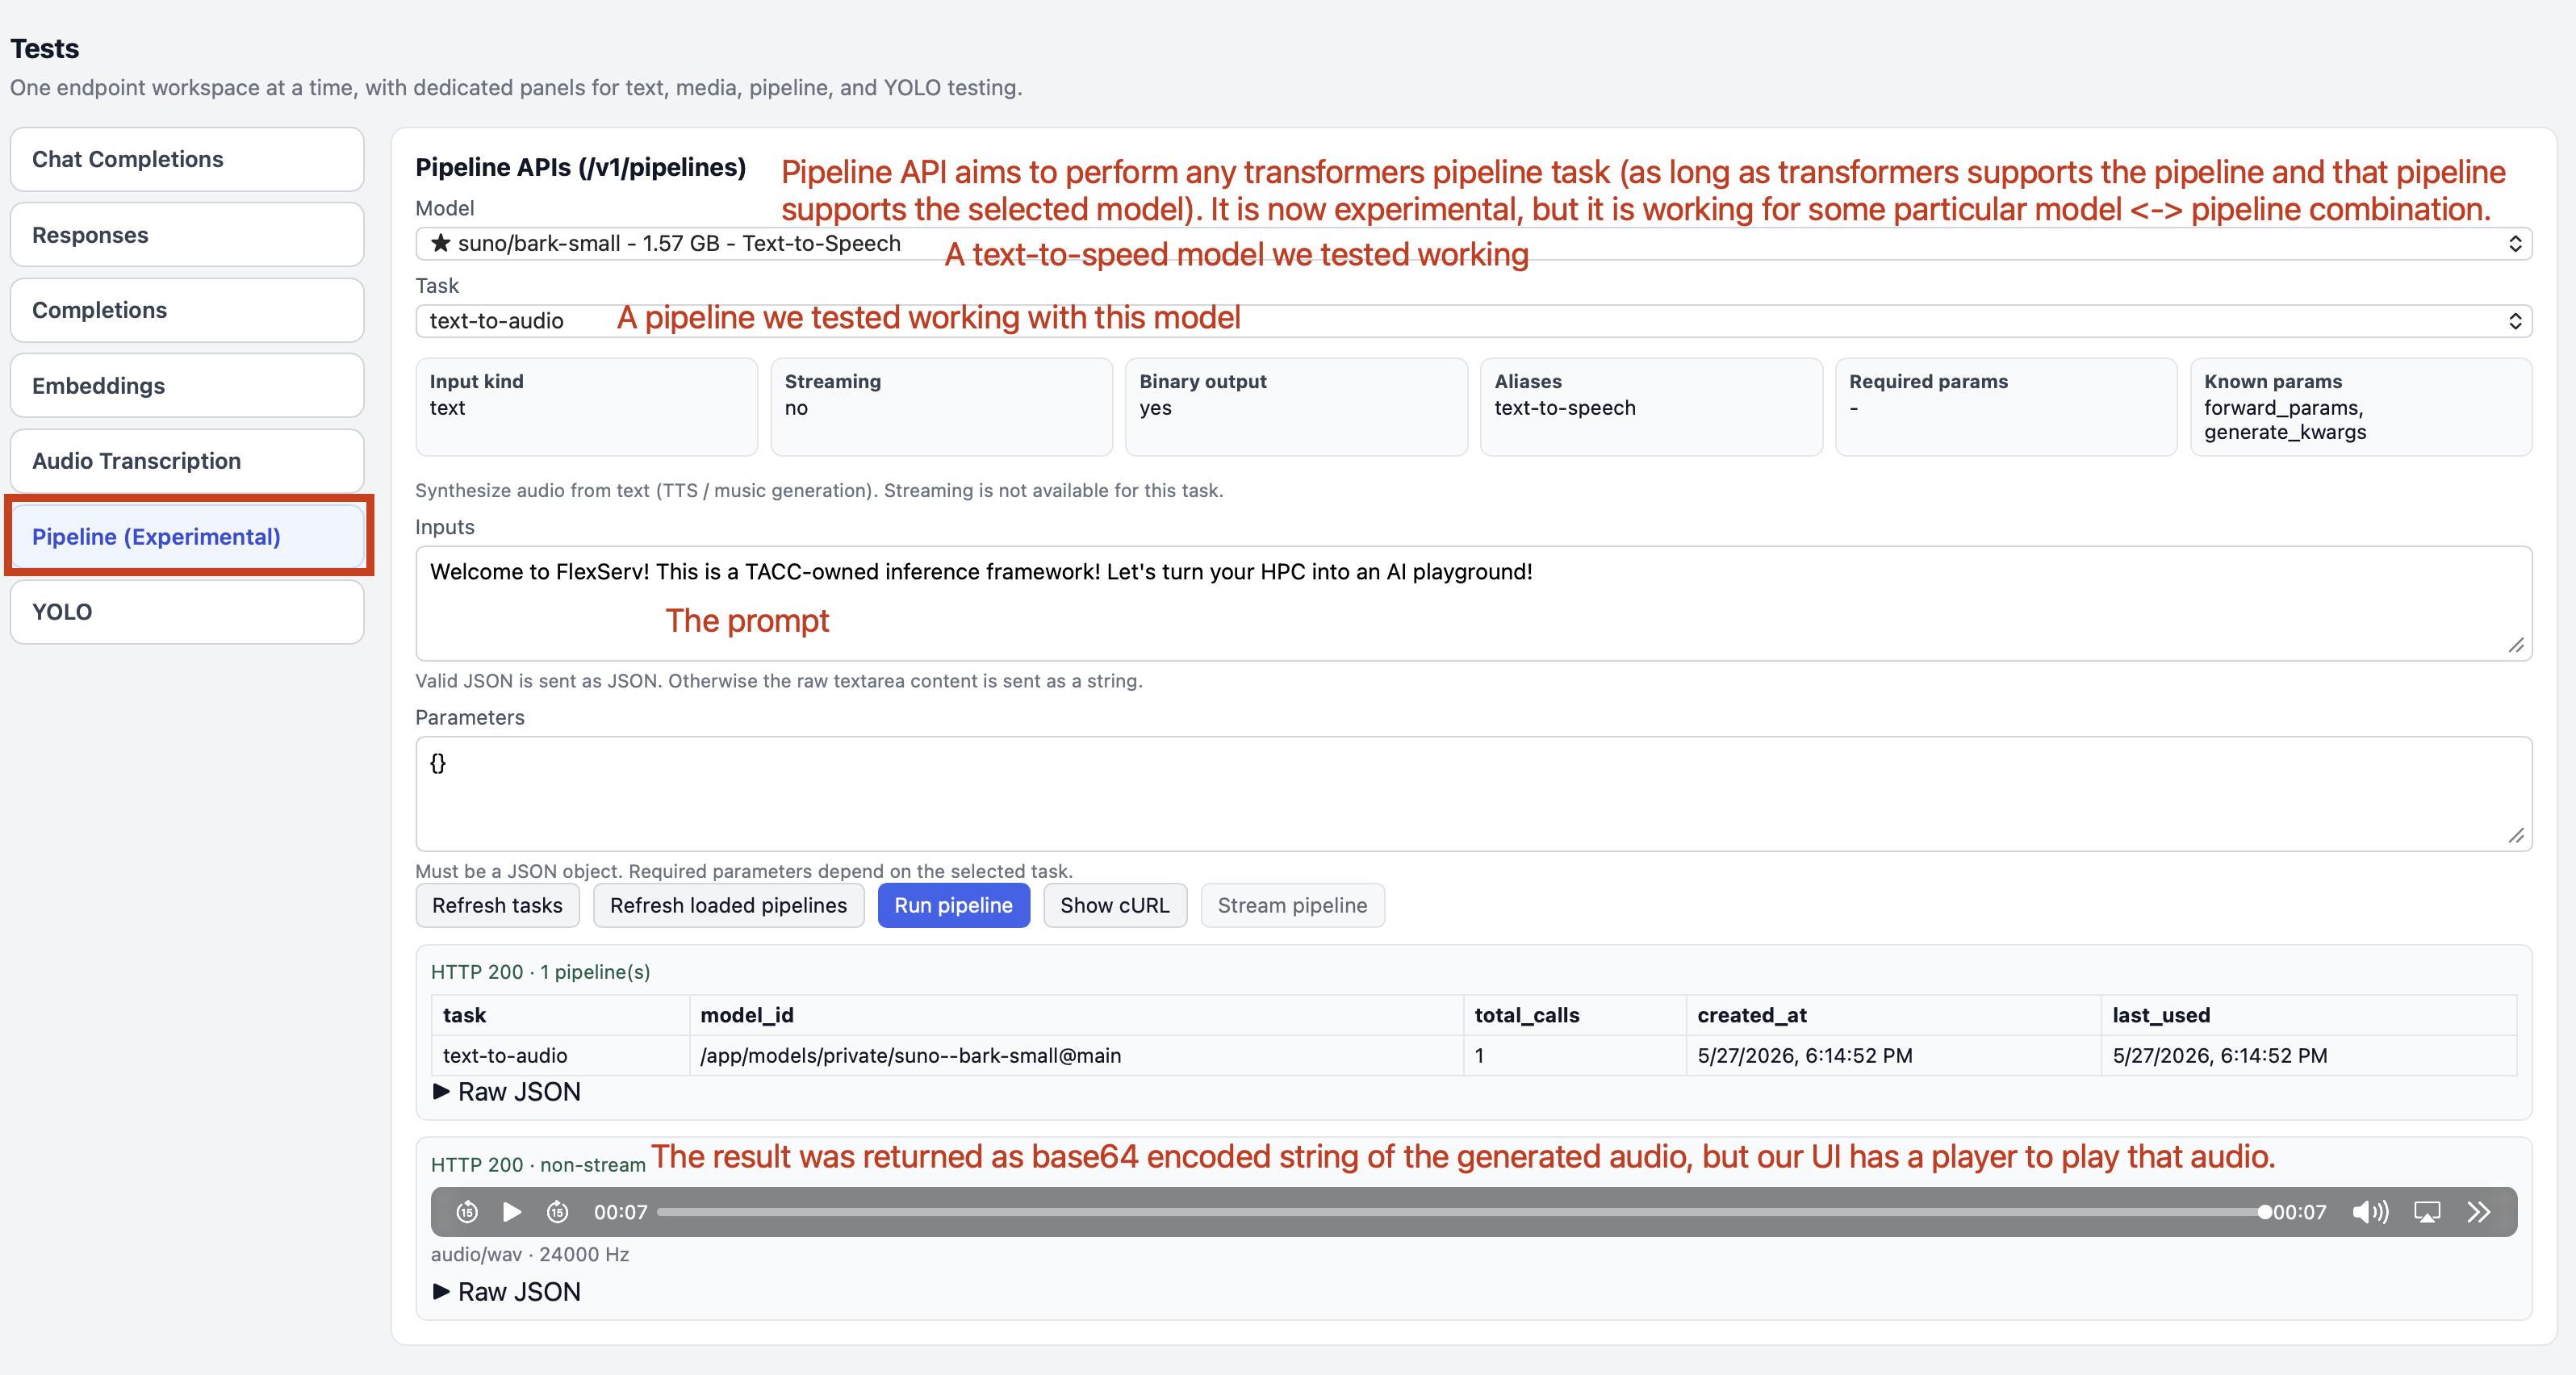
Step 4.2.11: Try to run any inference pipeline using Pipeline API
The long-term goal of FlexServ is to enable multi-modal inference with any model. We provide a RESTful pipeline inference API that utilizes the pipeline API in transformers library to enable multi-modal inference. This feature is very experimental as the modality of input/output of different pipelines are largely diverse and different models requires different hardware/software support, this API currently only works when the supported model matches with the right pipeline.
Based on our test, the following is working:
| Pipeline | Working model(s) |
|---|---|
text-generation |
- Any supported text-generation model |
automatic-speech-recognition |
- openai/whisper-tiny |
feature-extraction |
- Qwen/Qwen3-Embedding-0.6B- sentence-transformers/all-mpnet-base-v2 |
text-to-audio |
- suno/bark-small- facebook/musicgen-stereo-small |
object-detection |
- hustvl/yolos-base |
By supported model we refer to the models that can be loaded into transformers library correctly and can perform inference without any issue.
Note: if you don’t see Pipeline API tab, try to refresh the entire webpage.
Upcoming Next: From Prompt to Program - Build an Animal Detection App with FlexServ
Please come back to our prompt engineering session on Monday to see how you can use FlexServ to do some real work - we will show you how to use FlexServ to generate image recognition program for detecting small animals and run the program on Vista with TAPIS Job!