Section 8: Fine-Tuning Vision Models Using Ultralytics and Tapis
This Tapis application allows users to fine-tune Vision models such as YOLO using Ultralytics running in a Singularity container on Vista. It is designed to run on High-Performance Computing (HPC) systems via Tapis, leveraging GPU acceleration for training tasks.
Note: This app is already registered for the tutorial and is available to run via the Tapis UI.
App Definition
The following JSON represents the application definition that was used to register the fine-tuning service in Tapis:
{
    "id": "ultralytics-fine-tune",
    "version": "0.1",
    "description": "An app to fine-tune ultralytics YOLO using Singularity in batch mode.",
    "jobType": "BATCH",
    "runtime": "SINGULARITY",
    "containerImage": "/work/projects/aci/cic/apps/ultralytics-fine-tune/Ultralytics_FT_Tapis_app.sif",
    "jobAttributes": {
        "execSystemExecDir": "${JobWorkingDir}/jobs/${JobUUID}",
        "execSystemInputDir": "${JobWorkingDir}/jobs/${JobUUID}/data",
        "execSystemOutputDir": "${JobWorkingDir}/jobs/${JobUUID}/output",
        "parameterSet": {
            "containerArgs": [
                {
                    "name": "nvidia",
                    "inputMode": "FIXED",
                    "arg": "--nv",
                    "notes": {}
                }
            ],
            "envVariables": [
                {
                    "key": "EPOCHS",
                    "value": "3",
                    "description": "Number of epochs for the fine-tune job",
                    "inputMode": "REQUIRED",
                    "notes": {}
                }
            ]
        },
        "memoryMB": 1,
        "nodeCount": 1,
        "coresPerNode": 1,
        "maxMinutes": 60
    }
}
Understanding Ultralytics App Parameters
The ultralytics-fine-tune application uses a specific set of parameters to manage how the Singularity container interacts with the HPC hardware and how the training process is executed.
1. Container Arguments
Container arguments define how the Tapis runtime (Singularity) is initialized on the execution system.
| Parameter | Type | Value | Description |
|---|---|---|---|
| nvidia | FIXED |
--nv |
This is the most critical argument. It tells Singularity to bind the host’s NVIDIA drivers inside the container, enabling GPU acceleration for YOLO training. |
2. Environment Variables
Environment variables are passed into the training script inside the container to control the YOLO model’s behavior.
| Variable | Mode | Default | Description |
|---|---|---|---|
| EPOCHS | REQUIRED |
3 |
Defines the number of full passes through the training dataset. For this tutorial, it is set low (3) to ensure quick completion, but can be increased for real-world accuracy. |
3. Resource Attributes
These parameters define the hardware footprint requested from the Slurm scheduler on the execution system.
- Node Count (
1): The number of physical machines requested. Fine-tuning for this tutorial is optimized for a single node. - Cores Per Node (
1): The number of CPU cores allocated. Since the primary work is done by the GPU (via the--nvflag), CPU requirements are kept minimal. - Memory (
1 MB): The RAM allocation. Note: In many Tapis configurations, 1 implies a minimum default or is managed by the specific queue policy. - Max Minutes (
60): The “Wallclock” time. If the job exceeds 60 minutes, the scheduler will terminate it to prevent hanging processes from wasting allocation credits.
Submitting a Fine-Tuning Tapis Job
Follow these steps to submit the job using the Tapis UI:
Step 8.1: Initiate Submission
Navigate to the Apps list and select the ultralytics-fine-tune app. Click the button to initiate a JSON-based submission.
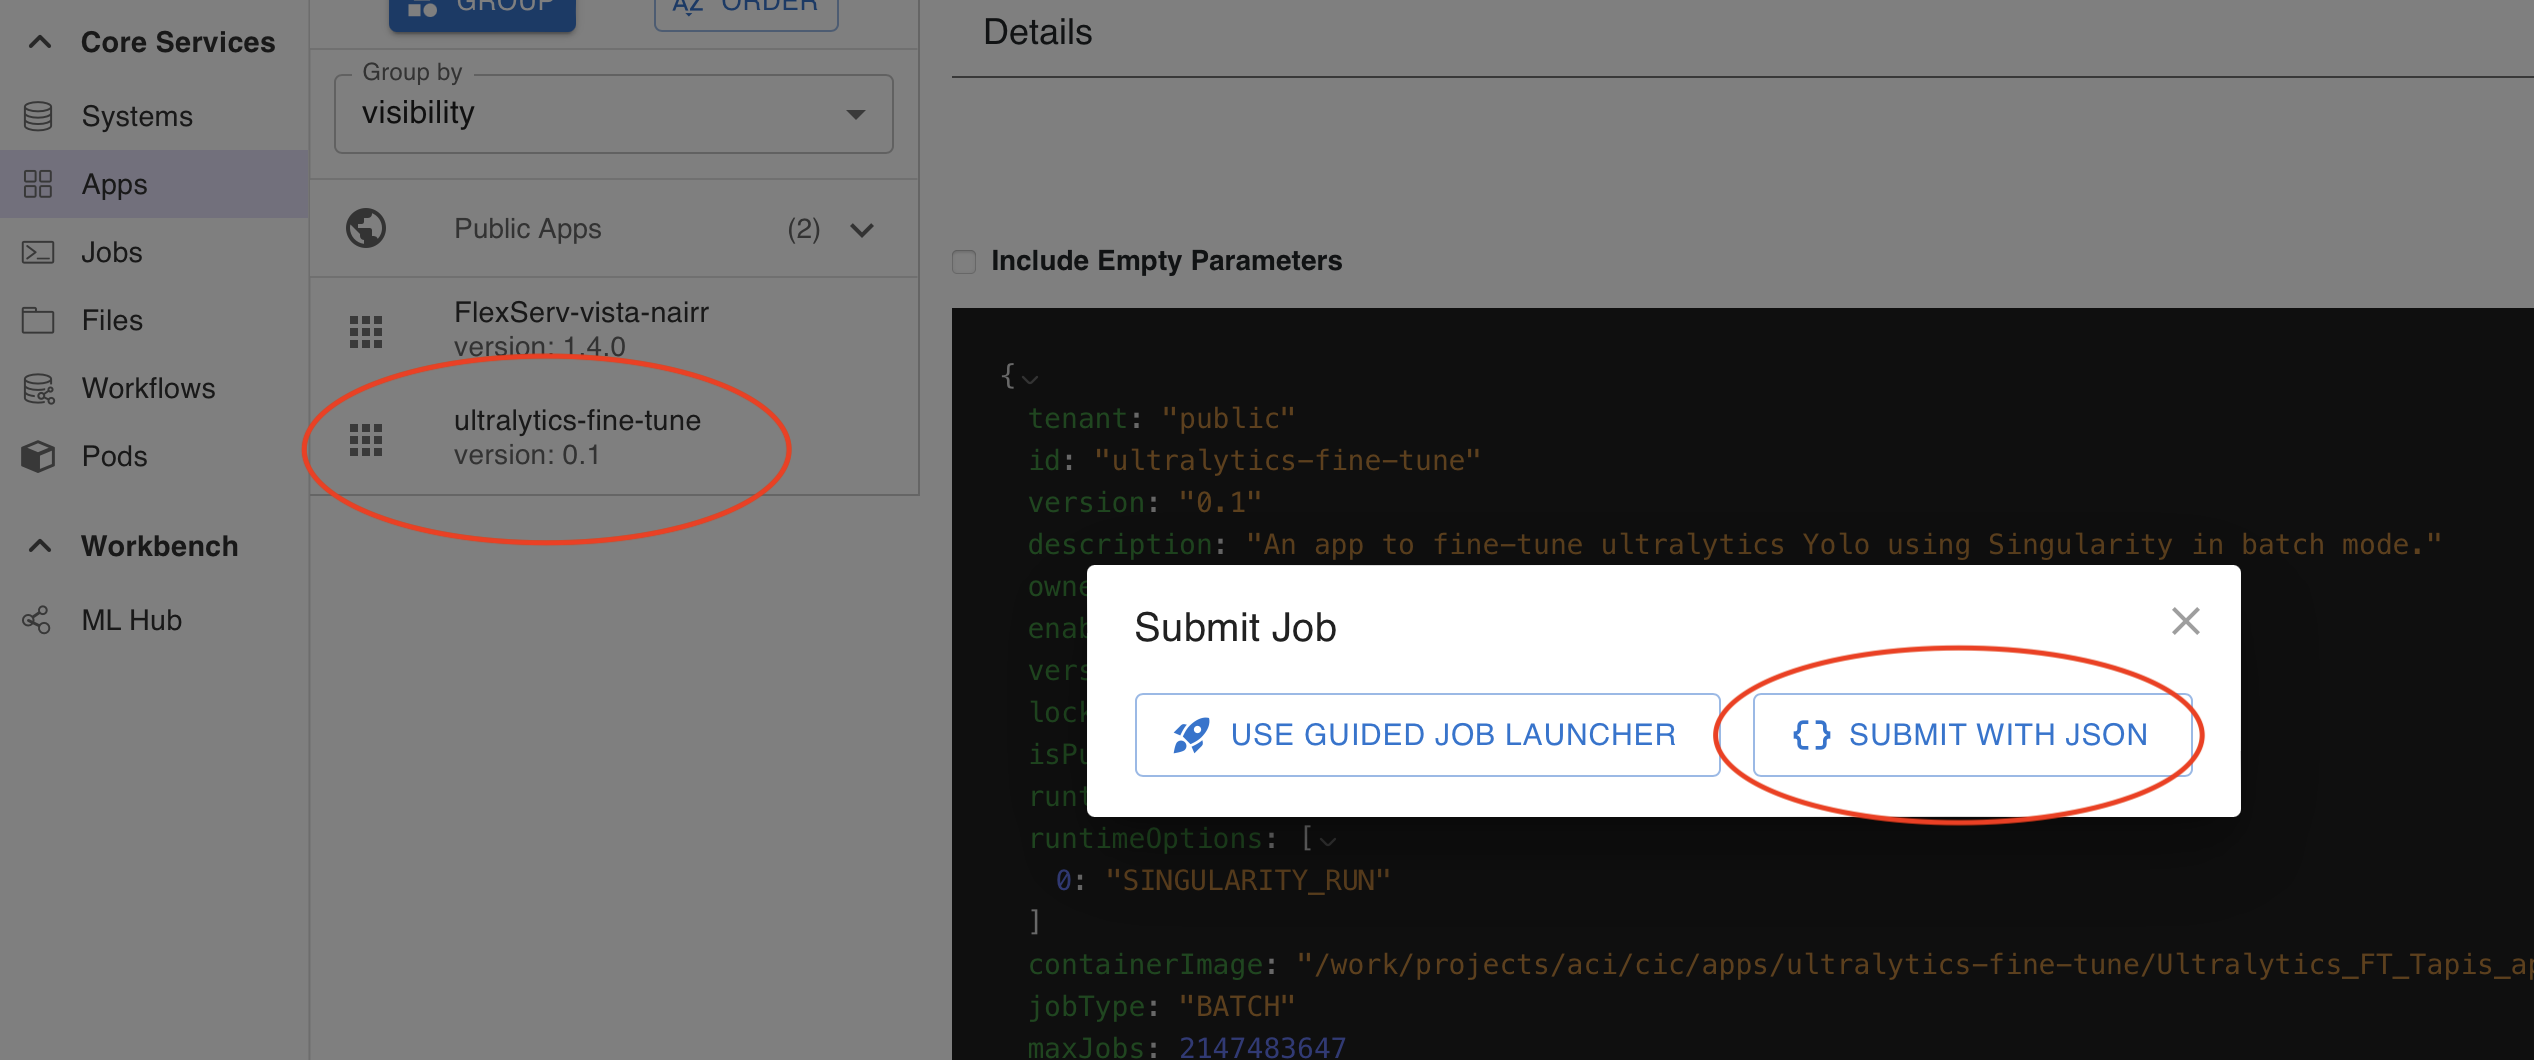
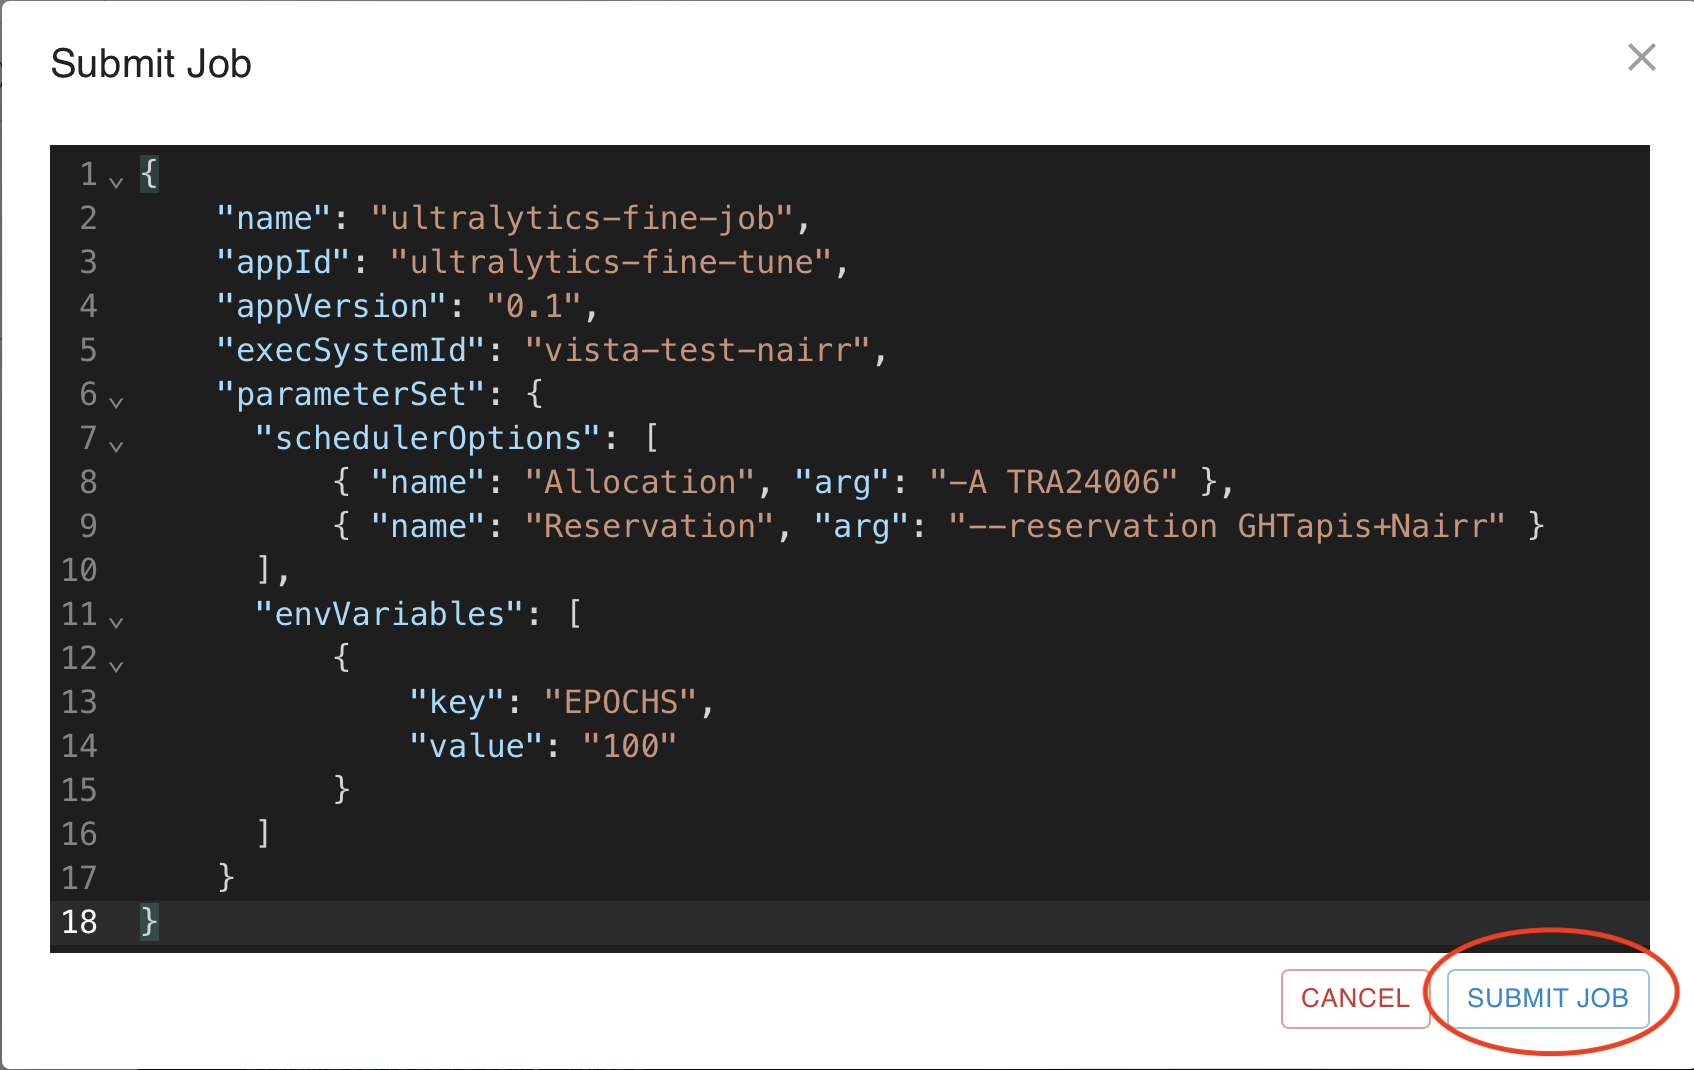
Step 8.2: Edit the JSON Payload
Paste the job JSON provided below into the editor and click Submit.
{
    "name": "ultralytics-fine-job",
    "appId": "ultralytics-fine-tune",
    "appVersion": "0.1",
    "execSystemId": "vista-test-nairr",
    "parameterSet": {
      "schedulerOptions": [
          { "name": "Allocation", "arg": "-A TRA24006" },
          { "name": "Reservation", "arg": "--reservation GHTapis+Nairr" }
      ],
      "envVariables": [
          {
              "key": "EPOCHS",
              "value": "100"
          }
      ]
    }
}
Understanding Job Parameters
The following parameters are used to define the specific execution requirements for your Ultralytics fine-tuning job.
1. Identification
name: A user-defined label for the job. This helps you identify the run in your job history.appId&appVersion: These link the job to the specificultralytics-fine-tuneapp definition created earlier.execSystemId: Specifies the HPC resource where the job will run (e.g.,vista-test-nairr).
2. Scheduler Options
These are specific flags passed to the Slurm scheduler on the Vista system:
- Allocation (
-A): This is your specific project account or allocation name. This is required for billing and resource tracking. - Reservation (
--reservation): If you are part of a specific workshop or have reserved nodes, you include the reservation name here.
3. Environment Variables
EPOCHS: In this job submission, the value is set to100. This overrides the default value of3in the app definition, allowing for a more thorough training session.
Step 8.3: Monitor Job Progress
After clicking Submit, navigate to the Jobs tab. You can monitor the status as it moves from PENDING to RUNNING and finally FINISHED.
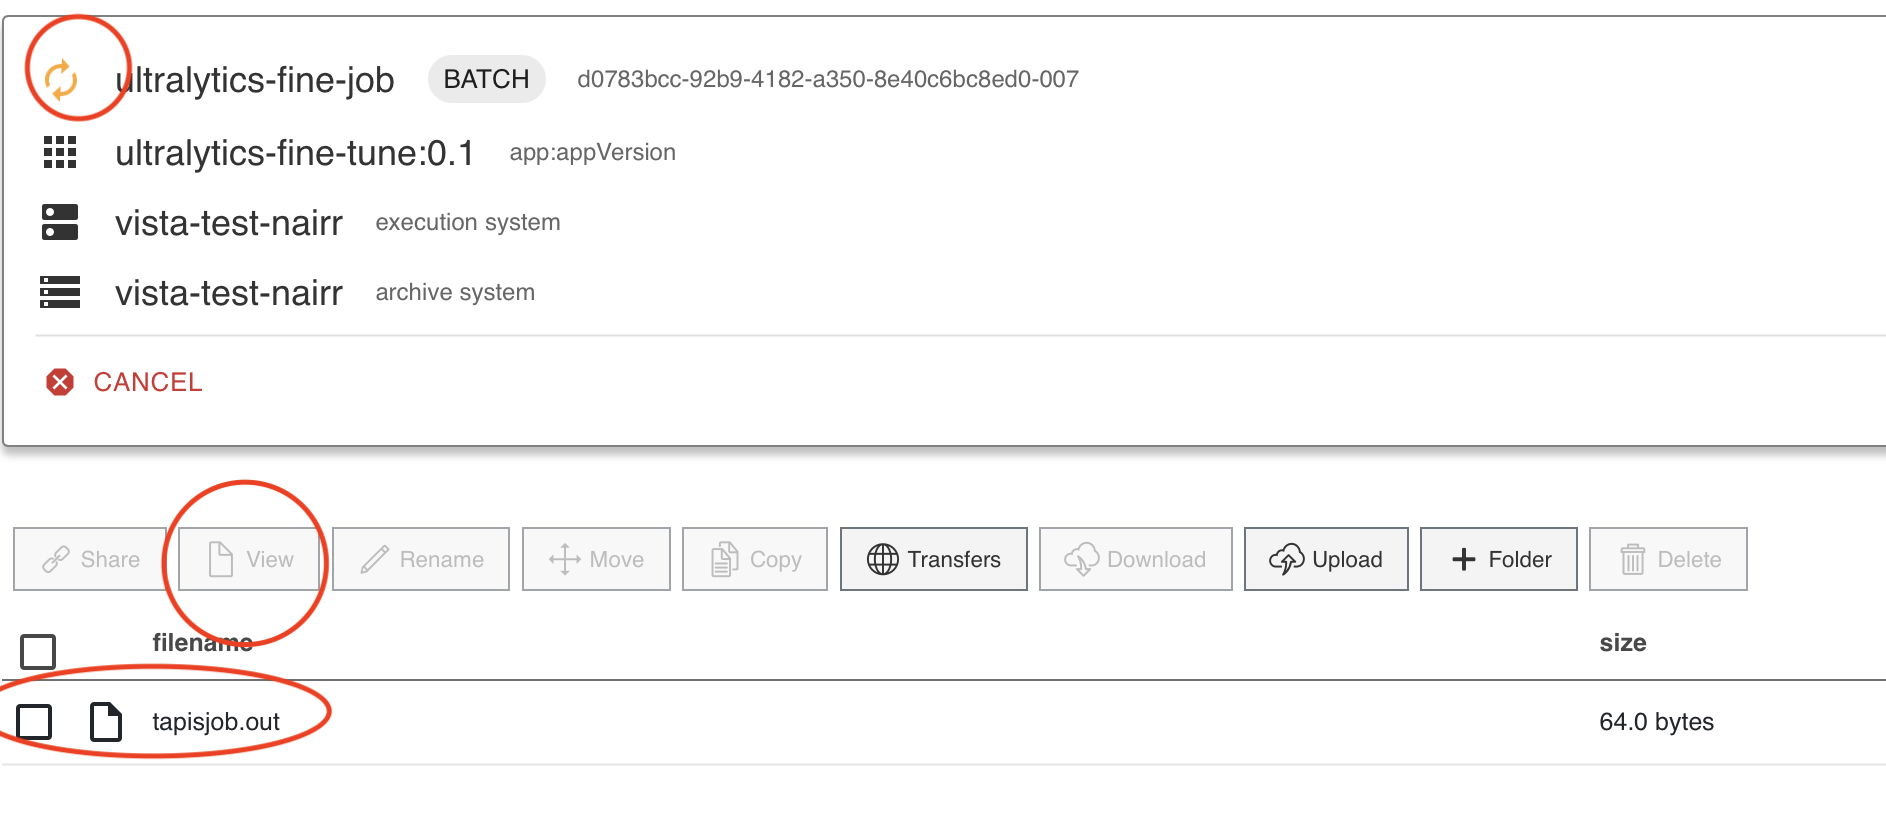 Since we are running 100 Epochs to fine-tune, this will take around 10-12 minutes to finish.
Step 8.4: Job Output and Results location
Once the job finishes, you should see output similar to the image below.
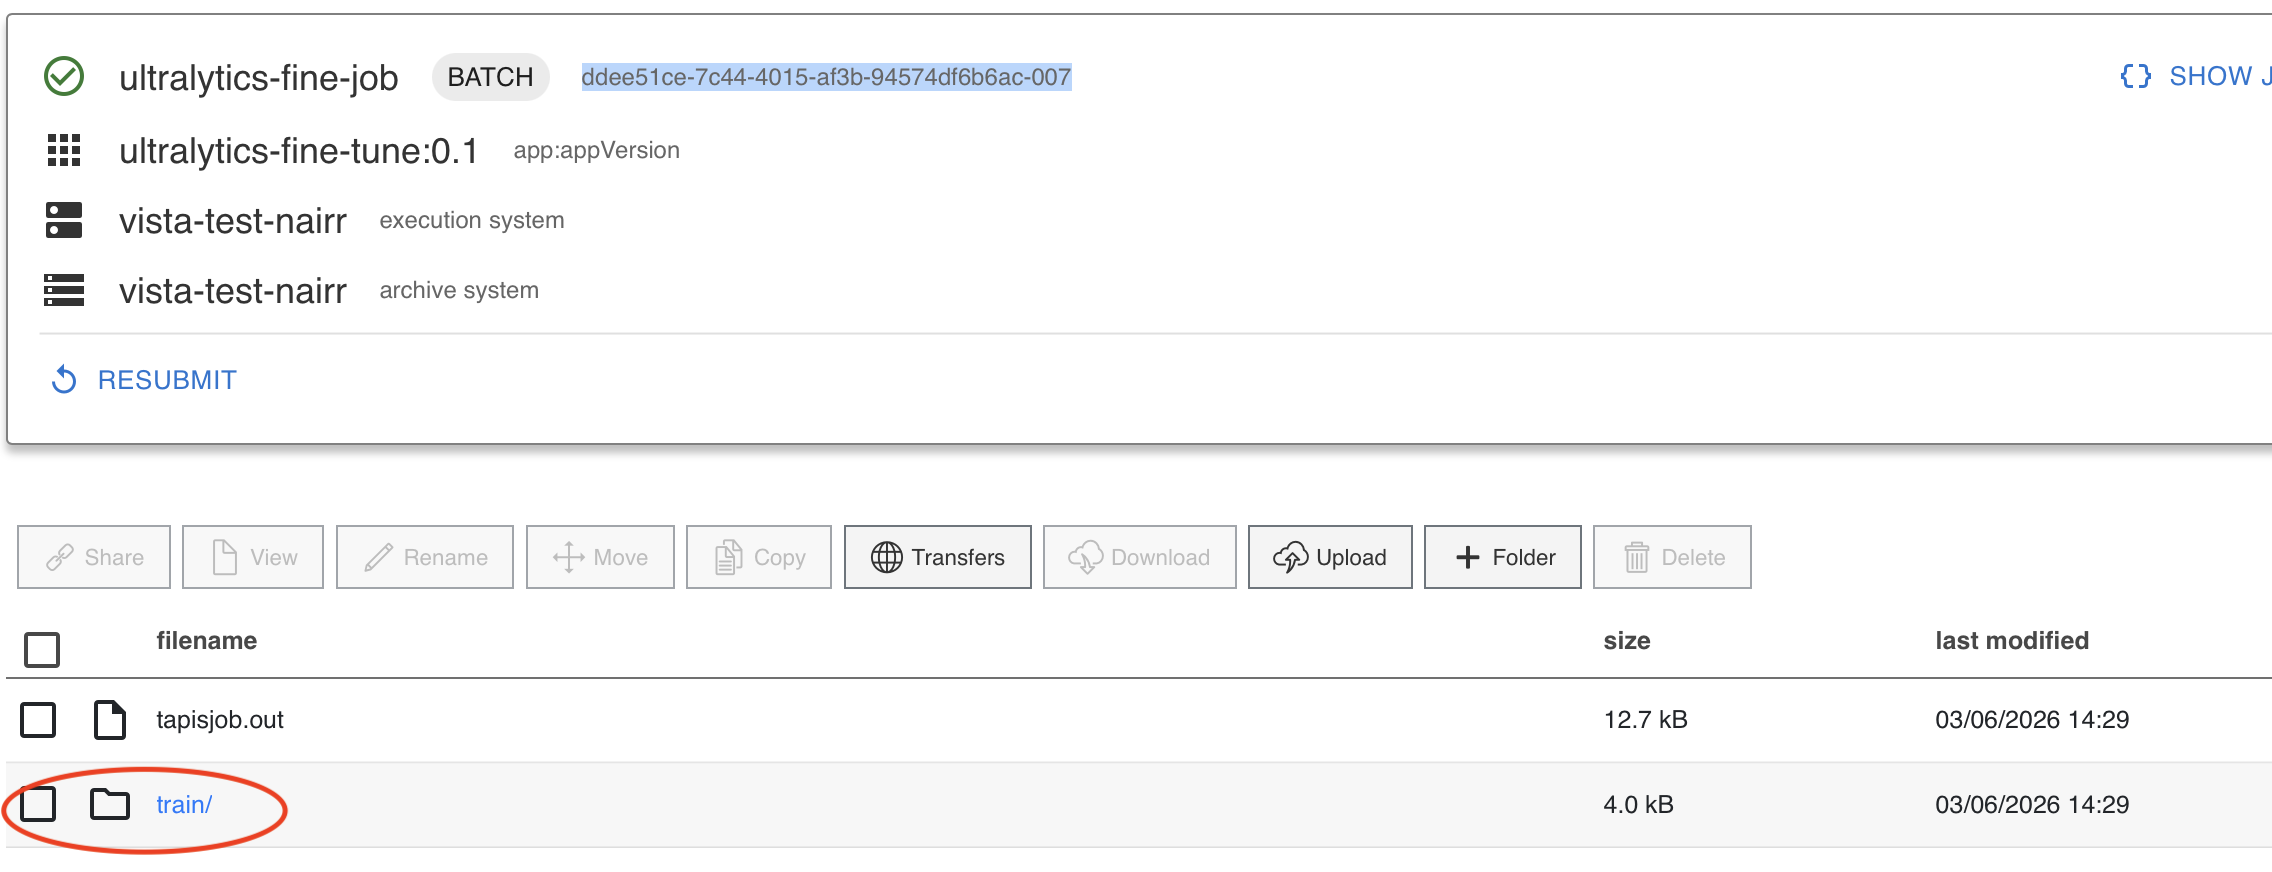
You should see a train directory with weights. Inside the weights directory, you can access the best.pt model. This file will be accessible in Jupyter Notebook.
Step 8.5: Finding best.pt file from Jupyter
Inside your work directory, you should see a vista folder. In there you can find the directory named with your jobUUID. In the above image the job uuid is highlighted. In the job directory you will find the outputs of the job archived with the same train directory containing the best.pt file.
$WORK -> vista -> jobUUID -> train -> weights -> best.pt